9.4.2: Airport navigational aids
- Page ID
- 78368
The maneuvers of approach and landing are assisted from the airport by means of radio- electric and visual aids. The flight that is assisted with radio-electric aids is said to be under Instrumental Flight Rules (IFR flight); the flight that is assisted only with visual rules is said to be under Visual Flight Rules (VFR flight).
Visual aids
When flying, there are a number of visual aids available to pilots:
- Signaling devices (such for instance, windsock indicator).
- Guidance signs (information, compulsory instructions, etc.).
- Signs painted over the pavement (runway, taxiways, aprons).
- Lights (runway, taxiway).
Windsock: Planes take-off and land in the presence of head/tail wind in order to achieve maximum performance. Wind speed and direction information is available through the ATIS or ATC, but pilots need instantaneous information during landing. For this purpose, a windsock is kept in view of the runway. As already pointed out before in order to justify the fact that airports might have runways in different directions, the presence of wind is dangerous and limiting in terms of operations. The aeronautical authorities have established a maximum crosswind of 15-40 knots depending of the aircraft (for instance, a B777 has a limit of 38 knots) for landing and take-off. If these values are exceeded the runway can not be operated.
Guidance signs: Airport guidance signs provide moving directions and information to aircraft operating in the airport, but also to airport vehicles. There are two classes of guidance signs at airports, with several types of each:

Figure 9.11: Airport visual aids.
- Location signs (yellow colored on black background): Identifies the runway or taxiway in which the aircraft is or is about to enter.
-
Direction/runway exit signs (black colored on yellow background): Identifies the intersecting taxiways the aircraft is approaching when rolling on the runway right after having landed. They also have an arrow indicating the direction to turn.
-
Other: Many airports use conventional traffic signs such for instance stop signs throughout the airport.
Mandatory instruction signs: They show entrances to runways or critical areas. Vehicles and aircraft are required to stop at these signs until the control tower provides clearance to proceed on.
-
Runway signs (white on red): These signs simply identify a runway intersection ahead of the aircraft.
-
Frequency change signs: Typically consists of a stop sign and an instruction to change to another frequency. These signs are used at airports with different areas of ground control, where different communication frequencies might be used.
-
Holding position signs: A single solid yellow bar across a taxiway (painted over the pavement) indicates a position where ground control may require a stop. If a two solid yellow bars and two dashed yellow bars are encountered (painted over the pavement), it indicates a holding position for a runway intersection ahead. Runway holding lines must never be crossed without ATC permission.
Signs painted over the pavement: There are three main sets of signs painted over the pavement:
- Runway signs (white).
- Taxiway signs (yellow).
- Apron signs (red).

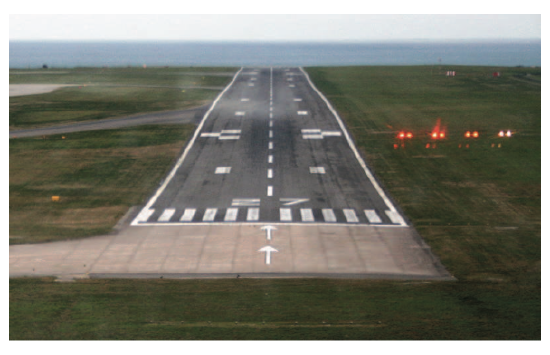
Figure 9.12: Runway pavement signs. © User:Mormegil / Wikimedia Commons / CC-BY-SA-3.0.
The runway signs, white colored, can be consulted in Figure 9.3 and Figure 9.12, namely: threshold, aiming point, touchdown zone, center line, runway designator, edge lines, etc. The taxiway signs, yellow colored, can also be consulted in Figure 9.3, namely: strip and axis lines, holding positions, crossing points, etc. The apron signs, red colored, are typically the so-called envelopes where aircraft park.
Lighting: Airports have lighting devices that help guide planes using the runways and taxiways at night or in rain/fog. There are two main sets of lighting in the movement area:
- Runway lights (green, red, and white).
- Taxiway signs (blue and green).

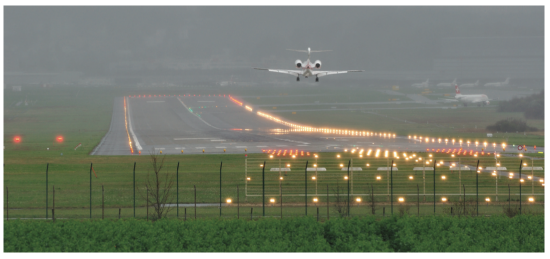
Figure 9.13: Runway lighting. © Hansueli Krapf / Wikimedia Commons / CC-BY-SA-3.0.
On runways, green lights indicate the beginning of the runway for landing, while red lights indicate the end of the runway. Runway edge lights are white spaced out on both sides of the runway. Some airports have more sophisticated lighting on the runways including embedded lights that run down the centerline of the runway and lights that help indicating the approach. Along taxiways, blue lights indicate the taxiway’s edge, and some airports have embedded green lights that indicate the centerline. See Figure 9.13 as illustration.
Other light devices also help pilots approaching, as in the case of the Precision Approach Path Indicator (PAPI). The PAPI is a visual aid that provides guidance information to help pilots acquire and maintain the correct approach (in the vertical plane) to an airport. It consists of 4 lights display in a row located on the right side of the runway, approximately 300 meters beyond the landing threshold. These lights emit in the red spectrum below the gliding path and in the white spectrum above it. In order to follow the correct glide slope, a pilot would maneuver the aircraft to obtain an equal number of red and white lights, i.e, 2 red lights on the left part and 2 white lights on the right part.
Instrumental Aids
Besides visual aids, that all airport have, a majority of big airports have also a number of radio-electric aids to assist aircraft and pilots:

Figure 9.14: PAPI: The greater number of red lights visible compared with the number of white lights visible in the picture means that the aircraft is flying below the glide slope. Wikimedia Commons / Public domain.
A typical instrumental aid located in airport is the so-called VHF omnidirectional range (VOR), which help pilots finding a desired flying course. VORs are often installed together with a Distance Measuring Equipment (DME), which provides the distance between the aircraft and air (located in the airport). In this way, a pilot can use course and distance to proceed safely towards the runway head. These two equipments are also for en-route navigation and will be described in detail in Chapter 10. There is one instrumental aid that is only used in airport operations: the Instrument Landing System (ILS).

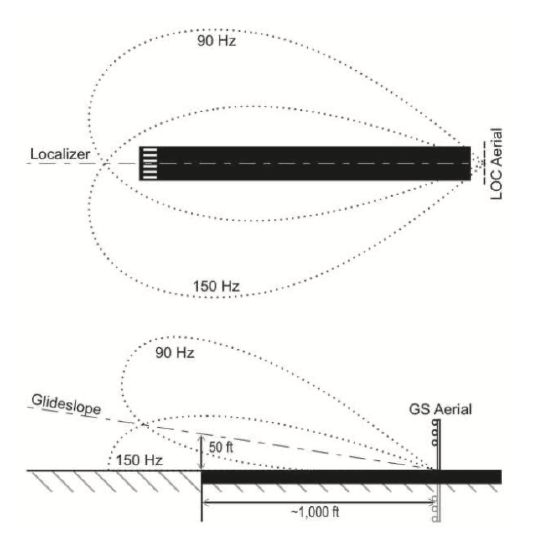
Figure 9.15: ILS: The emission patterns of the localizer and glide slope signals. Note that the glide slope beams are partly formed by the reflection of the glide slope aerial in the ground plane. © User:treesmill / Wikimedia Commons / CC-BY-SA-3.0.
Instrument Landing System (ILS): An ILS is a ground-based instrumental approach system that provides precision guidance to an aircraft approaching and landing on a runway. In poor visibility conditions (rain, fog, dark, etc.), pilots will be aided by an ILS to instrumentally find the runway and fly the correct approach and land safely, even if they cannot see the ground at some point of the approach procedure (or even during the whole approach procedure).
An ILS consists of two independent subsystems, one providing lateral guidance (localizer), and the other providing vertical guidance (glide slope or glide path). Aircraft guidance is provided by the ILS receivers in the aircraft by performing a modulation depth comparison. The localizer receiver on the aircraft measures the Difference in the Depth of Modulation5 (DDM) of two signals, one of 90 Hz and the other of 150 Hz. The difference between the two signals varies depending on the position of the approaching aircraft from the centerline. If there is a predominance of either 90 Hz or 150 Hz modulation, the aircraft is off the centerline. In the cockpit, the needle on the Horizontal Situation Indicator (HSI, the instrument part of the ILS), or Course Deviation Indicator (CDI), will show that the aircraft needs to fly left or right to correct the error to fly down the center of the runway. If the DDM is zero, the aircraft is on the centerline of the localizer coinciding with the physical runway centerline.

Figure 9.16: ILS: Localizer array and approach lighting. Wikimedia Commons / Public Domain.
A glide slope (GS) or glide path (GP) antenna array is sited to one side of the runway touchdown zone. The GP signal is transmitted on a carrier frequency between 328.6 and 335.4 MHz. The centerline of the glide slope signal is arranged to define a glide slope of approximately \(3^{\circ}\) above horizontal (ground level). The pilot controls the aircraft so that the indications on the instrument (i.e., the course deviation indicator (see Chapter 5)) remain centered on the display. This ensures the aircraft is following the ILS centerline (i.e., it provides lateral guidance). The vertical guidance is shown on the instrument panel by the glide slope indicator, and aids the pilot in reaching the runway at the proper touchdown point. Many modern aircraft are able to embed these signals into the autopilot, allowing the approach to be flown automatically.

Table 9.6: ILS categories. Data retrieved from ICAO [4].
According to ICAO, there are different ILS categories attending at the visual range and the decision altitude: the visual range is the longitudinal distance at which the pilot is able to clearly distinguish the signs painted over the pavement or the lights if flying at dark of fog (generally speaking at low visibility conditions); the decision altitude is the minimum vertical altitude at which the pilot must abort the approach in case of not seeing any of the visual aids. See Table 9.6.
5. It is based on the concept of space modulation, a radio amplitude modulation technique specifically used in ILS that incorporates the use of multiple antennas fed with various radio frequency powers and phases to create different depths of modulation within various volumes of three-dimensional airspace.


