
4.3: Image Textures
- Page ID
- 13726

Uniformly colored 3D objects look nice enough, but they are a little bland. Their uniform colors don’t have the visual appeal of, say, a brick wall or a plaid couch. Three- dimensional objects can be made to look more interesting and more realistic by adding a texture to their surfaces. A texture, in general, is some sort of variation from pixel to pixel within a single primitive. We will consider only one kind of texture: image textures. An image texture can be applied to a surface to make the color of the surface vary from point to point, something like painting a copy of the image onto the surface. Here is a picture that shows six objects with various image textures:
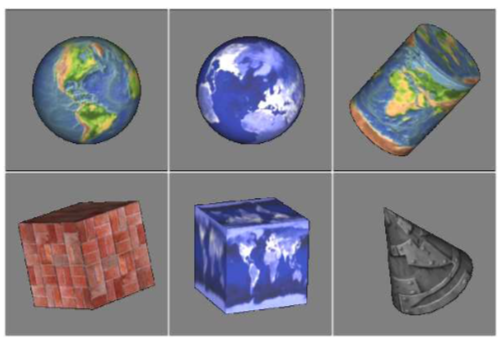
(Topographical Earth image, courtesy NASA/JPL-Caltech. Brick and metal textures from http://www.grsites.com/archive/textures/. EarthAtNight image taken from the Astronomy Picture of the Day web site; it is also a NASA/JPL image. Copies of the images can be found in the folder named textures in either the jogl or glut folder inside the source folder of the web site download. Images from that folder will be used in several examples in this book.)
Textures might be the most complicated part of OpenGL, and they are a part that has survived, and become more complicated, in the most modern versions since they are so vital for the efficient creation of realistic images. This section covers only part of the OpenGL 1.1 texture API. We will see more of textures in later chapters.
Note that an image that is used as a texture should have a width and a height that are powers of two, such as 128, 256, or 512. This is a requirement in OpenGL 1.1. The requirement might be relaxed in some versions, but it’s still a good idea to use power-of-two textures. Some of the things discussed in this section will not work with non-power-of-two textures, even on modern systems.
When an image texture is applied to a surface, the default behavior is to multiply the RGBA color components of pixels on the surface by the color components from the image. The surface color will be modified by light effects, if lighting is turned on, before it is multiplied by the texture color. It is common to use white as the surface color. If a different color is used on the surface, it will add a “tint” to the color from the texture image.
Texture Coordinates
When a texture is applied to a surface, each point on the surface has to correspond to a point in the texture. There has to be a way to determine how this mapping is computed. For that, the object needs texture coordinates. As is generally the case in OpenGL, texture coordinates are specified for each vertex of a primitive. Texture coordinates for points inside the primitive are calculated by interpolating the values from the vertices of the primitive.
A texture image comes with its own 2D coordinate system. Traditionally, s used for the horizontal coordinate on the image and t is used for the vertical coordinate. The s coordinate is a real number that ranges from 0 on the left of the image to 1 on the right, while t ranges from 0 at the bottom to 1 at the top. Values of s or t outside of the range 0 to 1 are not inside the image, but such values are still valid as texture coordinates. Note that texture coordinates are not based on pixels. No matter what size the image is, values of s and t between 0 and 1 cover the entire image.
To draw a textured primitive, we need a pair of numbers (s,t) for each vertex. These are the texture coordinates for that vertex. They tell which point in the image is mapped to the vertex. For example, suppose that we want to apply part of an EarthAtNight image to a triangular primitive. Let’s say that the area in the image that is to be mapped onto the primitive is the triangle shown here outlined in thick orange:
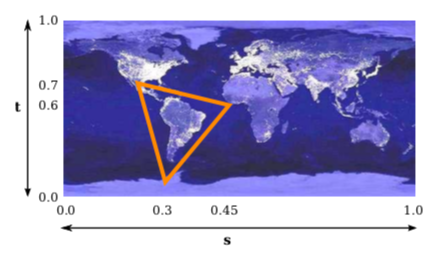
The vertices of this area have (s,t) coordinates (0.3,0.1), (0.45,0.6), and (0.25,0.7). These coordinates from the image should be used as the texture coordinates for the vertices of the triangular primitive.
The texture coordinates of a vertex are an attribute of the vertex, just like color, normal vectors, and material properties. Texture coordinates are specified by the family of functions glTexCoord*, including the functions glTexCoord2f(s,t), glTexCoord2d(s,t), glTexCoord2fv(array), and glTexCoord2dv(array). The OpenGL state includes a current set of texture coordinates, as specified by these functions. When you specify a vertex with glVertex*, the current texture coordinates are copied and become an attribute that is associated with the vertex. As usual, this means that the texture coordinates for a vertex must be specified before glVertex* is called. Each vertex of a primitive will need a different set of texture coordinates.
For example, to apply the triangular region in the image shown above to the triangle in the xy-plane with vertices at (0,0), (0,1), and (1,0), we can say:
glNormal3d(0,0,1);      // This normal works for all three vertices.
glBegin(GL_TRIANGLES);
glTexCoord2d(0.3,0.1);  // Texture coords for vertex (0,0)
glVertex2d(0,0);
glTexCoord2d(0.45,0.6); // Texture coords for vertex (0,1)
glVertex2d(0,1);
glTexCoord2d(0.25,0.7); // Texture coords for vertex (1,0)
glVertex2d(1,0);
glEnd();
Note that there is no particular relationship between the (x,y) coordinates of a vertex, which give its position in space, and the (s,t) texture coordinates associated with the vertex. In fact, in this case, the triangle that I am drawing has a different shape from the triangular area in the image, and that piece of the image will have to be stretched and distorted to fit. Such distortion occurs in most uses of texture images.
Sometimes, it’s difficult to decide what texture coordinates to use. One case where it’s easy is applying the complete texture to a rectangle. Here is a code segment that draws a square in the xy-plane, with appropriate texture coordinates to map the entire image onto the square:
glBegin(GL_TRIANGLE_FAN);
glNormal3f(0,0,1);
glTexCoord2d(0,0); // Texture coords for lower left corner
glVertex2d(-0.5,-0.5);
glTexCoord2d(1,0); // Texture coords for lower right corner
glVertex2d(0.5,-0.5);
glTexCoord2d(1,1); // Texture coords for upper right corner
glVertex2d(0.5,0.5);
glTexCoord2d(0,1); // Texture coords for upper left corner
glVertex2d(-0.5,0.5);
glEnd();
Unfortunately, the standard shapes in the GLUT library do not come with texture co- ordinates (except for the teapot, which does). I have written a set of functions for draw- ing similar shapes that do come with texture coordinates. The functions can be found in jogl/TexturedShapes.java for JOGL or in glut/textured-shapes.c (plus the corresponding header file glut/textured-shapes.h) for C. Of course, there are many ways of applying a texture to a given object. If you use my functions, you are stuck with my decision about how to do so.
The sample program jogl/TextureDemo.java or glut/texture-demo.c lets you view several different texture images on my textured shapes.
One last question: What happens if you supply texture coordinates that are not in the range from 0 to 1? It turns out that such values are legal. By default, in OpenGL 1.1, they behave as though the entire st-plane is filled with copies of the image. For example, if the texture coordinates for a square range from 0 to 3 in both directions, instead of 0 to 1, then you get nine copies of the image on the square (three copies horizontally by three copies vertically).
To draw a textured primitive using glDrawArrays or glDrawElements, you will need to supply the texture coordinates in a vertex array, in the same way that you supply vertex coordinates, colors, and normal vectors. (See Subsection 3.4.2.) The details are similar: You have to enable the use of a texture coordinate array by calling
glEnableClientState(GL_TEXTURE_COORD_ARRAY);
and you have to tell OpenGL the location of the data using the function
void glTexCoordPointer( int size, int dataType, int stride, void* array)
The size, for us, will always be 2. (OpenGL also allows 3 or 4 texture coordinates, but we have no use for them.) The dataType can be GL_FLOAT, GL_DOUBLE, or GL_INT. The stride will ordinarily be zero, to indicate that there is no extra data between texture coordinates in the array. The last parameter is an array or pointer to the data, which must be of the type indicated by the dataType. In JOGL, as usual, you would use an nio buffer instead of an array.
MipMaps and Filtering
When a texture is applied to a surface, the pixels in the texture do not usually match up one- to-one with pixels on the surface, and in general, the texture must be stretched or shrunk as it is being mapped onto the surface. Sometimes, several pixels in the texture will be mapped to the same pixel on the surface. In this case, the color that is applied to the surface pixel must somehow be computed from the colors of all the texture pixels that map to it. This is an example of “filtering”; in particular, it uses a minification filter because the texture is being shrunk. When one pixel from the texture covers more than one pixel on the surface, the texture has to be magnified, and we need a magnification filter.
One bit of terminology before we proceed: The pixels in a texture are referred to as texels, short for “texture pixel” or “texture element”, and I will use that term from now on.
When deciding how to apply a texture to a point on a surface, OpenGL knows the texture coordinates for that point. Those texture coordinates correspond to one point in the texture, and that point lies in one of the texture’s texels. The easiest thing to do is to apply the color of that texel to the point on the surface. This is called “nearest texel filtering.” It is very fast, but it does not usually give good results. It doesn’t take into account the difference in size between the pixels on the surface and the texels in the image. An improvement on nearest texel filtering is “linear filtering,” which can take an average of several texel colors to compute the color that will be applied to the surface.
The problem with linear filtering is that it will be very inefficient when a large texture is applied to a much smaller surface area. In this case, many texels map to one pixel, and computing the average of so many texels becomes very inefficient. There is a neat solution for this: mipmaps.
A mipmap for a texture is a scaled-down version of that texture. A complete set of mipmaps consists of the full-size texture, a half-size version in which each dimension is divided by two, a quarter-sized version, a one-eighth-sized version, and so on. If one dimension shrinks to a single pixel, it is not reduced further, but the other dimension will continue to be cut in half until it too reaches one pixel. In any case, the final mipmap consists of a single pixel. Here are the first few images in the set of mipmaps for a brick texture:
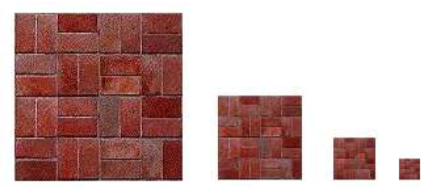
You’ll notice that the mipmaps become small very quickly. The total memory used by a set of mipmaps is only about one-third more than the memory used for the original texture, so the additional memory requirement is not a big issue when using mipmaps.
Mipmaps are used only for minification filtering. They are essentially a way of pre-computing the bulk of the averaging that is required when shrinking a texture to fit a surface. To texture a pixel, OpenGL can first select the mipmap whose texels most closely match the size of the pixel. It can then do linear filtering on that mipmap to compute a color, and it will have to average at most a few texels in order to do so.
In newer versions of OpenGL, you can get OpenGL to generate mipmaps automatically. In OpenGL 1.1, if you want to use mipmaps, you must either load each mipmap individually, or you must generate them yourself. (The GLU library has a method, gluBuild2DMipmaps that can be used to generate a set of mipmaps for a 2D texture.) However, my sample programs do not use mipmaps.
Texture Target and Texture Parameters
OpenGL can actually use one-dimensional and three-dimensional textures, as well as two- dimensional. Because of this, many OpenGL functions dealing with textures take a texture target as a parameter, to tell whether the function should be applied to one, two, or three dimensional textures. For us, the only texture target will be GL_TEXTURE_2D.
There are a number of options that apply to textures, to control the details of how textures are applied to surfaces. Some of the options can be set using the glTexParameteri() function, including two that have to do with filtering. OpenGL supports several different filtering techniques for minification and magnification. The filters can be set using glTexParameteri():
glTexParameteri(GL_TEXTURE_2D, GL_TEXTURE_MAG_FILTER, magFilter);
glTexParameteri(GL_TEXTURE_2D, GL_TEXTURE_MIN_FILTER, minFilter);
The values of magFilter and minFilter are constants that specify the filtering algorithm. For the magFilter, the only options are GL_NEAREST and GL_LINEAR, giving nearest texel and linear filtering. The default for the MAG filter is GL_LINEAR, and there is rarely any need to change it. For minFilter, in addition to GL_NEAREST and GL_LINEAR, there are four options that use mipmaps for more efficient filtering. The default MIN filter is GL_NEAREST_MIPMAP_LINEAR, which does averaging between mipmaps and nearest texel filtering within each mipmap. For even better results, at the cost of greater inefficiency, you can use GL_LINEAR_MIPMAP_LINEAR, which does averaging both between and within mipmaps. The other two options are GL_NEAREST_MIPMAP_NEAREST and GL_LINEAR_MIPMAP_NEAREST.
One very important note: If you are not using mipmaps for a texture, it is imperative that you change the minification filter for that texture to GL_LINEAR or, less likely, GL_NEAREST. The default MIN filter requires mipmaps, and if mipmaps are not available, then the texture is considered to be improperly formed, and OpenGL ignores it! Remember that if you don’t create mipmaps and if you don’t change the minification filter, then your texture will simply be ignored by OpenGL.
There is another pair of texture parameters to control how texture coordinates outside the range 0 to 1 are treated. As mentioned above, the default is to repeat the texture. The alternative is to “clamp” the texture. This means that when texture coordinates outside the range 0 to 1 are specified, those values are forced into that range: Values less than 0 are replaced by 0, and values greater than 1 are replaced by 1. Values can be clamped separately in the s and t directions using
glTexParameteri(GL_TEXTURE_2D, GL_TEXTURE_WRAP_S, GL_CLAMP);
glTexParameteri(GL_TEXTURE_2D, GL_TEXTURE_WRAP_T, GL CLAMP);
Passing GL_REPEAT as the last parameter restores the default behavior. When clamping is in effect, texture coordinates outside the range 0 to 1 return the same color as a texel that lies along the outer edge of the image. Here is what the effect looks like on two textured squares:
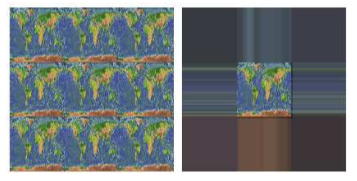
The two squares in this image have s and t texture coordinates that range from −1 to 2. The original image lies in the center of the square. For the square on the left, the texture is repeated. On the right, the texture is clamped.
Texture Transformation
When a texture is applied to a primitive, the texture coordinates for a vertex determine which point in the texture is mapped to that vertex. Texture images are 2D, but OpenGL also supports one-dimensional textures and three-dimensional textures. This means that texture coordinates cannot be restricted to two coordinates. In fact, a set of texture coordinates in OpenGL is represented internally in the form of homogeneous coordinates, which are referred to as (s,t,r,q). We have used glTexCoord2* to specify texture s and t coordinates, but a call to glTexCoord2f(s,t), for example, is really just shorthand for glTexCoord4f(s,t,0,1).
Since texture coordinates are no different from vertex coordinates, they can be transformed in exactly the same way. OpenGL maintains a texture transformation as part of its state, along with the modelview and projection transformations. The current value of each of the three transformations is stored as a matrix. When a texture is applied to an object, the texture coordinates that were specified for its vertices are transformed by the texture matrix. The transformed texture coordinates are then used to pick out a point in the texture. Of course, the default texture transform is the identity transform, which doesn’t change the coordinates.
The texture matrix can represent scaling, rotation, translation and combinations of these basic transforms. To specify a texture transform, you have to use glMatrixMode() to set the matrix mode to GL_TEXTURE. With this mode in effect, calls to methods such as glRotate*, glScale*, and glLoadIdentity are applied to the texture matrix. For example to install a texture transform that scales texture coordinates by a factor of two in each direction, you could say:
glMatrixMode(GL_TEXTURE);
glLoadIdentity(); // Make sure we are starting from the identity matrix.
glScalef(2,2,1);
glMatrixMode(GL_MODELVIEW); // Leave matrix mode set to GL_MODELVIEW.
Since the image lies in the st-plane, only the first two parameters of glScalef matter. For rotations, you would use (0,0,1) as the axis of rotation, which will rotate the image within the st-plane.
Now, what does this actually mean for the appearance of the texture on a surface? In the example, the scaling transform multiplies each texture coordinate by 2. For example, if a vertex was assigned 2D texture coordinates (0.4,0.1), then after the texture transform is applied, that vertex will be mapped to the point (s,t) = (0.8,0.2) in the texture. The texture coordinates vary twice as fast on the surface as they would without the scaling transform. A region on the surface that would map to a 1-by-1 square in the texture image without the transform will instead map to a 2-by-2 square in the image—so that a larger piece of the image will be seen inside the region. In other words, the texture image will be shrunk by a factor of two on the surface! More generally, the effect of a texture transformation on the appearance of the texture is the inverse of its effect on the texture coordinates. (This is exactly analogous to the inverse relationship between a viewing transformation and a modeling transformation.) If the texture transform is translation to the right, then the texture moves to the left on the surface. If the texture transform is a counterclockwise rotation, then the texture rotates clockwise on the surface.
I mention texture transforms here mostly to show how OpenGL can use transformations in another context. But it is sometimes useful to transform a texture to make it fit bet- ter on a surface. And for an unusual effect, you might even animate the texture transform to make the texture image move on the surface. To see the effect, try the on-line demo c4/texture-transform.html.
Loading a Texture from Memory
It’s about time that we looked at the process of getting an image into OpenGL so that it can be used as a texture. Usually, the image starts out in a file. OpenGL does not have functions for loading images from a file. For now, we assume that the file has already been loaded from the file into the computer’s memory. Later in this section, I will explain how that’s done in C and in Java.
The OpenGL function for loading image data from the computer’s memory into a 2D texture is glTexImage2D(), which takes the form:
glTexImage2D(target, mipmapLevel, internalFormat, width, height, border, format, dataType, pixels);
The target should be GL_TEXTURE_2D. The mipmapLevel should ordinarily be 0. The value 0 is for loading the main texture; a larger value is used to load an individual mipmap. The internalFormat tells OpenGL how you want the texture data to be stored in OpenGL texture memory. It is ordinarily GL_RGB to store an 8-bit red/green/blue component for each pixel. Another possibility is GL_RGBA, which adds an alpha component. The width and height give the size of the image; the values should usually be powers of two. The value of border should be 0; the only other possibility is 1, which indicates that a one-pixel border has been added around the image data for reasons that I will not discuss. The last three parameters describe the image data. The format tells how the original image data is represented in the computer’s memory, such as GL RGB or GL_RGBA. The dataType is usually GL_UNSIGNED_BYTE, indicating that each color component is represented as a one-byte value in the range 0 to 255. And pixels is a pointer to the start of the actual color data for the pixels. The pixel data has to be in a certain format, but that need not concern us here, since it is usually taken care of by the functions that are used to read the image from a file. (For JOGL, the pointer would be replaced by a buffer.)
This all looks rather complicated, but in practice, a call to glTexImage2D generally takes the following form, except possibly with GL_RGB replaced with GL_RGBA.
glTexImage2D(GL_TEXTURE_2D, 0, GL_RGB, width, height, 0, GL_RGB, GL_UNSIGNED_BYTE, pixels);
Calling this function will load the image into the texture, but it does not cause the texture to be used. For that, you also have to call
glEnable(GL_TEXTURE_2D);
If you want to use the texture on some objects but not others, you can enable GL_TEXTURE_2D before drawing objects that you want to be textured and disable it before drawing untextured objects. You can also change the texture that is being used at any time by calling glTexImage2D.
Texture from Color Buffer
Texture images for use in an OpenGL program usually come from an external source, most often an image file. However, OpenGL is itself a powerful engine for creating images. Sometimes, instead of loading an image file, it’s convenient to have OpenGL create the image internally, by rendering it. This is possible because OpenGL can read texture data from its own color buffer, where it does its drawing. To create a texture image using OpenGL, you just have to draw the image using standard OpenGL drawing commands and then load that image as a texture using the method
glCopyTexImage2D( target, mipmapLevel, internalFormat, x, y, width, height, border );
In this method, target will be GL_TEXTURE_2D; mipmapLevel should be zero; the internal- Format will ordinarily be GL_RGB or GL_RGBA; x and y specify the lower left corner of the rectangle from which the texture will be read; width and height are the size of that rectangle; and border should be 0. As usual with textures, the width and height should ordinarily be powers of two. A call to glCopyTexImage2D will typically look like
glCopyTexImage2D(GL_TEXTURE_2D, 0, GL RGB, x, y, width, height, 0);
The end result is that the specified rectangle from the color buffer will be copied to texture memory and will become the current 2D texture. This works in the same way as a call to glTexImage2D(), except for the source of the image data.
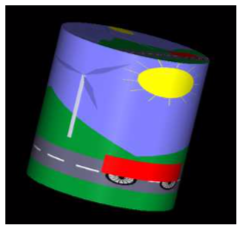
An example can be found in the JOGL program jogl/TextureFromColorBuffer.java or in the C version glut/texture-from-color-buffer.c. This program draws the windmill-and-cart scene from Subsection 2.4.1 and then uses that drawing as a texture on 3D objects. Here is an image from the program, showing the texture on a cylinder:
The texture can be animated! For the animation, a new texture is drawn for each frame. All the work is done in the display method. In that method, the current frame of the windmill-and-cart scene is first drawn as a 2D scene with lighting disabled. This picture is not shown on the computer screen; the drawing is done off-screen and the image will be erased and replaced with the 3D image before it’s ever shown on screen. The glCopyTexImage2D() function is then called to copy the scene into the current texture. Then, the color buffer is cleared, lighting is enabled, and a 3D projection is set up, before finally drawing the 3D object that is seen on the computer screen.
Texture Objects
Everything that I’ve said so far about textures was already true for OpenGL 1.0. OpenGL 1.1 introduced a new feature called texture objects to make texture handling more efficient. Texture objects are used when you need to work with several texture images in the same program. The usual method for loading texture images, glTexImage2D, transfers data from your program into the graphics card. This is an expensive operation, and switching among multiple textures by using this method can seriously degrade a program’s performance. Texture objects offer the possibility of storing texture data for multiple textures on the graphics card. With texture objects, you can switch from one texture object to another with a single, fast OpenGL command: You just have to tell OpenGL which texture object you want to use. (Of course, the graphics card has only a limited amount of memory for storing textures, and you aren’t guaranteed that all of your texture objects will actually be stored on the graphics card. Texture objects that don’t fit in the graphics card’s memory are no more efficient than ordinary textures.)
Texture objects are managed by OpenGL and the graphics hardware. A texture object is identified by an integer ID number. To use a texture object, you need to obtain an ID number from OpenGL. This is done with the glGenTextures function:
void glGenTexures( int textureCount, int* array )
This function can generate multiple texture IDs with a single call. The first parameter specifies how many IDs you want. The second parameter says where the generated IDs will be stored. It should be an array whose length is at least textureCount. For example, if you plan to use three texture objects, you can say
int idList[3];

glGenTextures( 3, idList );
You can then use idList[0], idList[1], and idList[2] to refer to the textures.
Every texture object has its own state, which includes the values of texture parameters such as GL_TEXTURE_MIN_FILTER as well as the texture image itself. To work with a specific texture object, you must first call
glBindTexture( GL_TEXTURE_2D, texID )
where texID is the texture ID returned by glGenTextures. After this call, any use of glTexParameteri, glTexImage2D, or glCopyTexImage2D will be applied to the texture object with ID texID.
Similarly, when a textured primitive is rendered, the texture that is used is the one that was most recently bound using glBindTexture. A typical pattern would be to load and configure a number of textures during program initialization:
glGenTextures( n, textureIdList );
for (i = 0; i < n; i++) {
    glBindTexture( textureIDList[i] );
        .
        .  // Load texture image number i
        .  // Configure texture image number i
        .
}
Then, while rendering a scene, you would call glBindTexture every time you want to switch from one texture image to another texture image. This would be much more efficient than calling glTexImage2D every time you want to switch textures.
OpenGL 1.1 reserves texture ID zero as the default texture object, which is bound initially. It is the texture object that you are using if you never call glBindTexture. This means that you can write programs that use textures without ever mentioning glBindTexture. (However, I should note that when we get to WebGL, that will no longer be true.)
The small sample program glut/texture-objects.c shows how to use texture objects in C. In is available only in C since, as we will see, JOGL has its own way of working with texture objects.
Loading Textures in C
We have seen how to load texture image data from memory into OpenGL. The problem that remains is how to get the image data into memory before calling glTexImage2D. One possibility is to compute the data — you can actually have your program generate texture data on the fly. More likely, however, you want to load it from a file. This section looks at how that might be done in C. You will probably want to use a library of image-manipulation functions. Several free image processing libraries are available. I will discuss one of them, FreeImage. FreeImage can be obtained from http://freeimage.sourceforge.net/, but I was able to use it in Linux simply by installing the package libfreeimage-dev. To make it available to my program, I added #include “FreeImage.h” to the top of my C program, and I added the option -lfreeimage to the gcc command to make the library available to the compiler. (See the sample program glut/texture-demo.c for an example that uses this library.) Instead of discussing FreeImage in detail, I present a well-commented function that uses it to load image data from a file:
void* imgPixels; // Pointer to raw RGB data for texture in memory.
int imgWidth;    // Width of the texture image.
int imgHeight;   // Height of the texture image.

void loadTexture( char* fileName ) {
        // Loads a texture image using the FreeImage library, and stores the
        // required info in global variables imgPixels, imgWidth, imgHeight.
        // The parameter fileName is a string that contains the name of the
        // image file from which the image is to be loaded.  If the image
        // can’t be loaded, then imgPixels will be set to be a null pointer.

    imgPixels = 0; // Null pointer to signal that data has not been read.

    FREE IMAGE FORMAT format = FreeImage_GetFIFFromFilename(fileName);
        // FREE IMAGE FORMAT is a type defined by the FreeImage library.
        // Here, the format is determined from the file extension in
        // the file name, such as .png, .jpg, or .gif. Many formats
        // are supported.

    if (format == FIF_UNKNOWN) {
        printf("Unknown file type for texture image file %s\n", fileName);
        return;
    }

    FIBITMAP* bitmap = FreeImage_Load(format, fileName, 0);
        // FIBITMAP is a type defined by the FreeImage library, representing
        // the raw image data plus some metadata such as width, height,
        // and the format of the image data. This actually tries to
        // read the data from the specified file.

    if (!bitmap) {
        printf("Failed to load image %s\n", fileName);
        return;
    }

    FIBITMAP* bitmap2 = FreeImage_ConvertTo24Bits(bitmap);
        // This creates a copy of the image, with the data represented
        // in standard RGB (or BGR) format, for use with OpenGL.

    FreeImage Unload(bitmap);
        // After finishing with a bitmap, it should be disposed.
        // We are finished with bitmap, but not with bitmap2, since
        // we will continue to use the data from bitmap2.

    imgPixels = FreeImage_GetBits(bitmap2); // Get the data we need!
    imgWidth = FreeImage_GetWidth(bitmap2);
    imgHeight = FreeImage_GetHeight(bitmap2);

    if (imgPixels) {
        printf("Texture image loaded from file %s, size %dx%d\n",
            fileName, imgWidth, imgHeight);
    }
    else {
        printf("Failed to get texture data from %s\n", fileName);
    }

} // end loadTexture
After this function has been called, the data that we need for glTexImage2D() is in the global variables imgWidth, imgHeight, and imgPixels (or imgPixels is 0 to indicate that the attempt to load the image failed). There is one complication: FreeImage will store the color components for a pixel in the order red/green/blue on some platforms but in the order blue/green/red on other platforms. The second data format is called GL_BGR in OpenGL. If you use the wrong format in glTextImage2D(), then the red and blue components of the color will be reversed. To tell the difference, you can use the FreeImage constant FI_RGBA_RED, which tells the position of the red color component in pixel data. This constant will be 0 if the format is GL_RGB and will be 2 if the format is GL_BGR. So, to use the texture in OpenGL, you might say:
if ( imgPixels ) { // The image data exists
    int format; // The format of the color data in memory
    if ( FI_RGBA_RED == 0 )
        format = GL_RGB;
    else
        format = GL_BGR;
    glTexImage2D(GL_TEXTURE_2D, 0, GL RGBA, imgWidth, imgHeight, 0, format,
        GL_UNSIGNED_BYTE, imgPixels);
    glEnable(GL_TEXTURE_2D);
}
else { // The image data was not loaded, so don’t attempt to use the texture.
    glDisable(GL_TEXTURE_2D);
}
To be even more careful, you could check that the width and the height of the image are powers of two. If not, you can resize it using the function FreeImage_Rescale() from the FreeImage library.
Using Textures with JOGL
We turn finally to using texture images in Java. JOGL comes with several classes that make it fairly easy to use textures in Java, notably the classes Texture and TextureIO in package com.jogamp.opengl.util.texture and AWTTextureIO in package com.jogamp.opengl.util.texture.awt. For an example of using textures with JOGL, see the sample program jogl/TextureDemo.java.
An object of type Texture represents a texture that has already been loaded into OpenGL. Internally, it uses a texture object to store the texture and its configuration data. If tex is an object of type Texture, you can call
tex.bind(gl);
to use the texture image while rendering objects. The parameter, gl, as usual, is a variable of type GL2 the represents the OpenGL drawing context. This function is equivalent to calling glBindTexture for the OpenGL texture object that is used by the Java Texture. You still need to enable GL_TEXTURE_2D by calling gl.glEnable(GL2.GL_TEXTURE_2D) or, equivalently,
tex.enable(gl);
You can set texture parameters in the usual way, by calling gl.glTexParameteri() while the texture is bound, but it is preferable to use a method from the Texture class to set the parameters:
tex.setTexParameteri( gl, parameterName, value );
This will automatically bind the texture object before setting the texture parameter. For example,
tex.setTexParameteri(gl, GL2.GL_TEXTURE_MIN_FILTER, GL2.LINEAR_MIPMAP_LINEAR);
So, once you have a Texture, it’s pretty easy to use. But there remains the problem of creating Texture objects. For that, you can use static methods in the TextureIO and AWTTextureIO classes. For example, if fileName is the name of an image file (or a path to such a file), then you can say
tex = TextureIO.newTexture( new File(fileName), true );
to load a texture from the file into a Texture object, tex. The boolean parameter here, and in all the methods we will look at, tells JOGL whether or not to create mipmaps for the texture; by passing true, we automatically get a full set of mipmaps!
One important note: Java’s texture creation functions will only work when an OpenGL context is “current.” This will be true in the event-handling methods of a GLEventListener, including the init() and display() methods. However, it will not be true in ordinary methods and constructors.
Of course, in Java, you are more likely to store the image as a resource in the program than as a separate file. If resourceName is a path to the image resource, you can load the image into a texture with
URL textureURL;
textureURL = getClass().getClassLoader().getResource( resourceName );
texture = TextureIO.newTexture(textureURL, true, null);
The third parameter to this version of newTexture specifies the image type and can be given as a string containing a file suffix such as “png” or “jpg”; the value null tells OpenGL to autodetect the image type, which should work in general. (By the way, all the texture-loading code that I discuss here can throw exceptions, which you will have to catch or otherwise handle in some way.)
One problem with all this is that textures loaded in this way will be upside down! This happens because Java stores image data from the top row of the image to the bottom, whereas OpenGL expects image data to be stored starting with the bottom row. If this is a problem for you, you can flip the image before using it to create a texture. To do that, you have to load the image into a BufferedImage and then load that into a texture using the AWTTextureIO class. For example, assuming resourceName is a path to an image resource in the program:
URL textureURL;
textureURL = getClass().getClassLoader().getResource( resourceName );
BufferedImage img = ImageIO.read( textureURL );
ImageUtil.flipImageVertically( img );
texture = AWTTextureIO.newTexture(GLProfile.getDefault(), img, true);
The ImageUtil class is defined in package com.jogamp.opengl.util.awt. Here, I obtained a BufferedImage by reading it from a resource. You could also read it from a file—or even draw it using Java 2D graphics.