
1.15: Chapter 15 SQL Structured Query Language
- Page ID
- 6872

Authors: Adrienne Watt & Nelson Eng
Structured Query Language (SQL) is a database language designed for managing data held in a relational database management system. SQL was initially developed by IBM in the early 1970s (Date 1986). The initial version, called SEQUEL (Structured English Query Language), was designed to manipulate and retrieve data stored in IBM’s quasi-relational database management system, System R. Then in the late 1970s, Relational Software Inc., which is now Oracle Corporation, introduced the first commercially available implementation of SQL, Oracle V2 for VAX computers.
Many of the currently available relational DBMSs, such as Oracle Database, Microsoft SQL Server (shown in Figure 15.1), MySQL, IBM DB2, IBM Informix and Microsoft Access, use SQL.

Figure 15.1. Example of Microsoft SQL Server, by A. Watt.
In a DBMS, the SQL database language is used to:
- Create the database and table structures
- Perform basic data management chores (add, delete and modify)
- Perform complex queries to transform raw data into useful information
In this chapter, we will focus on using SQL to create the database and table structures, mainly using SQL as a data definition language (DDL). In Chapter 16, we will use SQL as a data manipulation language (DML) to insert, delete, select and update data within the database tables.
Create Database
The major SQL DDL statements are CREATE DATABASE and CREATE/DROP/ALTER TABLE. The SQL statement CREATE is used to create the database and table structures.
Example: CREATE DATABASE SW
A new database named SW is created by the SQL statement CREATE DATABASE SW. Once the database is created, the next step is to create the database tables.
The general format for the CREATE TABLE command is:
ColumnName, Datatype, Optional Column Constraint,
ColumnName, Datatype, Optional Column Constraint,
Optional table Constraints
);
Tablename is the name of the database table such as Employee. Each field in the CREATE TABLE has three parts (see above):
- ColumnName
- Data type
- Optional Column Constraint
ColumnName
The ColumnName must be unique within the table. Some examples of ColumnNames are FirstName and LastName.
Data Type
The data type, as described below, must be a system data type or a user-defined data type. Many of the data types have a size such as CHAR(35) or Numeric(8,2).
Bit–Integer data with either a 1 or 0 value
Int –Integer (whole number) data from -2^31 (-2,147,483,648) through 2^31 – 1 (2,147,483,647)
Smallint –Integer data from 2^15 (-32,768) through 2^15 – 1 (32,767)
Tinyint–Integer data from 0 through 255
Decimal –Fixed precision and scale numeric data from -10^38 -1 through 10^38
Numeric –A synonym for decimal
Timestamp –A database-wide unique number
Uniqueidentifier –A globally unique identifier (GUID)
Money – Monetary data values from -2^63 (-922,337,203,685,477.5808) through 2^63 – 1 (+922,337,203,685,477.5807), with accuracy to one-ten-thousandth of a monetary unit
Smallmoney –Monetary data values from -214,748.3648 through +214,748.3647, with accuracy to one-ten-thousandth of a monetary unit
Float –Floating precision number data from -1.79E + 308 through 1.79E + 308
Real –Floating precision number data from -3.40E + 38 through 3.40E + 38
Datetime –Date and time data from January 1, 1753, to December 31, 9999, with an accuracy of one-three-hundredths of a second, or 3.33 milliseconds
Smalldatetime –Date and time data from January 1, 1900, through June 6, 2079, with an accuracy of one minute
Char –Fixed-length non-Unicode character data with a maximum length of 8,000 characters
Varchar –Variable-length non-Unicode data with a maximum of 8,000 characters
Text –Variable-length non-Unicode data with a maximum length of 2^31 – 1 (2,147,483,647) characters
Binary –Fixed-length binary data with a maximum length of 8,000 bytes
Varbinary –Variable-length binary data with a maximum length of 8,000 bytes
Image –Variable-length binary data with a maximum length of 2^31 – 1 (2,147,483,647) bytes
Optional Column Constraints
The Optional ColumnConstraints are NULL, NOT NULL, UNIQUE, PRIMARY KEY and DEFAULT, used to initialize a value for a new record. The column constraint NULL indicates that null values are allowed, which means that a row can be created without a value for this column. The column constraint NOT NULL indicates that a value must be supplied when a new row is created.
To illustrate, we will use the SQL statement CREATE TABLE EMPLOYEES to create the employees table with 16 attributes or fields.
CREATE TABLE EMPLOYEES
(
EmployeeNo CHAR(10) NOT NULL UNIQUE,
DepartmentName CHAR(30) NOT NULL DEFAULT “Human Resources”,
FirstName CHAR(25) NOT NULL,
LastName CHAR(25) NOT NULL,
Category CHAR(20) NOT NULL,
HourlyRate CURRENCY NOT NULL,
TimeCard LOGICAL NOT NULL,
HourlySalaried CHAR(1) NOT NULL,
EmpType CHAR(1) NOT NULL,
Terminated LOGICAL NOT NULL,
ExemptCode CHAR(2) NOT NULL,
Supervisor LOGICAL NOT NULL,
SupervisorName CHAR(50) NOT NULL,
BirthDate DATE NOT NULL,
CollegeDegree CHAR(5) NOT NULL,
CONSTRAINT Employee_PK PRIMARY KEY(EmployeeNo
);
The first field is EmployeeNo with a field type of CHAR. For this field, the field length is 10 characters, and the user cannot leave this field empty (NOT NULL).
Similarly, the second field is DepartmentName with a field type CHAR of length 30. After all the table columns are defined, a table constraint, identified by the word CONSTRAINT, is used to create the primary key:
We will discuss the constraint property further later in this chapter.
Likewise, we can create a Department table, a Project table and an Assignment table using the CREATE TABLE SQL DDL command as shown in the below example.
CREATE TABLE DEPARTMENT
(
DepartmentName Char(35) NOT NULL,
BudgetCode Char(30) NOT NULL,
OfficeNumber Char(15) NOT NULL,
Phone Char(15) NOT NULL,
CONSTRAINT DEPARTMENT_PK PRIMARY KEY(DepartmentName)
);
In this example, a project table is created with seven fields: ProjectID, ProjectName, Department, MaxHours, StartDate, and EndDate.
CREATE TABLE PROJECT
(
ProjectID Int NOT NULL IDENTITY (1000,100),
ProjectName Char(50) NOT NULL,
Department Char(35) NOT NULL,
MaxHours Numeric(8,2) NOT NULL DEFAULT 100,
StartDate DateTime NULL,
EndDate DateTime NULL,
CONSTRAINT ASSIGNMENT_PK PRIMARY KEY(ProjectID)
);
In this last example, an assignment table is created with three fields: ProjectID, EmployeeNumber, and HoursWorked. The assignment table is used to record who (EmployeeNumber) and how much time(HoursWorked) an employee worked on the particular project(ProjectID).
CREATE TABLE ASSIGNMENT
(
ProjectID Int NOT NULL,
EmployeeNumber Int NOT NULL,
HoursWorked Numeric(6,2) NULL,
);
Table Constraints
Table constraints are identified by the CONSTRAINT keyword and can be used to implement various constraints described below.
IDENTITY constraint
We can use the optional column constraint IDENTITY to provide a unique, incremental value for that column. Identity columns are often used with the PRIMARY KEY constraints to serve as the unique row identifier for the table. The IDENTITY property can be assigned to a column with a tinyint, smallint, int, decimal or numeric data type. This constraint:
- Generates sequential numbers
- Does not enforce entity integrity
- Only one column can have the IDENTITY property
- Must be defined as an integer, numeric or decimal data type
- Cannot update a column with the IDENTITY property
- Cannot contain NULL values
- Cannot bind defaults and default constraints to the column
For IDENTITY[(seed, increment)]
- Seed – the initial value of the identity column
- Increment – the value to add to the last increment column
We will use another database example to further illustrate the SQL DDL statements by creating the table tblHotel in this HOTEL database.
(
HotelNo Int IDENTITY (1,1),
Name Char(50) NOT NULL,
Address Char(50) NULL,
City Char(25) NULL,
)
UNIQUE constraint
The UNIQUE constraint prevents duplicate values from being entered into a column.
- Both PK and UNIQUE constraints are used to enforce entity integrity.
- Multiple UNIQUE constraints can be defined for a table.
- When a UNIQUE constraint is added to an existing table, the existing data is always validated.
- A UNIQUE constraint can be placed on columns that accept nulls. Only one row can be NULL.
- A UNIQUE constraint automatically creates a unique index on the selected column.
This is the general syntax for the UNIQUE constraint:
UNIQUE [CLUSTERED | NONCLUSTERED]
(col_name [, col_name2 […, col_name16]])
[ON segment_name]
This is an examle using the UNIQUE constraint.
(
EmployeeNo CHAR(10) NOT NULL UNIQUE,
)
FOREIGN KEY constraint
The FOREIGN KEY (FK) constraint defines a column, or combination of columns, whose values match the PRIMARY KEY (PK) of another table.
- Values in an FK are automatically updated when the PK values in the associated table are updated/changed.
- FK constraints must reference PK or the UNIQUE constraint of another table.
- The number of columns for FK must be same as PK or UNIQUE constraint.
- If the WITH NOCHECK option is used, the FK constraint will not validate existing data in a table.
- No index is created on the columns that participate in an FK constraint.
This is the general syntax for the FOREIGN KEY constraint:
[FOREIGN KEY (col_name [, col_name2 […, col_name16]])]
REFERENCES [owner.]ref_table [(ref_col [, ref_col2 […, ref_col16]])]
In this example, the field HotelNo in the tblRoom table is a FK to the field HotelNo in the tblHotel table shown previously.
GO
CREATE TABLE tblRoom
(
HotelNo Int NOT NULL ,
RoomNo Int NOT NULL,
Type Char(50) NULL,
Price Money NULL,
PRIMARY KEY (HotelNo, RoomNo),
FOREIGN KEY (HotelNo) REFERENCES tblHotel
)
CHECK constraint
The CHECK constraint restricts values that can be entered into a table.
- It can contain search conditions similar to a WHERE clause.
- It can reference columns in the same table.
- The data validation rule for a CHECK constraint must evaluate to a boolean expression.
- It can be defined for a column that has a rule bound to it.
This is the general syntax for the CHECK constraint:
CHECK [NOT FOR REPLICATION] (expression)
In this example, the Type field is restricted to have only the types ‘Single’, ‘Double’, ‘Suite’ or ‘Executive’.
GO
CREATE TABLE tblRoom
(
HotelNo Int NOT NULL,
RoomNo Int NOT NULL,
Type Char(50) NULL,
Price Money NULL,
PRIMARY KEY (HotelNo, RoomNo),
FOREIGN KEY (HotelNo) REFERENCES tblHotel
CONSTRAINT Valid_Type
CHECK (Type IN (‘Single’, ‘Double’, ‘Suite’, ‘Executive’))
)
In this second example, the employee hire date should be before January 1, 2004, or have a salary limit of $300,000.
CREATE TABLE SALESREPS
(
Empl_num Int Not Null
CHECK (Empl_num BETWEEN 101 and 199),
Name Char (15),
Age Int CHECK (Age >= 21),
Quota Money CHECK (Quota >= 0.0),
HireDate DateTime,
CONSTRAINT QuotaCap CHECK ((HireDate < “01-01-2004”) OR (Quota <=300000))
)
DEFAULT constraint
The DEFAULT constraint is used to supply a value that is automatically added for a column if the user does not supply one.
- A column can have only one DEFAULT.
- The DEFAULT constraint cannot be used on columns with a timestamp data type or identity property.
- DEFAULT constraints are automatically bound to a column when they are created.
The general syntax for the DEFAULT constraint is:
DEFAULT {constant_expression | niladic-function | NULL}
[FOR col_name]
This example sets the default for the city field to ‘Vancouver’.
ALTER TABLE tblHotel
Add CONSTRAINT df_city DEFAULT ‘Vancouver’ FOR City
User Defined Types
User defined types are always based on system-supplied data type. They can enforce data integrity and they allow nulls.
To create a user-defined data type in SQL Server, choose types under “Programmability” in your database. Next, right click and choose ‘New’ –>‘User-defined data type’ or execute the sp_addtype system stored procedure. After this, type:
This will add a new user-defined data type called SIN with nine characters.
In this example, the field EmployeeSIN uses the user-defined data type SIN.
(
EmployeeID INT Primary Key,
EmployeeSIN SIN,
CONSTRAINT CheckSIN
CHECK (EmployeeSIN LIKE
‘ [0-9][0-9][0-9] – [0-9][0-9] [0-9] – [0-9][0-9][0-9] ‘)
)
ALTER TABLE
You can use ALTER TABLE statements to add and drop constraints.
- ALTER TABLE allows columns to be removed.
- When a constraint is added, all existing data are verified for violations.
In this example, we use the ALTER TABLE statement to the IDENTITY property to a ColumnName field.
GO
ALTER TABLE tblHotel
ADD CONSTRAINT unqName UNIQUE (Name)
Use the ALTER TABLE statement to add a column with the IDENTITY property such as ALTER TABLE TableName.
ColumnName int IDENTITY(seed, increment)
DROP TABLE
The DROP TABLE will remove a table from the database. Make sure you have the correct database selected.
Executing the above SQL DROP TABLE statement will remove the table tblHotel from the database.
Key Terms
DDL: abbreviation for data definition language
DML: abbreviation for data manipulation language
SEQUEL: acronym for Structured English Query Language; designed to manipulate and retrieve data stored in IBM’s quasi-relational database management system, System R
Structured Query Language (SQL): a database language designed for managing data held in a relational database management system
Exercises
- Using the information for the Chapter 9 exercise, implement the schema using Transact SQL (show SQL statements for each table). Implement the constraints as well.
- Create the table shown here in SQL Server and show the statements you used.
Table: EmployeeATTRIBUTE (FIELD) NAME DATA DECLARATION EMP_NUM CHAR(3) EMP_LNAME VARCHAR(15) EMP_FNAME VARCHAR(15) EMP_INITIAL CHAR(1) EMP_HIREDATE DATE JOB_CODE CHAR(3) - Having created the table structure in question 2, write the SQL code to enter the rows for the table shown in Figure 15.1.
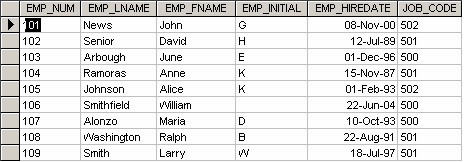
Figure 15.2. Employee table with data for questions 4-10, by A. Watt.
Use Figure 15.2 to answer questions 4 to 10.
- Write the SQL code to change the job code to 501 for the person whose personnel number is 107. After you have completed the task, examine the results, and then reset the job code to its original value.
- Assuming that the data shown in the Employee table have been entered, write the SQL code that lists all attributes for a job code of 502.
- Write the SQL code to delete the row for the person named William Smithfield, who was hired on June 22, 2004, and whose job code classification is 500. (Hint: Use logical operators to include all the information given in this problem.)
- Add the attributes EMP_PCT and PROJ_NUM to the Employee table. The EMP_PCT is the bonus percentage to be paid to each employee.
- Using a single command, write the SQL code that will enter the project number (PROJ_NUM) = 18 for all employees whose job classification (JOB_CODE) is 500.
- Using a single command, write the SQL code that will enter the project number (PROJ_NUM) = 25 for all employees whose job classification (JOB_CODE) is 502 or higher.
- Write the SQL code that will change the PROJ_NUM to 14 for those employees who were hired before January 1, 1994, and whose job code is at least 501. (You may assume that the table will be restored to its original condition preceding this question.)
Also see Appendix C: SQL Lab with Solution
References
Date, C.J. Relational Database Selected Writings. Reading: Mass: Addison-Wesley Publishing Company Inc., 1986, p. 269-311.