
14.4: Rendering HTML
- Page ID
- 39657
The purpose of a web application is to create, or render, web pages. As we mentioned in Section 14.3, each Seaside component is responsible for rendering itself. So, let’s start our exploration of rendering by seeing how the counter component renders itself.
Rendering the Counter
The rendering of the counter is relatively straightforward; the code is shown in Figure 14.3.2. The current value of the counter is displayed as an HTML heading, and the increment and decrement operations are implemented as HTML anchors (that is, links) with callbacks to blocks that will send increase and decrease to the counter object.
We will have a closer look at the rendering protocol in a moment. But before we do, let’s have a quick look at the multi-counter.
From Counter to MultiCounter
WAMultiCounter, shown in Figure \(\PageIndex{1}\) is also a standalone application, so it overrides canBeRoot to answer true. In addition, it is a composite component, so Seaside requires it to declare its children by implementing a method children that answers an array of all the components it contains. It renders itself by rendering each of its subcomponents, separated by a horizontal rule. Aside from instance and class-side initialization methods, there is nothing else to the multi-counter!

More about rendering HTML
As you can see from these examples, Seaside does not use templates to generate web pages. Instead it generates HTML programmatically. The basic idea is that every Seaside component should override the method renderContentOn:; this message will be sent by the framework to each component that needs to be rendered. This renderContentOn: message will have an argument that is an HTML canvas onto which the component should render itself. By convention, the HTML canvas parameter is called html. An HTML canvas is analogous to the graphics canvas used by Morphic (and most other drawing frameworks) to abstract away from the device-dependent details of drawing.
Here are some of the most basic rendering methods:
html text: 'hello world'. "render a plain text string"
html html: '–'. "render an HTML incantation"
html render: 1. "render any object"
The message render: anyObject can be sent to an HTML canvas to render anyObject; it is normally used to render subcomponents. anyObject will itself be sent the message renderContentOn: this is what happens in the multi-counter (see Figure \(\PageIndex{1}\)).
Using brushes
A canvas provides a number of brushes that can be used to render (i.e., paint) content on the canvas. There are brushes for every kind of HTML element — paragraphs, tables, lists, and so on. To see the full protocol of brushes and convenience methods, you should browse the class WACanvas and its subclasses. The argument to renderContentOn: is actually an instance of the subclass WARender.
We have already seen the following brush used in the counter and multi-counter examples:
html horizontalRule.
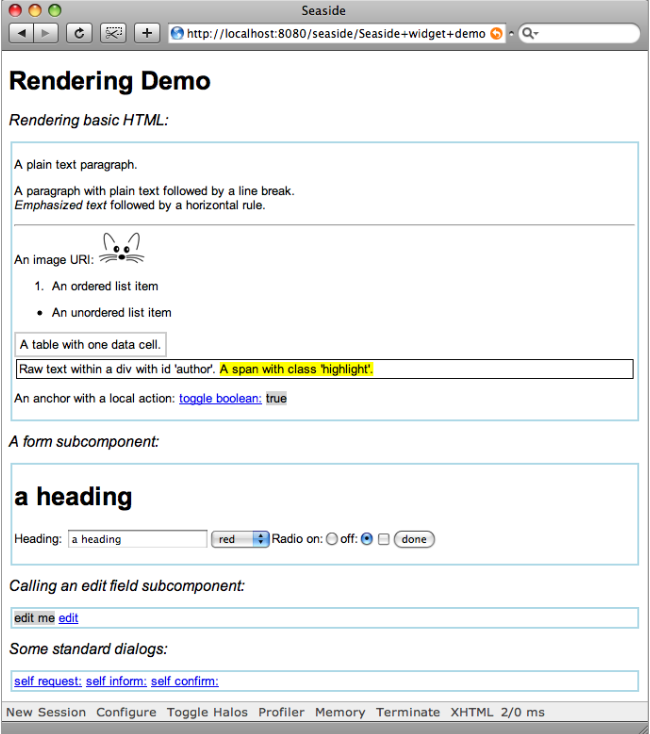
In Figure \(\PageIndex{2}\) we can see the output of many of the basic brushes offered by Seaside. (The source code for method SeasideDemo >> renderContentOn: defined below is in the package PBE-SeasideDemo in the project www.squeaksource.com/PharoByExample.) The root component SeasideDemo simply renders its subcomponents, which are instances of SeasideHtmlDemo, SeasideFormDemo, SeasideEditCallDemo and SeasideDialogDemo, as shown below.
SeasideDemo >> renderContentOn: html
    html heading: 'Rendering Demo'.
    html heading
        level: 2;
        with: 'Rendering basic HTML: '.
    html div
        class: 'subcomponent';
        with: htmlDemo.
    "render the remaining components ..."
Recall that a root component must always declare its children, or Seaside will refuse to render them.
SeasideDemo >> children
    ^ { htmlDemo . formDemo . editDemo . dialogDemo }
Notice that there are two different ways of instantiating the heading brush. The first way is to set the text directly by sending the message heading:. The second way is to instantiate the brush by sending heading, and then to send a cascade of messages to the brush to set its properties and render it. Many of the available brushes can be used in these two ways.
Important
If you send a cascade of messages to a brush including the message with:, then with: should be the final message. with: both sets the content and renders the result.
In method renderContentOn: above, the first heading is at level 1, since this is the default. We explicitly set the level of the second heading to 2. The sub- component is rendered as an HTML div with the CSS class subcomponent. (More on CSS in Section 14.5.) Also note that the argument to the with: keyword message need not be a literal string: it can be another component, or even — as in the next example — a block containing further rendering actions.
The SeasideHtmlDemo component demonstrates many of the most basic brushes. Most of the code should be self-explanatory.
SeasideHtmlDemo >> renderContentOn: html
    self renderParagraphsOn: html.
    self renderListsAndTablesOn: html.
    self renderDivsAndSpansOn: html.
    self renderLinkWithCallbackOn: html
It is common practice to break up long rendering methods into many helper methods, as we have done here.
A word of advice: Don’t put all your rendering code into a single method.
Instead, split it into helper methods named using the pattern render*On:. All rendering methods go in the rendering protocol. Don’t send renderContentOn: from your own code, use render: instead.
Look at the following code. The first helper method, SeasideHtmlDemo>>renderParagraphsOn:, shows you how to generate HTML paragraphs, plain and emphasized text, and images. Note that in Seaside simple elements are rendered by specifying the text they contain directly, whereas complex elements are specified using blocks. This is a simple convention to help you structure your rendering code.
SeasideHtmlDemo >> renderParagraphsOn: html
    html paragraph: 'A plain text paragraph.'.
    html paragraph: [
        html
            text: 'A paragraph with plain text followed by a line break. ';
            break;
            emphasis: 'Emphasized text ';
            text: 'followed by a horizontal rule.';
            horizontalRule;
            text: 'An image URI: '.
        html image
            url: self squeakImageUrl;
            width: '50']
The next helper method, SeasideHtmlDemo>>renderListsAndTablesOn:, shows you how to generate lists and tables. A table uses two levels of blocks to display each of its rows and the cells within the rows.
SeasideHtmlDemo >> renderListsAndTablesOn: html
    html orderedList: [
        html listItem: 'An ordered list item'].
    html unorderedList: [
        html listItem: 'An unordered list item'].
    html table: [
        html tableRow: [
            html tableData: 'A table with one data cell.']]
The next example shows how we can specify class or id attributes for div and span elements (for use with CSS). Of course, the messages class: and id: can also be sent to the other brushes, not just to div and span. The method SeasideDemoWidget>>style defines how these HTML elements should be displayed (see Section 14.5).
SeasideHtmlDemo >> renderDivsAndSpansOn: html
    html div
        id: 'author';
        with: [
            html text: 'Raw text within a div with id ''author''. '.
            html span
                class: 'highlight';
                with: 'A span with class ''highlight''.']
Finally we see a simple example of a link, created by binding a simple callback to an anchor (i.e., a link). Clicking on the link will cause the subsequent text to toggle between true and false by toggling the instance variable toggleValue.
SeasideHtmlDemo >> renderLinkWithCallbackOn: html
    html paragraph: [
        html text: 'An anchor with a local action: '.
        html span with: [
        html anchor
            callback: [toggleValue := toggleValue not];
            with: 'toggle boolean:'].
        html space.
        html span
            class: 'boolean';
            with: toggleValue ]
Note that actions should appear only in callbacks.
The code executed while rendering should not change the state of the application!
Forms
Forms are rendered just like the other examples that we have already seen. Here is the code for the SeasideFormDemo component in Figure \(\PageIndex{2}\).
SeasideFormDemo >> renderContentOn: html
    | radioGroup |
    html heading: heading.
    html form: [
        html span: 'Heading: '.
        html textInput on: #heading of: self.
        html select
            list: self colors;
            on: #color of: self.
        radioGroup := html radioGroup.
        html text: 'Radio on:'.
        radioGroup radioButton
            selected: radioOn;
            callback: [radioOn := true].
        html text: 'off:'.
        radioGroup radioButton
            selected: radioOn not;
            callback: [radioOn := false].
        html checkbox on: #checked of: self.
        html submitButton
            text: 'done' ]
Since a form is a complex entity, it is rendered using a block. Note that all the state changes happen in the callbacks, not as part of the rendering.
There is one Seaside feature used here that is worth special mention, namely the message on:of:. In the example, this message is used to bind a text input field to the variable heading. Anchors and buttons also support this message. The first argument is the name of an instance variable for which accessors have been defined; the second argument is the object to which this instance variable belongs. Both observer (heading) and mutator (heading:) accessor messages must be understood by the object, with the usual naming convention. In the case of a text input field, this saves us the trouble of having to define a callback that updates the field as well as having to bind the default contents of the HTML input field to the current value of the instance variable. Using on: #heading of: self, the heading variable is updated automatically whenever the user updates the text input field.
The same message is used twice more in this example, to cause the selection of a colour on the HTML form to update the color variable, and to bind the result of the checkbox to the checked variable. Many other examples can be found in the functional tests for Seaside. Have a look at the package Seaside-Tests-Functional, or just point your browser to http://localhost:8080/tests/functional. Select WAInputPostFunctionalTest and click on the Restart button to see most of the features of forms.
Don’t forget, if you toggle Halos, you can browse the source code of the examples directly using the Seaside class browser.