6.3: Grow Your Test Base Incrementally
- Page ID
- 32395
\( \newcommand{\vecs}[1]{\overset { \scriptstyle \rightharpoonup} {\mathbf{#1}} } \)
\( \newcommand{\vecd}[1]{\overset{-\!-\!\rightharpoonup}{\vphantom{a}\smash {#1}}} \)
\( \newcommand{\id}{\mathrm{id}}\) \( \newcommand{\Span}{\mathrm{span}}\)
( \newcommand{\kernel}{\mathrm{null}\,}\) \( \newcommand{\range}{\mathrm{range}\,}\)
\( \newcommand{\RealPart}{\mathrm{Re}}\) \( \newcommand{\ImaginaryPart}{\mathrm{Im}}\)
\( \newcommand{\Argument}{\mathrm{Arg}}\) \( \newcommand{\norm}[1]{\| #1 \|}\)
\( \newcommand{\inner}[2]{\langle #1, #2 \rangle}\)
\( \newcommand{\Span}{\mathrm{span}}\)
\( \newcommand{\id}{\mathrm{id}}\)
\( \newcommand{\Span}{\mathrm{span}}\)
\( \newcommand{\kernel}{\mathrm{null}\,}\)
\( \newcommand{\range}{\mathrm{range}\,}\)
\( \newcommand{\RealPart}{\mathrm{Re}}\)
\( \newcommand{\ImaginaryPart}{\mathrm{Im}}\)
\( \newcommand{\Argument}{\mathrm{Arg}}\)
\( \newcommand{\norm}[1]{\| #1 \|}\)
\( \newcommand{\inner}[2]{\langle #1, #2 \rangle}\)
\( \newcommand{\Span}{\mathrm{span}}\) \( \newcommand{\AA}{\unicode[.8,0]{x212B}}\)
\( \newcommand{\vectorA}[1]{\vec{#1}} % arrow\)
\( \newcommand{\vectorAt}[1]{\vec{\text{#1}}} % arrow\)
\( \newcommand{\vectorB}[1]{\overset { \scriptstyle \rightharpoonup} {\mathbf{#1}} } \)
\( \newcommand{\vectorC}[1]{\textbf{#1}} \)
\( \newcommand{\vectorD}[1]{\overrightarrow{#1}} \)
\( \newcommand{\vectorDt}[1]{\overrightarrow{\text{#1}}} \)
\( \newcommand{\vectE}[1]{\overset{-\!-\!\rightharpoonup}{\vphantom{a}\smash{\mathbf {#1}}}} \)
\( \newcommand{\vecs}[1]{\overset { \scriptstyle \rightharpoonup} {\mathbf{#1}} } \)
\( \newcommand{\vecd}[1]{\overset{-\!-\!\rightharpoonup}{\vphantom{a}\smash {#1}}} \)
\(\newcommand{\avec}{\mathbf a}\) \(\newcommand{\bvec}{\mathbf b}\) \(\newcommand{\cvec}{\mathbf c}\) \(\newcommand{\dvec}{\mathbf d}\) \(\newcommand{\dtil}{\widetilde{\mathbf d}}\) \(\newcommand{\evec}{\mathbf e}\) \(\newcommand{\fvec}{\mathbf f}\) \(\newcommand{\nvec}{\mathbf n}\) \(\newcommand{\pvec}{\mathbf p}\) \(\newcommand{\qvec}{\mathbf q}\) \(\newcommand{\svec}{\mathbf s}\) \(\newcommand{\tvec}{\mathbf t}\) \(\newcommand{\uvec}{\mathbf u}\) \(\newcommand{\vvec}{\mathbf v}\) \(\newcommand{\wvec}{\mathbf w}\) \(\newcommand{\xvec}{\mathbf x}\) \(\newcommand{\yvec}{\mathbf y}\) \(\newcommand{\zvec}{\mathbf z}\) \(\newcommand{\rvec}{\mathbf r}\) \(\newcommand{\mvec}{\mathbf m}\) \(\newcommand{\zerovec}{\mathbf 0}\) \(\newcommand{\onevec}{\mathbf 1}\) \(\newcommand{\real}{\mathbb R}\) \(\newcommand{\twovec}[2]{\left[\begin{array}{r}#1 \\ #2 \end{array}\right]}\) \(\newcommand{\ctwovec}[2]{\left[\begin{array}{c}#1 \\ #2 \end{array}\right]}\) \(\newcommand{\threevec}[3]{\left[\begin{array}{r}#1 \\ #2 \\ #3 \end{array}\right]}\) \(\newcommand{\cthreevec}[3]{\left[\begin{array}{c}#1 \\ #2 \\ #3 \end{array}\right]}\) \(\newcommand{\fourvec}[4]{\left[\begin{array}{r}#1 \\ #2 \\ #3 \\ #4 \end{array}\right]}\) \(\newcommand{\cfourvec}[4]{\left[\begin{array}{c}#1 \\ #2 \\ #3 \\ #4 \end{array}\right]}\) \(\newcommand{\fivevec}[5]{\left[\begin{array}{r}#1 \\ #2 \\ #3 \\ #4 \\ #5 \\ \end{array}\right]}\) \(\newcommand{\cfivevec}[5]{\left[\begin{array}{c}#1 \\ #2 \\ #3 \\ #4 \\ #5 \\ \end{array}\right]}\) \(\newcommand{\mattwo}[4]{\left[\begin{array}{rr}#1 \amp #2 \\ #3 \amp #4 \\ \end{array}\right]}\) \(\newcommand{\laspan}[1]{\text{Span}\{#1\}}\) \(\newcommand{\bcal}{\cal B}\) \(\newcommand{\ccal}{\cal C}\) \(\newcommand{\scal}{\cal S}\) \(\newcommand{\wcal}{\cal W}\) \(\newcommand{\ecal}{\cal E}\) \(\newcommand{\coords}[2]{\left\{#1\right\}_{#2}}\) \(\newcommand{\gray}[1]{\color{gray}{#1}}\) \(\newcommand{\lgray}[1]{\color{lightgray}{#1}}\) \(\newcommand{\rank}{\operatorname{rank}}\) \(\newcommand{\row}{\text{Row}}\) \(\newcommand{\col}{\text{Col}}\) \(\renewcommand{\row}{\text{Row}}\) \(\newcommand{\nul}{\text{Nul}}\) \(\newcommand{\var}{\text{Var}}\) \(\newcommand{\corr}{\text{corr}}\) \(\newcommand{\len}[1]{\left|#1\right|}\) \(\newcommand{\bbar}{\overline{\bvec}}\) \(\newcommand{\bhat}{\widehat{\bvec}}\) \(\newcommand{\bperp}{\bvec^\perp}\) \(\newcommand{\xhat}{\widehat{\xvec}}\) \(\newcommand{\vhat}{\widehat{\vvec}}\) \(\newcommand{\uhat}{\widehat{\uvec}}\) \(\newcommand{\what}{\widehat{\wvec}}\) \(\newcommand{\Sighat}{\widehat{\Sigma}}\) \(\newcommand{\lt}{<}\) \(\newcommand{\gt}{>}\) \(\newcommand{\amp}{&}\) \(\definecolor{fillinmathshade}{gray}{0.9}\)Intent Balance the costs and the benefits of tests by incrementally introducing just the tests you need at a given point in time.
Problem
When should you start to introduce tests? When can you stop?
This problem is difficult because:
-
In a reengineering project, you cannot afford to spend too much time for writing tests.
-
Legacy systems tend to be huge, so testing everything is impossible.
-
Legacy systems tend to be poorly-documented and poorly-understood.
-
The original developers may have left and the system maintainers may have only limited knowledge of the system’s inner workings.
Yet, solving this problem is feasible because:
-
We know where the fragile parts or the parts that we would like to change are.
-
We could convince programmers that they can benefit from tests.
Solution
Introduce tests incrementally for parts of the system you are working on.
Hints
-
Carefully assess your priorities and initially develop tests only for the most critical components. As you reengineer the system, introduce tests for the new features, parts of the legacy that may be affected, and any bugs you identify along the way.
-
Keep a snapshot of the old system handy so you can later introduce tests that should run against both the original system and its new incarnation.
-
Focus on business values. Start to write tests for the parts of your system that have the most important artifacts. Try to Record Business Rules as Tests.
-
If you have the history of bug fixes or problems, apply Test Old Bugs as a starting point.
-
If you have acceptable documentation and some original developers of the system at hand, consider applying Test Fuzzy Features.
-
Apply Test the Interface, Not the Implementation, start to test big abstractions and then refine tests if time allows. For example, if you have a pipeline architecture, start to write tests that ensure you that the output of the full pipeline is right given the right input. Then write tests for the individual pipeline components.
-
Black-box test parts (subsystems, classes, methods) that are likely to change their implementation in the future.
Tradeoffs
Pros
-
You save time by only developing the tests that you need.
-
You build up a base of the most critical tests as the project progresses.
-
You build confidence as you go along
-
You streamline future development and maintenance activities.
Cons
-
You may guess wrong which aspects are critical to test.
-
Tests can give you false confidence — untested bugs can still lurk in the system.
Difficulties
-
Setting-up the proper context for the tests may require considerable time and effort.
-
Identifying the boundaries of the components to test is just hard. Deciding which parts to test and how fine-grained these tests should be, requires a good understanding of the system and the way you intend to reengineer it.
Example
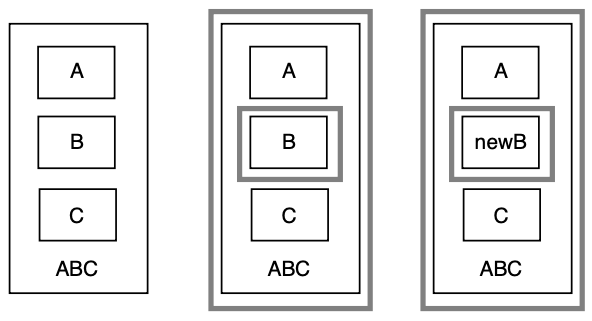
Initially introduce tests only for the subsystems and component you intend to change. In Figure \(\PageIndex{1}\) we introduce some tests for subsystem ABC and for its component B. We apply Test the Interface, Not the Implementation to ensure that the tests for B should also pass for newB.
Note that if we only introduce tests for component B, then we fail to test its integration with A and C. In any case, it may be that we fail to test all important aspects, so it is important to incrementally add new tests as bugs are detected and repaired.
Rationale
An incremental testing strategy allows you to start reengineering efforts before all the tests are in place. By focussing on just those tests that concern the parts of the system you are currently changing, you enable change with a minimal investment in testing, while help your team build confidence as you grow your tests base.
Related Patterns
Use a Testing Framework to organize your tests.
Test the Interface, Not the Implementation provides a strategy for developing tests at arbitrary granularities. Record Business Rules as Tests provides another strategy for testing components that implement business logic. Write Tests to Understand helps you prime a test base while you are still reverse engineering the system.