6.4: Use a Testing Framework
- Page ID
- 32396
Intent Encourage developers to write and use regression tests by providing a framework that makes it easy to develop, organize and run tests.
Problem
How do you encourage your team to adopt systematic testing?
This problem is difficult because:
-
Tests are boring to write.
-
Tests may require a considerable test data to be built up and torn down.
-
It may be hard to distinguish between test failures and unexpected errors.
Yet, solving this problem is feasible because:
-
Most tests follow the same basic pattern: create some test data, perform some actions, see if the results match your expectations, clean up the test data.
-
Very little infrastructure is needed to run tests and report failures and errors.
Solution
Use a testing framework that allows suites of tests to be composed from individual test cases.
Steps
Unit testing frameworks, like JUnit and SUnit [BG98], and various commercial test harness packages are available for most programming languages. If a suitable testing framework is not available for the programming language you are using, you can easily brew your own according to the following principles:
- The user must provide test cases that set up test data, exercise them, and make assertions about the results
- The testing framework should wrap test cases as tests which can distinguish between assertion failures and unexpected errors.
- The framework should provide only minimal feedback if tests succeed.
- Assertion failures should indicate precisely which test failed.
- Errors should result in more detailed feedback (such as a full stack trace).
- The framework should allow tests to be composed as test suites.
Tradeoffs
Pros
-
A testing framework simplifies the formulation of tests and encourages programmers to write tests and use them.
Cons
-
Testing requires commitment, discipline and support. You must convince your team of the need and benefits of disciplined testing, and you must integrate testing into your daily process. One way of supporting this discipline is to have one testing coach in your team; consider this when you Appoint a Navigator.
Example
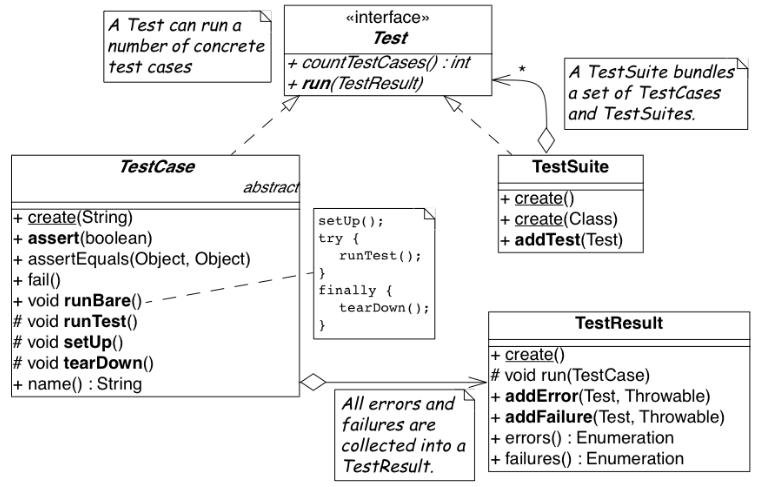
JUnit is a popular testing framework for Java, which considerable enhances the basic scheme described above. Figure \(\PageIndex{1}\) shows that the framework requires users to define their tests as subclasses of TestCase. Users must provide the methods setUp(), runTest() and tearDown(). The default implementation of setup() and tearDown() are empty, and the default implementation of runTest() looks for and runs a method which is the name of the test (given in the constructor). These user-supplied hook methods are then called by the runBare() template method.

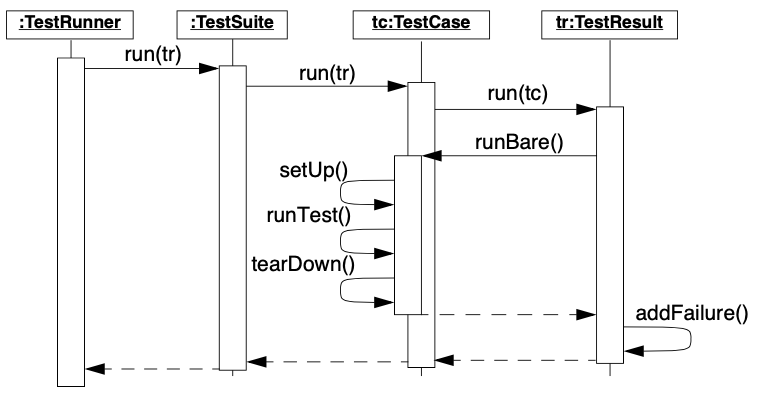
JUnit manages the reporting of failures and errors with the help of an additional TestResult class. In the design of JUnit, it is an instance of TestResult that actually runs the tests and logs errors or failures. In Figure \(\PageIndex{2}\) we see a scenario in which a TestCase, in its run method, passes control to an instance of TestResult, which in turn calls the runBare template method of the TestCase.

TestResult, which invokes the runBare template method of a TestCase. The user only needs to provide the setUp() and tearDown() methods, and the test method to be invoked by runTest().TestCase additionally provides a set of different kinds of standard assertion methods, such as assertEquals, assertFails, and so on. Each of these methods throws an AssertionFailedError, which can be distinguished from any other kind of exception.
In order to use the framework, we will typically define a new class, say TestHashtable, that bundles a set of test suites for a given class, Hashtable, that we would like to test. The test class should extend junit.framework.TestCase:
import junit.framework.*;
import java.util.Hashtable;

public class TestHashtable extends TestCase {
The instance variables of the test class will hold the fixture - the actual test data:
    private Hashtable boss;
    private String joe = "Joe";
    private String mary = "Mary";
    private String dave = "Dave";
    private String boris = "Boris";
There should be constructor that takes the name of a test case as its parameter. Its behavior is defined by its superclass:
    public TestHashtable(String name) {
        super(name);
    }
The setUp() hook method can be overridden to set up the fixture. If there is any cleanup activity to be performed, we should also override tearDown(). Their default implementations are empty.
    protected void setUp() {
        boss = new Hashtable();
    }
We can then define any number of test cases that make use of the fixture. Note that each test case is independent, and will have a fresh copy of the fixture. (In principle, we should design tests that not only exercise the entire interface, but the test data should cover both typical and boundary cases. The sample tests shown here are far from complete.)
Each test case should start with the characters “test":
    public void testEmpty() {
        assert(boss.isEmpty());
        assertEquals(boss.size(), 0);
        assert(!boss.contains(joe));
        assert(!boss.containsKey(joe));
    }

    public void testBasics() {
        boss.put(joe, mary);
        boss.put(mary, dave);
        boss.put(boris, dave);
        assert(!boss.isEmpty());
        assertEquals(boss.size(), 3);
        assert(boss.contains(mary));
        assert(!boss.contains(joe));
        assert(boss.containsKey(mary));
        assert(!boss.containsKey(dave));
        assertEquals(boss.get(joe), mary);
        assertEquals(boss.get(mary), dave);
        assertEquals(boss.get(dave), null);
    }
You may provide a static method suite() which will build an instance of junit.framework.TestSuite from the test cases defined by this class:
    public static TestSuite suite() {
        TestSuite suite = new TestSuite();
        suite.addTest(new TestHashtable("testBasics"));
        suite.addTest(new TestHashtable("testEmpty"));
        return suite;
    }
}
The test case class should be compiled, together with any class it depends on.
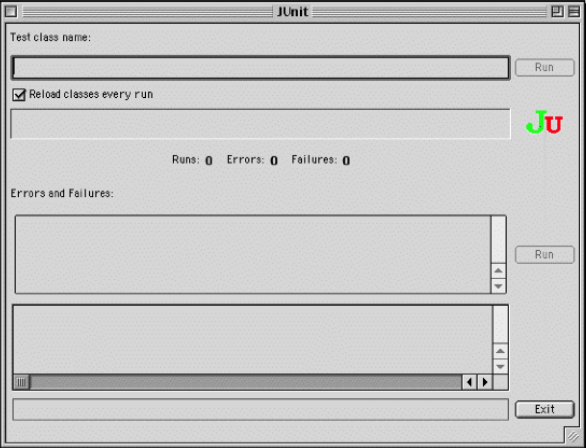
To run the tests, we can start up any one of a number of test runner classes provided by the JUnit framework, for instance junit.ui.TestRunner (see Figure \(\PageIndex{3}\)).
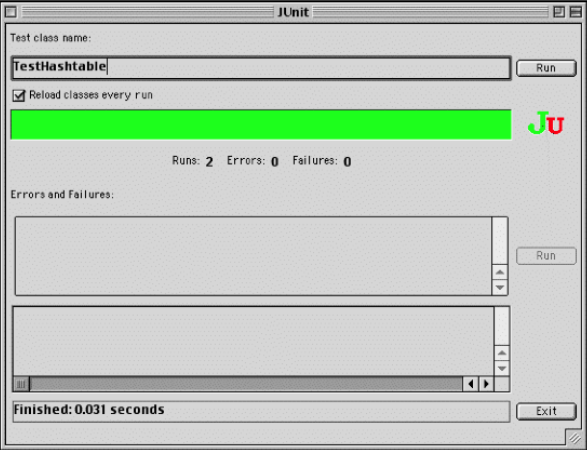
This particular test runner expects you to type in the name of the test class. You may then run the tests defined by this class. The test runner will look for the suite method and use it to build an instance of TestSuite. If you do not provide a static suite method, the test runner will automatically build a test suite assuming that all the methods named test* are test cases. The test runner then runs the resulting test suite. The interface will report how many tests succeeded (see Figure \(\PageIndex{4}\)). A successful test run will show a green display. If any individual test fails, the display will be red, and details of the test case leading to the failure will be given.

java.ui.TestRunner.
Rationale
A testing framework makes it easier to organize and run tests.
Hierarchically organizing tests makes it easier to run just the tests that concern the part of the system you are working on.
Known Uses
Testing frameworks exist for a vast number of languages, including Ada, ANT, C, C++, Delphi, .Net (all languages), Eiffel, Forte 4GL, GemStone/S, Jade, JUnit Java, JavaScript, k language (ksql, from kbd), Objective C, Open Road (CA), Oracle, PalmUnit, Perl, PhpUnit, PowerBuilder, Python, Rebol, ‘Ruby, Smalltalk, Visual Objects and UVisual Basic.
Beck and Gamma give a good overview in the context of JUnit [BG98].


