10.5: Factor out Strategy
- Page ID
- 32425
\( \newcommand{\vecs}[1]{\overset { \scriptstyle \rightharpoonup} {\mathbf{#1}} } \)
\( \newcommand{\vecd}[1]{\overset{-\!-\!\rightharpoonup}{\vphantom{a}\smash {#1}}} \)
\( \newcommand{\dsum}{\displaystyle\sum\limits} \)
\( \newcommand{\dint}{\displaystyle\int\limits} \)
\( \newcommand{\dlim}{\displaystyle\lim\limits} \)
\( \newcommand{\id}{\mathrm{id}}\) \( \newcommand{\Span}{\mathrm{span}}\)
( \newcommand{\kernel}{\mathrm{null}\,}\) \( \newcommand{\range}{\mathrm{range}\,}\)
\( \newcommand{\RealPart}{\mathrm{Re}}\) \( \newcommand{\ImaginaryPart}{\mathrm{Im}}\)
\( \newcommand{\Argument}{\mathrm{Arg}}\) \( \newcommand{\norm}[1]{\| #1 \|}\)
\( \newcommand{\inner}[2]{\langle #1, #2 \rangle}\)
\( \newcommand{\Span}{\mathrm{span}}\)
\( \newcommand{\id}{\mathrm{id}}\)
\( \newcommand{\Span}{\mathrm{span}}\)
\( \newcommand{\kernel}{\mathrm{null}\,}\)
\( \newcommand{\range}{\mathrm{range}\,}\)
\( \newcommand{\RealPart}{\mathrm{Re}}\)
\( \newcommand{\ImaginaryPart}{\mathrm{Im}}\)
\( \newcommand{\Argument}{\mathrm{Arg}}\)
\( \newcommand{\norm}[1]{\| #1 \|}\)
\( \newcommand{\inner}[2]{\langle #1, #2 \rangle}\)
\( \newcommand{\Span}{\mathrm{span}}\) \( \newcommand{\AA}{\unicode[.8,0]{x212B}}\)
\( \newcommand{\vectorA}[1]{\vec{#1}} % arrow\)
\( \newcommand{\vectorAt}[1]{\vec{\text{#1}}} % arrow\)
\( \newcommand{\vectorB}[1]{\overset { \scriptstyle \rightharpoonup} {\mathbf{#1}} } \)
\( \newcommand{\vectorC}[1]{\textbf{#1}} \)
\( \newcommand{\vectorD}[1]{\overrightarrow{#1}} \)
\( \newcommand{\vectorDt}[1]{\overrightarrow{\text{#1}}} \)
\( \newcommand{\vectE}[1]{\overset{-\!-\!\rightharpoonup}{\vphantom{a}\smash{\mathbf {#1}}}} \)
\( \newcommand{\vecs}[1]{\overset { \scriptstyle \rightharpoonup} {\mathbf{#1}} } \)
\( \newcommand{\vecd}[1]{\overset{-\!-\!\rightharpoonup}{\vphantom{a}\smash {#1}}} \)
\(\newcommand{\avec}{\mathbf a}\) \(\newcommand{\bvec}{\mathbf b}\) \(\newcommand{\cvec}{\mathbf c}\) \(\newcommand{\dvec}{\mathbf d}\) \(\newcommand{\dtil}{\widetilde{\mathbf d}}\) \(\newcommand{\evec}{\mathbf e}\) \(\newcommand{\fvec}{\mathbf f}\) \(\newcommand{\nvec}{\mathbf n}\) \(\newcommand{\pvec}{\mathbf p}\) \(\newcommand{\qvec}{\mathbf q}\) \(\newcommand{\svec}{\mathbf s}\) \(\newcommand{\tvec}{\mathbf t}\) \(\newcommand{\uvec}{\mathbf u}\) \(\newcommand{\vvec}{\mathbf v}\) \(\newcommand{\wvec}{\mathbf w}\) \(\newcommand{\xvec}{\mathbf x}\) \(\newcommand{\yvec}{\mathbf y}\) \(\newcommand{\zvec}{\mathbf z}\) \(\newcommand{\rvec}{\mathbf r}\) \(\newcommand{\mvec}{\mathbf m}\) \(\newcommand{\zerovec}{\mathbf 0}\) \(\newcommand{\onevec}{\mathbf 1}\) \(\newcommand{\real}{\mathbb R}\) \(\newcommand{\twovec}[2]{\left[\begin{array}{r}#1 \\ #2 \end{array}\right]}\) \(\newcommand{\ctwovec}[2]{\left[\begin{array}{c}#1 \\ #2 \end{array}\right]}\) \(\newcommand{\threevec}[3]{\left[\begin{array}{r}#1 \\ #2 \\ #3 \end{array}\right]}\) \(\newcommand{\cthreevec}[3]{\left[\begin{array}{c}#1 \\ #2 \\ #3 \end{array}\right]}\) \(\newcommand{\fourvec}[4]{\left[\begin{array}{r}#1 \\ #2 \\ #3 \\ #4 \end{array}\right]}\) \(\newcommand{\cfourvec}[4]{\left[\begin{array}{c}#1 \\ #2 \\ #3 \\ #4 \end{array}\right]}\) \(\newcommand{\fivevec}[5]{\left[\begin{array}{r}#1 \\ #2 \\ #3 \\ #4 \\ #5 \\ \end{array}\right]}\) \(\newcommand{\cfivevec}[5]{\left[\begin{array}{c}#1 \\ #2 \\ #3 \\ #4 \\ #5 \\ \end{array}\right]}\) \(\newcommand{\mattwo}[4]{\left[\begin{array}{rr}#1 \amp #2 \\ #3 \amp #4 \\ \end{array}\right]}\) \(\newcommand{\laspan}[1]{\text{Span}\{#1\}}\) \(\newcommand{\bcal}{\cal B}\) \(\newcommand{\ccal}{\cal C}\) \(\newcommand{\scal}{\cal S}\) \(\newcommand{\wcal}{\cal W}\) \(\newcommand{\ecal}{\cal E}\) \(\newcommand{\coords}[2]{\left\{#1\right\}_{#2}}\) \(\newcommand{\gray}[1]{\color{gray}{#1}}\) \(\newcommand{\lgray}[1]{\color{lightgray}{#1}}\) \(\newcommand{\rank}{\operatorname{rank}}\) \(\newcommand{\row}{\text{Row}}\) \(\newcommand{\col}{\text{Col}}\) \(\renewcommand{\row}{\text{Row}}\) \(\newcommand{\nul}{\text{Nul}}\) \(\newcommand{\var}{\text{Var}}\) \(\newcommand{\corr}{\text{corr}}\) \(\newcommand{\len}[1]{\left|#1\right|}\) \(\newcommand{\bbar}{\overline{\bvec}}\) \(\newcommand{\bhat}{\widehat{\bvec}}\) \(\newcommand{\bperp}{\bvec^\perp}\) \(\newcommand{\xhat}{\widehat{\xvec}}\) \(\newcommand{\vhat}{\widehat{\vvec}}\) \(\newcommand{\uhat}{\widehat{\uvec}}\) \(\newcommand{\what}{\widehat{\wvec}}\) \(\newcommand{\Sighat}{\widehat{\Sigma}}\) \(\newcommand{\lt}{<}\) \(\newcommand{\gt}{>}\) \(\newcommand{\amp}{&}\) \(\definecolor{fillinmathshade}{gray}{0.9}\)Intent Eliminate conditional code that selects a suitable algorithm by applying the Strategy design pattern.
Problem
How do you make a class whose behavior depends on testing the value of some variable more extensible?
This problem is difficult because:
- New functionality cannot be added without modifying all the methods containing the conditional code.
- The conditional code may be spread over several classes which make similar decisions about which algorithm to apply.
Yet, solving this problem is feasible because:
- The alternative behaviors are essentially interchangeable.
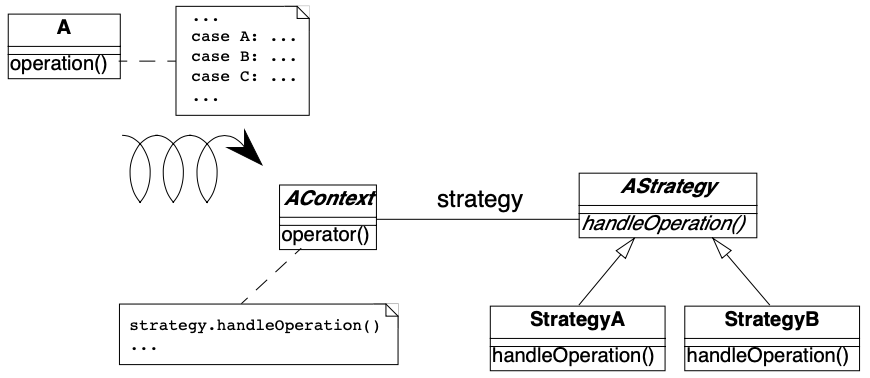
Solution
Apply the Strategy pattern, i.e., encapsulate the algorithmic dependent behavior into separate objects with polymorphic interfaces and delegate calls to these objects (see Figure \(\PageIndex{1}\)).
Steps
- Identify the interface of the strategy class.
- Create a new abstract class,
Strategy, representing the interface of the strategies. - Create a new class subclass of
Strategyfor each identified algorithms. - Define methods of the interface identified in Step 1 in each of the strategy classes by copying the corresponding code of the test to the method.
- Add a new instance variable in the
Contextclass to refer to the current strategy. - You may have to have a reference from the
Strategyto theContextclass to provide access to the information maintained by theContext(See difficulties). - Initialize the newly created instance to refer to a default strategy instance.
- Change the methods of the
Contextclass containing the tests by eliminating the tests and delegating the call to the instance variable.
Step 4 can be performed using the Extract Method operation of the Refactoring Browser. Note that after each step, the regression tests should still run. The critical step is the last one, in which behavior is delegated to the new Strategy objects.
Tradeoffs
Pros
- Limited Impact. The public interface of the original class does not have to change. Since the
Strategyinstances are accessed by delegation from the original object, the clients are unaffected. In a straight-forward case the application of this pattern has a limited impact on the clients. However, theContextinterface will be reduced because all the previously implemented algorithms are now moved toStrategyclasses. So you have to check the invocations of these methods and decide on a per case base. - After applying this pattern, you will be able to plug new strategies without impacting modifying the interface of the
Context. Adding a new strategy does not require to recompile theContextclass and its clients. - After applying this pattern, the interface of the
Contextclass and theStrategyclasses will be clearer.
Cons
- The systematic application of this pattern may lead to a class explosion. If you have 20 different algorithms you may not want to have 20 new classes each with only one method.
- Object explosion. Strategies increase the number of instances in an application.
Difficulties
- There are several ways to share information between the
Contextand theStrategyobjects, and the tradeoffs can be subtle. The information can be passed as argument when theStrategymethod is invoked, theContextobject itself can be passed as argument, or theStrategyobjects can hold a reference to their context. If the relationship between theContextand theStrategyis highly dynamic, then it may be preferable to pass this information as a method argument. More detailed discussions of this issue exist in the literature on the Strategy pattern [GHJV95] [ABW98].
Example
The Design Patterns Smalltalk Companion [ABW98] presents a step-by-step code transformation.
Related Patterns
The symptoms and structure of Factor out Strategy bear comparison with Factor out State. The main difference consists in the fact that the Factor out State identifies behavior with different possible states of objects whereas Factor out Strategy is concerned with interchangeable algorithms that are independent of object state. Factor out Strategy allows one to add new strategies without impacting the existing strategy objects.


