Engineering LibreTexts

6.2: IDE

  • Page ID
    25712
  • \( \newcommand{\vecs}[1]{\overset { \scriptstyle \rightharpoonup} {\mathbf{#1}} } \) \( \newcommand{\vecd}[1]{\overset{-\!-\!\rightharpoonup}{\vphantom{a}\smash {#1}}} \)\(\newcommand{\id}{\mathrm{id}}\) \( \newcommand{\Span}{\mathrm{span}}\) \( \newcommand{\kernel}{\mathrm{null}\,}\) \( \newcommand{\range}{\mathrm{range}\,}\) \( \newcommand{\RealPart}{\mathrm{Re}}\) \( \newcommand{\ImaginaryPart}{\mathrm{Im}}\) \( \newcommand{\Argument}{\mathrm{Arg}}\) \( \newcommand{\norm}[1]{\| #1 \|}\) \( \newcommand{\inner}[2]{\langle #1, #2 \rangle}\) \( \newcommand{\Span}{\mathrm{span}}\) \(\newcommand{\id}{\mathrm{id}}\) \( \newcommand{\Span}{\mathrm{span}}\) \( \newcommand{\kernel}{\mathrm{null}\,}\) \( \newcommand{\range}{\mathrm{range}\,}\) \( \newcommand{\RealPart}{\mathrm{Re}}\) \( \newcommand{\ImaginaryPart}{\mathrm{Im}}\) \( \newcommand{\Argument}{\mathrm{Arg}}\) \( \newcommand{\norm}[1]{\| #1 \|}\) \( \newcommand{\inner}[2]{\langle #1, #2 \rangle}\) \( \newcommand{\Span}{\mathrm{span}}\)\(\newcommand{\AA}{\unicode[.8,0]{x212B}}\)

    Once the board is installed, it’s time to open the Arduino IDE. It is fairly simple when compared to larger desktop C language development systems.


    clipboard_e1410307ef2c2911ef81659c629485adf.png

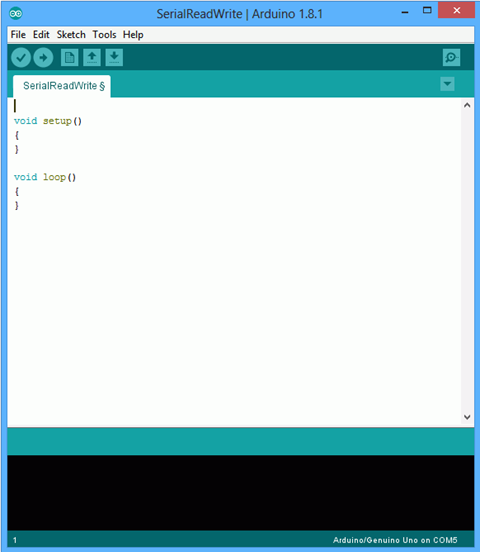
    Figure \(\PageIndex{1}\)

    You will see a single edit space with the usual cut-paste-copy facilities. The black area below the edit space is for messages from the compiler/downloader. That is, this is where compiler errors will show up along with status messages. The File and Edit menu content are fairly typical. The Tools menu is particularly important.

    clipboard_ebbc340c87ed833ac120b91c51e3e34da.png

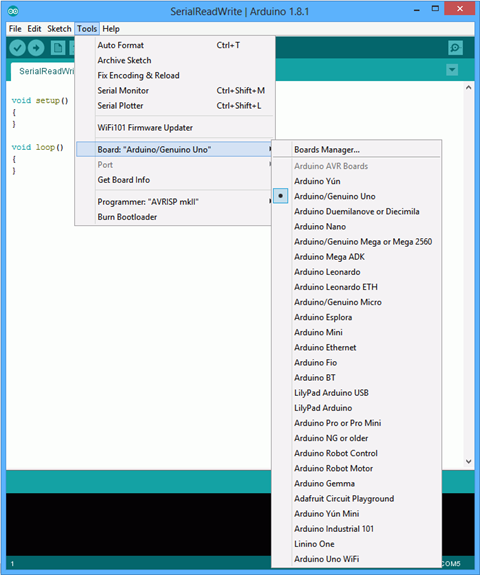
    Figure \(\PageIndex{2}\)

    The two most important items here are Board (from which you select your particular board) and Serial Port (from which you select the COM port to which your board is connected). Failure to set these correctly will result in unsuccessful programming of your board. Note that the current board and COM port selections are printed at the lower right corner of the IDE window.

    There is a simple toolbar below the menus. The first item (checkmark) is called “Verify” and compiles your code. The second item (right arrow) downloads the code to the target board. The other items open and save files.


    This page titled 6.2: IDE is shared under a CC BY-NC-SA 4.0 license and was authored, remixed, and/or curated by James M. Fiore via source content that was edited to the style and standards of the LibreTexts platform; a detailed edit history is available upon request.