
1.4.2 Instruction Cycles - Instruction Primer
- Page ID
- 45614

How Instructions Work
On the previous page we showed how the fetched instruction is loaded into the instruction register (IR). The instruction contains bits that specify the action the processor is to take. The processor will read the instruction and performs the necessary action. In general, these actions fall into four categories:
-
Processor - memory: Data may be transferred from processor to memory, or from memory to processor.
-
Processor - I/O: Data may be transferred to or from a peripheral device by transferring between the processor and the system's I/O module.
-
Data processing: The processor may perform some arithmetic or logic operation on data, such as addition or comparisons.
-
Control: An instruction may specify that the sequence of execution be altered. For example, the processor may fetch an instruction from location 149, which specifies that the next instruction be from location 182. The processor sets the program counter to 182. Thus, on the next fetch stage, the instruction will be fetched from location 182 rather than 150.
It is not the intent of this course to cover assembly language programming, or the concepts taught there. However, in order to provide an example the following details are provided.
In this simplistic example, both the instructions and data are 16 bits long. The instructions have to following format:

The opcode is a numerical representation of the instruction to be performed, instructions such as mathematical or logic operations. The opcode tells the processor what it needs to do. The second part of the instructions tells the processor WHERE to find the data that is being operated on. (we will see more specifically how this works in a moment).

When reading data from a memory location the first bit is a sign bit, and the other 15 bits are for the actual data.
In our example, we include an Accumulator (AC) which will be used as a temporary storage location for the data.
There will be 3 opcodes - PLEASE understand these are sample opcode for this example...do NOT confuse these with actual processor opcodes.
- 0001 - this opcode tells the processor to load the accumulator (AC) from the given memory address.
- 0011 - this opcode tells the processor to add to the value currently stored in the AC from the specified memory address.
- 0111 - this opcode tells the processor to move the value in the AC to the specified memory address.
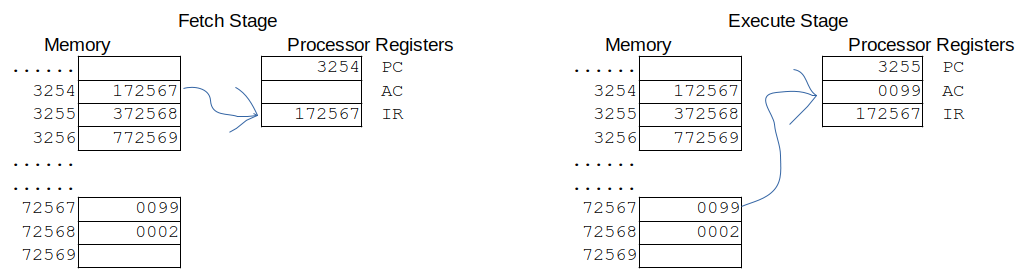
- At the beginning the PC contains 3254, which is the memory address of the next instruction to be executed. In this example we have skipped the micro-steps, showing the IR receiving the value at the specified address.
- The instruction at address 3254 is 172567. Remember from above - the first 4 bits are the opcode, in this case it is the number 1 (0001 in binary).
- This opcode tells the processor to load the AC from the memory address located in the last 12 bits of the instruction - 72567.
- Go to address 72567 and load that value, 0099, into the accumulator.
ALSO NOTICE - the PC has been incremented by 1, so it now points to the next instruction in memory.
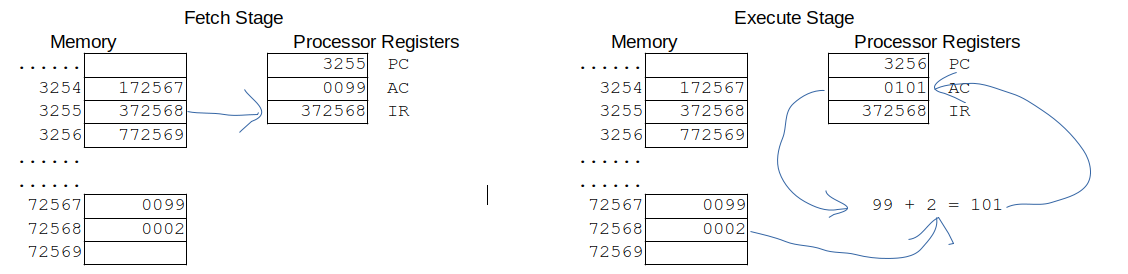
Figure \(\PageIndex{4}\): Second Cylce ("Second Cycle" by Patrick McClanahan is licensed under CC BY-SA 4.0)
- Again - we start with the PC - and move the contents found at the memory address, 3255, into the IR.
- The instruction in the IR has an opcode of 3 (0011 in binary).
- This opcode in our example tells the processor to add the value currently stored in the AC, 0099, to the value stored at the given memory address, 72568, which is the value 2.
- This value, 101, is stored back into the AC.
AGAIN, the PC has been incremented by one as well.

- The PC points to 3256, the value 772569 is moved to the IR.
- This instruction has an opcode of 7 (0111 in binary)
- This opcode tells the processor to move the value in the AC, 101, to the specified memory address, 72569.
The PC has again been incremented by one - and when our simple 3 instructions are completed, whatever instruction was at that address would be executed.