

4.5: Equivalent Point Load
- Page ID
- 102539

\( \newcommand{\vecs}[1]{\overset { \scriptstyle \rightharpoonup} {\mathbf{#1}} } \)
\( \newcommand{\vecd}[1]{\overset{-\!-\!\rightharpoonup}{\vphantom{a}\smash {#1}}} \)
\( \newcommand{\dsum}{\displaystyle\sum\limits} \)
\( \newcommand{\dint}{\displaystyle\int\limits} \)
\( \newcommand{\dlim}{\displaystyle\lim\limits} \)
\( \newcommand{\id}{\mathrm{id}}\) \( \newcommand{\Span}{\mathrm{span}}\)
( \newcommand{\kernel}{\mathrm{null}\,}\) \( \newcommand{\range}{\mathrm{range}\,}\)
\( \newcommand{\RealPart}{\mathrm{Re}}\) \( \newcommand{\ImaginaryPart}{\mathrm{Im}}\)
\( \newcommand{\Argument}{\mathrm{Arg}}\) \( \newcommand{\norm}[1]{\| #1 \|}\)
\( \newcommand{\inner}[2]{\langle #1, #2 \rangle}\)
\( \newcommand{\Span}{\mathrm{span}}\)
\( \newcommand{\id}{\mathrm{id}}\)
\( \newcommand{\Span}{\mathrm{span}}\)
\( \newcommand{\kernel}{\mathrm{null}\,}\)
\( \newcommand{\range}{\mathrm{range}\,}\)
\( \newcommand{\RealPart}{\mathrm{Re}}\)
\( \newcommand{\ImaginaryPart}{\mathrm{Im}}\)
\( \newcommand{\Argument}{\mathrm{Arg}}\)
\( \newcommand{\norm}[1]{\| #1 \|}\)
\( \newcommand{\inner}[2]{\langle #1, #2 \rangle}\)
\( \newcommand{\Span}{\mathrm{span}}\) \( \newcommand{\AA}{\unicode[.8,0]{x212B}}\)
\( \newcommand{\vectorA}[1]{\vec{#1}} % arrow\)
\( \newcommand{\vectorAt}[1]{\vec{\text{#1}}} % arrow\)
\( \newcommand{\vectorB}[1]{\overset { \scriptstyle \rightharpoonup} {\mathbf{#1}} } \)
\( \newcommand{\vectorC}[1]{\textbf{#1}} \)
\( \newcommand{\vectorD}[1]{\overrightarrow{#1}} \)
\( \newcommand{\vectorDt}[1]{\overrightarrow{\text{#1}}} \)
\( \newcommand{\vectE}[1]{\overset{-\!-\!\rightharpoonup}{\vphantom{a}\smash{\mathbf {#1}}}} \)
\( \newcommand{\vecs}[1]{\overset { \scriptstyle \rightharpoonup} {\mathbf{#1}} } \)
\(\newcommand{\longvect}{\overrightarrow}\)
\( \newcommand{\vecd}[1]{\overset{-\!-\!\rightharpoonup}{\vphantom{a}\smash {#1}}} \)
\(\newcommand{\ket}[1]{\left| #1 \right>}\)
\(\newcommand{\bra}[1]{\left< #1 \right|}\)
\(\newcommand{\braket}[2]{\left< #1 \vphantom{#2} \right| \left. #2 \vphantom{#1} \right>}\)
\(\newcommand{\braopket}[3]{\left< #1 \vphantom{#2}\vphantom{#3} \right| #2 \vphantom{#1}\vphantom{#3} \left| #3 \vphantom{#1}\vphantom{#2} \right>}\)
\(\newcommand{\qmvec}[1]{\mathbf{\vec{#1}}}\)
\(\newcommand{\op}[1]{\hat{\mathbf{#1}}}\)
\(\newcommand{\expect}[1]{\langle #1 \rangle}\)
\(\newcommand{\dfn}[1]{\emph{\textbf{#1}}}\)
An equivalent point load is a single point force that will have the same effect on a body as the original loading condition, which is usually a distributed force. The equivalent point load should always cause the same linear acceleration and angular acceleration as the original force it is equivalent to (or cause the same reaction forces if the body is constrained). Finding the equivalent point load for a distributed force often helps simplify the analysis of a system by removing the integrals from the equations of equilibrium or equations of motion in later analysis.
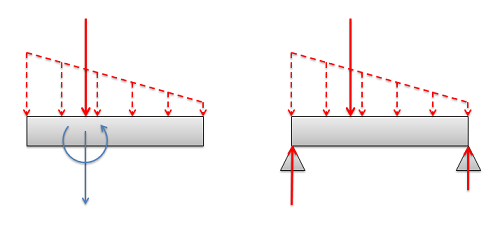
Finding the Equivalent Point Load
When finding the equivalent point load, we need to find the magnitude, direction, and point of application of a single force that is equivalent to the distributed force we are given. In this course we will only deal with distributed forces with a uniform direction, in which case the direction of the equivalent point load will match the uniform direction of the distributed force. This leaves the magnitude and the point of application to be found. There are two options available to find these values:
- We can find the magnitude and the point of application of the equivalent point load via integration of the force functions.
- We can use the area/volume and the centroid/center of volume of the area or volume under the force function.
The first method is more flexible, allowing us to find the equivalent point load for any force function that we can make a mathematical formula for (assuming we have the skill in calculus to integrate that function). The second method is usually faster, assuming that we can look up the values for the area or volume under the force curve and the values for the centroid or center of volume for the area under the curve. In this course, we will use the second method.
Using the Area and Centroid in 2D Surface Force Problems:
As an alternative to using integration, we can use the area under the force curve and the centroid of the area under the force curve to find the equivalent point load's magnitude and point of application respectively.
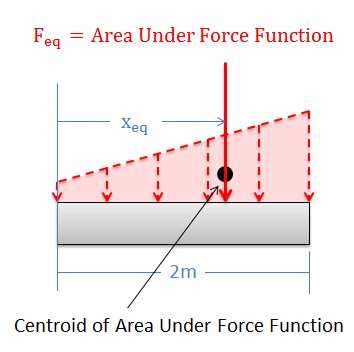
The magnitude \((F_{eq})\) of the equivalent point load will be equal to the area under the force function. We can find this area using calculus, but there are often easier geometry-based ways of finding the area under the force function.
The equivalent point load will also travel through centroid of the area under the force function. This allows us to find the value for \(x_{eq}\). The centroid for many common shapes can be looked up in tables, and the parallel axis theorem can be used to determine the centroid of more complex shapes (see the Appendix page on centroids for more details).
Using Volume and Center of Volume in 3D Surface Force Problems:
Just as in the 2D problems, there are some available shortcuts to finding the equivalent point load in 3D surface force problems. For a force spread over an area, the magnitude \((F_{eq})\) of the equivalent point load will be equal to the volume under the force function. The equivalent point load will also travel through the center of volume of the volume under the force function. This should allow you to determine both \(x_{eq}\) and \(y_{eq}\).
The center of volume for a shape will be the same as the center of mass for a shape if the shape is assumed to have uniform density. It should be possible to look these values up for common shapes in a table. Again, the parallel axis theorem can be used to find the center of volume for more complex shapes (See the Center of Mass page in Appendix 2 for more details).
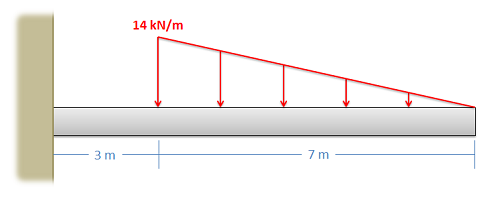
Determine the magnitude and the point of application for the equivalent point load of the distributed force shown below.
- Solution
-
Video \(\PageIndex{2}\): Worked solution to example problem \(\PageIndex{1}\), provided by Dr. Jacob Moore. YouTube source: https://youtu.be/h_E0XjIJaiI. Video Transcript 2
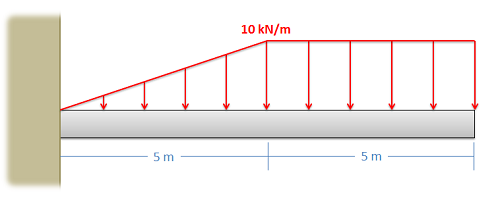
Determine the magnitude and the point of application for the equivalent point load of the distributed force shown below.
- Solution
-
Video \(\PageIndex{2}\): Worked solution to example problem \(\PageIndex{2}\), provided by Dr. Jacob Moore. YouTube source: https://youtu.be/UbnfNAQctyg. Video Transcript 3