
5: Commands
- Page ID
- 89348
Introduction
Commands will serve as tools that complete defined tasks within a MATLAB code. Often represented as puzzle pieces in introductory programming guides, commands enable the code to interact with the user, finish tasks in response to user inputs, or serve as a road map within the code. By piecing together commands with instructions a “map” will be created which enables the code to complete the user’s desired operation. This chapter will introduce several functions which will be prevalent within ME 160 and will drastically expand the number of applications for MATLAB.
The Display Command (disp)
The display command (typed “disp”) allows the user to instruct the program to display a message in the command window. The display command is an excellent way to give instructions or other information in the command window for the user of the code. This can include instructions about the code’s function that appear when the user runs the code, greetings for the user, error messages, or conclusions determined by the code.
The display command appears in the following format in MATLAB. To use the display command, type disp followed by a set of parentheses with single quotations inside of them. Everything else in the quotations will be displayed in the command window by the program.
disp (‘Message Here.’)
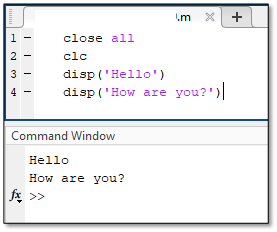 Note that the message being displayed cannot contain apostrophes, as the code will stop reading the message there. Additionally, it is important to understand that this command is not the best way to prompt users to input data or other information into the code, as the input command is best suited for that function.
The Input Command (input)
The input function, typed input, operates as a way for the user to assign a value to a variable. With the input command, the user can have MATLAB provide a prompt in the command window. The user is then able to respond to the prompt by entering in their input directly after the prompt in the command window. An example of the input command is to the right. The user would type their response where the yellow box is next to the prompt. Note that the variable x will be assigned the user input for the remainder of the code unless another function reassigns its value.
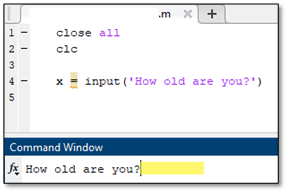
 To improve the appearance of this function the user can add \n to the command, which will cause everything following the symbol to appear in the next line. If added to the end of the display command, as shown in the second example, the prompt to type an input appears in the line below the text in the command window and not next to the text, as indicated by the yellow box in the image. This is an easy way to improve the appearance and usability of a code, which will ensure data is properly input and that the user easily operates the code.
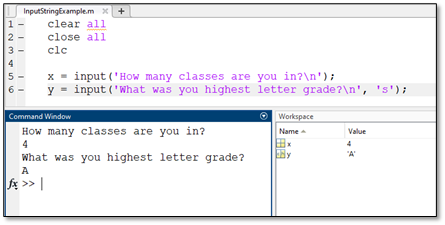
The method of using the input command introduced is designed for inputs that are strictly numeric. There are many applications where the user would like to input a value that is not a number and instead is letters or words. Many programming languages refer to a series of characters that consist of letters as “strings”. MATLAB follows this convention and has modifications to the input command for string inputs. The example below shows that the input command can receive strings by modifying the end of the command with ‘s’ after a comma after the standard input prompt. Several examples in the MATLAB script shown below compares numeric and string inputs.
>> example = input(‘Prompt typed here’, ‘s’)
The fprintf Command
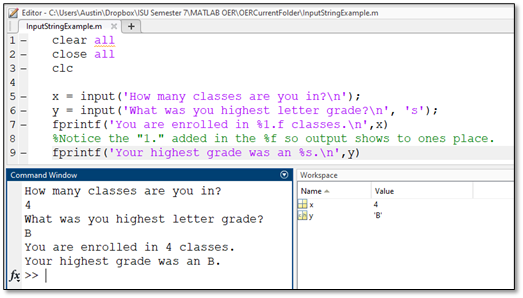
The disp and input functions enable the user to display information and input information into the code. However, these functions will be insufficient if the user wants to output information that changes based on inputs or other values in a script. As an example, let’s say a code was written to find the square of user input. The code may use a display function to inform the user of the code’s function and an input function to prompt the user to input a value. However, since the output changes depending on the input, a display value is unable to update to show this calculated output. The function fprintf is designed to display the value assigned to a variable inside of a text output message. The format for the fprintf is as follows:
>>fprintf ('Text text text %f text text text %f text text text %f \n',x,y,z)
Place a “%f” in each location where the value assigned to a variable should be displayed amongst a fixed message. The values of each variable input by the user are listed at the end of the function in a list separated by commas. Note that the included example is with three variables that happen to be named x, y, and z, respectively. fprintf follows the same format as the example when different numbers of variables are present.
The following example demonstrates input, and fprintf functions used together to provide the user instructions, allow the user to input data, and to output the processed data in a text message.
clc
clear
a=input('insert a: ');
b=input('insert b: ');
p=a*b;
n=a/b;
fprintf('%f multiplied by %f is %f \n and \n %f divided by %f is %f \n', a,b,p,a,b,n)
When using fprintf, the %f placeholder in the text output is specific to numeric variables. This means that it can only output numeric values. Alternative placeholders exist for different types of outputs that the user desires. The most common alternative to %f that may be encountered is %s, which outputs a string variable. String variables, as introduced previously, are letters or phrases assigned to a variable. Using %s allows users to output specific words within the defined output message. This is shown in the following example. Alternative placeholders can be viewed within the fprintf documentation on the MathWorks webpage that allows customization of everything from the decimal length in output to scientific notation to integer outputs.
| Common Placeholder in fprintf | Usage |
| %f | Fixed point output (Most commonly used placeholder) |
| %s | Outputs a series of characters or a string |
| %i | Outputs an integer |
| %e or %E | Scientific notation with “e” displayed as a lowercase or uppercase, respectively |
| %g | Fixed point output (like %f) without trailing zeros. |
Modification of the %f operator can allow the user to control the precision of the output number. By default, the output number will include a large series of zeros at the end, which can be visually distracting and incorrect if that level of precision is not actually known.
Rounding
MATLAB has functions developed to round integers or array values within a code. The following functions are useful for rounding with standard rounding conventions, rounding to the floor, and rounding to the ceiling. These functions operate by modifying a variable and creating a new rounded variable. The following example shows how to round some variable a conventionally, to the floor, and to the ceiling and create a variable, b.
b = round(a)
b = floor(a)
b = ceiling(a)
if Statements
if statements enable you to write code that will only be executed if predetermined conditions are met. A real-world comparison can be made with shopping. When you go shopping you only will purchase an item if it below a certain price. In other words, IF the item is below a price, you will buy it. Otherwise, you will not buy it and proceed to get something else. This example demonstrates the general format of an If statement.
If condition is true
first result occurs
Else second result occurs
End
When applied to the shopping example:
If orange juice is below a specified price
Purchase orange juice
Else purchase milk.
End
In this example, if the initial condition is true, then the first result will occur. When the initial condition is false, then the code will skip over instructions nested under the “if” statement and will execute instructions nested under the “else” statement. The “end” denotes the end of the if statement. Every “if” statement you write must have an “end” command.
When more than two options are required for a code the “if” and “else” structure can be modified to also include “elseif” options. “elseif” functions as an additional option that can be executed after the “if” and before the “else”, which is always the last option. The user can have as many “elseif” elements within an if statement as required. An example expanding on the grocery example using multiple “elseif” elements is shown below.
If orange juice costs less than 1 dollar
Purchase 3 cartons of orange juice
Elseif Orange juice costs between 1 dollar and 1.50 dollars
Purchase 2 carton of orange juice
Elseif orange juice costs between 1.50 and 2 dollars
Purchase one carton of orange juice
Else purchase milk.
End
Switch Statements
for Loops
When coding in MATLAB, you will encounter situations where you want to execute a command when specific conditions are true. For example, if a code is to repeat an operation a, it would use the conditional statement known as a for loop. The structure of a for loop is provided below. This example runs the code included under the for line repeatedly for x = 1 through x = n. After the code is ran for n iterations the code goes after the end line and runs the remainder of the code.
for x = 1:n
Task here. This could be a mathematical operation, for example.
end
The following is an example of a for loop that is being used to sum all prime numbers between 1 and 1000. This code includes the use of the “isprime” function, which checks if the input (in this case k is prime). The for loop cycles every number between 1 and 999 through the isprime function, which will proceed to add together only the numbers that are prime. The isprime function will not be included in the scope of ME 160, but I am including it as a supplementary piece of information which may benefit you as you write codes.
Notice how the code starts with a variable called “total” which initially is assigned the value of zero. As the for loop runs over and over the value for total is over written by the value of total in the previous iteration summed with any new prime number that is found in the current iteration.
Another example of a for loop is included below. This code uses a series of integers that are stored in an array named m. The dimension of the matrix is determined by using the “size” command. This creates another array that lists the number of rows and columns, respectively in a matrix or array. The second value in this size array is pulled out, informing us of the number of columns (and quantity of numbers) present. The objective of the code is to sort through the array and decrease all odd numbers by one so that every value ends up being positive. Two images are included, one with just the MATLAB script and another with comments added walking through the code.
Include section on nesting for loops and show pseudo code and real code examples of this. Show 3d plot using this.
The next example shows two for loops that are nested within each other. This means that for every time the outer for loop runs once, the inner loop runs its entirety of iterations. This example is used to populate values within a 2-dimensional matrix.
While Loops
As you learn more commands in the MATLAB language, you will find that loops are a powerful tool to ensure your code runs under the correct parameters. In addition to for loops, MATLAB contains the while loop, which operates similarly to the for loop. When coding with the while loop, the user defines a parameter that must be true for code nested inside the while loop to run. Within ME 160, while loops will be used often to add a way to rerun or end your code. An example of a rerun option using a while loop is listed below.
While loops are frequently used in conjunction with a for loop as a way to control how long the for loop runs. For example, in optimization problems a for loop may be used to attempt to find a minimum value in a quadratic function using a line search method where values are checked until the slope of the function equals zero. A for loop can search every value within a desired range of the function. A while loop placed outside the for loop can be used so once the minimum point with zero slope is found, a variable is changed which stops the while loop, and the for loop within, from running.
Examples
Create a code which can prompt the user to input the year they graduated from high school, calculate the year that they would receive a bachelor’s degree (assuming a four-year program), and display that year for the user. Use input and fprintf functions to complete the script.
A company wants to know how much it costs to pay an employee each year. If the employee receives some raise each year they work, create a calculator which will determine the pay the employee receives for each of 5 years and in total. Allow the user to input the worker’s initial pay and how many hours they initially work. Assume the worker works 40 hours per week for 52 weeks a year.
Examples in previous chapters have created codes which can calculate the hypotenuse of a right triangle using the Pythagorean Theorem. These codes had to be written to accommodate each triangle and was not practical. Create an improved Pythagorean Theorem calculator which:Informs the user what the code does using a display command.
Prompts the user to input the length of both short legs of a triangle using an input function.
Displays the length of the hypotenuse using a fprintf command.
The following equation converts between degrees Fahrenheit (°F) and degrees Celsius (°C):
℃=(℉-32)×5/9
Create a MATLAB code which converts temperatures in Fahrenheit to Celsius. Use a display function, input function, and fprintf function to create the code. Test the code with any temperature in degrees Fahrenheit.
Problems
When solving various engineering problems, it is useful to easily convert from various units. Create a code which can convert seconds to hours and days. For example, 3600 seconds should equal 1 hour and 1/24th of a day. Use an input function and at least one fprintf function to complete this code.
Modify the script written in problem 1 such that the user is asked if they would like to run the code again. Either repeat the code or end the code with a loop depending on the user’s selection.
Create a code which enables the user to determine the density of a specific volume of a material. Have at minimum the following components:
The ability to select between aluminum or 1020 steel, with respective densities of 2.7g/cm^3 and 7.87 g/cm^3.
Have the user input the volume of the object. Ensure they are informed of the units they are expected to use.
Objects fall at different rates on the Earth and the moon as a result of their gravitational attraction having different magnitudes. Create a code that calculates how much longer it takes an object to fall from an input height on the moon than the Earth. The gravitational acceleration of Earth is 9.8 m/s^2 and 1.62 m/s^2 on the moon. The following kinematic equation will prove useful to write the request.
time=√((2(height))/g)