
Appendix
- Page ID
- 76973
\( \newcommand{\vecs}[1]{\overset { \scriptstyle \rightharpoonup} {\mathbf{#1}} } \)
\( \newcommand{\vecd}[1]{\overset{-\!-\!\rightharpoonup}{\vphantom{a}\smash {#1}}} \)
\( \newcommand{\dsum}{\displaystyle\sum\limits} \)
\( \newcommand{\dint}{\displaystyle\int\limits} \)
\( \newcommand{\dlim}{\displaystyle\lim\limits} \)
\( \newcommand{\id}{\mathrm{id}}\) \( \newcommand{\Span}{\mathrm{span}}\)
( \newcommand{\kernel}{\mathrm{null}\,}\) \( \newcommand{\range}{\mathrm{range}\,}\)
\( \newcommand{\RealPart}{\mathrm{Re}}\) \( \newcommand{\ImaginaryPart}{\mathrm{Im}}\)
\( \newcommand{\Argument}{\mathrm{Arg}}\) \( \newcommand{\norm}[1]{\| #1 \|}\)
\( \newcommand{\inner}[2]{\langle #1, #2 \rangle}\)
\( \newcommand{\Span}{\mathrm{span}}\)
\( \newcommand{\id}{\mathrm{id}}\)
\( \newcommand{\Span}{\mathrm{span}}\)
\( \newcommand{\kernel}{\mathrm{null}\,}\)
\( \newcommand{\range}{\mathrm{range}\,}\)
\( \newcommand{\RealPart}{\mathrm{Re}}\)
\( \newcommand{\ImaginaryPart}{\mathrm{Im}}\)
\( \newcommand{\Argument}{\mathrm{Arg}}\)
\( \newcommand{\norm}[1]{\| #1 \|}\)
\( \newcommand{\inner}[2]{\langle #1, #2 \rangle}\)
\( \newcommand{\Span}{\mathrm{span}}\) \( \newcommand{\AA}{\unicode[.8,0]{x212B}}\)
\( \newcommand{\vectorA}[1]{\vec{#1}} % arrow\)
\( \newcommand{\vectorAt}[1]{\vec{\text{#1}}} % arrow\)
\( \newcommand{\vectorB}[1]{\overset { \scriptstyle \rightharpoonup} {\mathbf{#1}} } \)
\( \newcommand{\vectorC}[1]{\textbf{#1}} \)
\( \newcommand{\vectorD}[1]{\overrightarrow{#1}} \)
\( \newcommand{\vectorDt}[1]{\overrightarrow{\text{#1}}} \)
\( \newcommand{\vectE}[1]{\overset{-\!-\!\rightharpoonup}{\vphantom{a}\smash{\mathbf {#1}}}} \)
\( \newcommand{\vecs}[1]{\overset { \scriptstyle \rightharpoonup} {\mathbf{#1}} } \)
\(\newcommand{\longvect}{\overrightarrow}\)
\( \newcommand{\vecd}[1]{\overset{-\!-\!\rightharpoonup}{\vphantom{a}\smash {#1}}} \)
\(\newcommand{\avec}{\mathbf a}\) \(\newcommand{\bvec}{\mathbf b}\) \(\newcommand{\cvec}{\mathbf c}\) \(\newcommand{\dvec}{\mathbf d}\) \(\newcommand{\dtil}{\widetilde{\mathbf d}}\) \(\newcommand{\evec}{\mathbf e}\) \(\newcommand{\fvec}{\mathbf f}\) \(\newcommand{\nvec}{\mathbf n}\) \(\newcommand{\pvec}{\mathbf p}\) \(\newcommand{\qvec}{\mathbf q}\) \(\newcommand{\svec}{\mathbf s}\) \(\newcommand{\tvec}{\mathbf t}\) \(\newcommand{\uvec}{\mathbf u}\) \(\newcommand{\vvec}{\mathbf v}\) \(\newcommand{\wvec}{\mathbf w}\) \(\newcommand{\xvec}{\mathbf x}\) \(\newcommand{\yvec}{\mathbf y}\) \(\newcommand{\zvec}{\mathbf z}\) \(\newcommand{\rvec}{\mathbf r}\) \(\newcommand{\mvec}{\mathbf m}\) \(\newcommand{\zerovec}{\mathbf 0}\) \(\newcommand{\onevec}{\mathbf 1}\) \(\newcommand{\real}{\mathbb R}\) \(\newcommand{\twovec}[2]{\left[\begin{array}{r}#1 \\ #2 \end{array}\right]}\) \(\newcommand{\ctwovec}[2]{\left[\begin{array}{c}#1 \\ #2 \end{array}\right]}\) \(\newcommand{\threevec}[3]{\left[\begin{array}{r}#1 \\ #2 \\ #3 \end{array}\right]}\) \(\newcommand{\cthreevec}[3]{\left[\begin{array}{c}#1 \\ #2 \\ #3 \end{array}\right]}\) \(\newcommand{\fourvec}[4]{\left[\begin{array}{r}#1 \\ #2 \\ #3 \\ #4 \end{array}\right]}\) \(\newcommand{\cfourvec}[4]{\left[\begin{array}{c}#1 \\ #2 \\ #3 \\ #4 \end{array}\right]}\) \(\newcommand{\fivevec}[5]{\left[\begin{array}{r}#1 \\ #2 \\ #3 \\ #4 \\ #5 \\ \end{array}\right]}\) \(\newcommand{\cfivevec}[5]{\left[\begin{array}{c}#1 \\ #2 \\ #3 \\ #4 \\ #5 \\ \end{array}\right]}\) \(\newcommand{\mattwo}[4]{\left[\begin{array}{rr}#1 \amp #2 \\ #3 \amp #4 \\ \end{array}\right]}\) \(\newcommand{\laspan}[1]{\text{Span}\{#1\}}\) \(\newcommand{\bcal}{\cal B}\) \(\newcommand{\ccal}{\cal C}\) \(\newcommand{\scal}{\cal S}\) \(\newcommand{\wcal}{\cal W}\) \(\newcommand{\ecal}{\cal E}\) \(\newcommand{\coords}[2]{\left\{#1\right\}_{#2}}\) \(\newcommand{\gray}[1]{\color{gray}{#1}}\) \(\newcommand{\lgray}[1]{\color{lightgray}{#1}}\) \(\newcommand{\rank}{\operatorname{rank}}\) \(\newcommand{\row}{\text{Row}}\) \(\newcommand{\col}{\text{Col}}\) \(\renewcommand{\row}{\text{Row}}\) \(\newcommand{\nul}{\text{Nul}}\) \(\newcommand{\var}{\text{Var}}\) \(\newcommand{\corr}{\text{corr}}\) \(\newcommand{\len}[1]{\left|#1\right|}\) \(\newcommand{\bbar}{\overline{\bvec}}\) \(\newcommand{\bhat}{\widehat{\bvec}}\) \(\newcommand{\bperp}{\bvec^\perp}\) \(\newcommand{\xhat}{\widehat{\xvec}}\) \(\newcommand{\vhat}{\widehat{\vvec}}\) \(\newcommand{\uhat}{\widehat{\uvec}}\) \(\newcommand{\what}{\widehat{\wvec}}\) \(\newcommand{\Sighat}{\widehat{\Sigma}}\) \(\newcommand{\lt}{<}\) \(\newcommand{\gt}{>}\) \(\newcommand{\amp}{&}\) \(\definecolor{fillinmathshade}{gray}{0.9}\)Appendix A
Coding Conventions
This appendix covers various aspects of programming style and coding conventions. It follows the conventions suggested in the Java Language Specification (http://java.sun.com/docs/books/jls/), which is summarized on Sun’s Java Web site (http://java.sun.com/docs/). The conventions have been modified somewhat to fit the needs of an academic programming course. For further details see
Coding conventions improve the readability and maintainability of the code. Because maintenance is often done by programmers who did not have a hand in designing or writing the original code, it is important that the code follow certain conventions. For a typical piece of commercial software, much more time and expense are invested in maintaining the code than in creating the code.
Comments
Java recognizes two types of comments: C-style comments use the same syntax found in C and C++. They are delimited by /* ... */ and //. The first set of delimiters is used to delimit a multiline comment. The Java compiler will ignore all text that occurs between /* and */. The second set of delimiters is used for a single-line comment. Java will ignore all the code on the rest of the line following a double slash (//). C-style comments are called implementation comments and are mainly used to describe the implementation of your code.
Documentation comments are particular to Java. They are delimited by /** ... */. These are used mainly to describe the specification or design of the code rather than its implementation. When a file containing documentation comments is processed by the javadoc tool that comes with the Java Development Kit (JDK), the documentation comments will be incorporated into an HTML document. This is how online documentation has been created for the Java library classes.
Implementation Commenting Guidelines
Implementation (C-style) comments should be used to provide an overview of the code and to provide information that is not easily discernible from the code itself. They should not be used as a substitute for poorly written or poorly designed code.
In general, comments should be used to improve the readability of the code. Of course, readability depends on the intended audience. Code that’s easily readable by an expert programmer may be completely indecipherable to a novice. Our commenting guidelines are aimed at someone who is just learning to program in Java.
Block Comments
A block comment or comment block is a multiline comment that is used to describe files, methods, data structures, and algorithms:
/∗
∗ Multiline comment block
∗/
Single-Line Comments
A single-line comment can be delimited either by // or by /* ... */. The // is also used to comment out a line of code that you want to skip during a particular run. The following example illustrates these uses:
/∗ Single line comment ∗/
System.out.println(”Hello”); // End of line comment
// System.out.println(”Goodbye”);
Note that the third line is commented out and would be ignored by the Java compiler.
In this text, we generally use slashes for single-line and end-of-line comments. And we frequently use end-of-line comments to serve as a running commentary on the code itself. These types of comments serve a pedagogical purpose—to teach you how the code works. In a “production environment” it would be unusual to find this kind of running commentary.
Java Documentation Comments
Java’s online documentation has been generated by the javadoc tool that comes with the Java Development Kit (JDK). To conserve space, we use documentation comments only sparingly in the programs listed in this textbook itself. However, javadoc comments are used more extensively to document the online source code that accompanies the textbook.
Documentation comments are placed before classes, interfaces, constructors, methods, and fields. They generally take the following form:
/∗ ∗
∗ The Example class blah blah
∗ @author J . Programmer
∗/
public class Example { . . .
Note how the class definition is aligned with the beginning of the comment. Javadoc comments use special tags, such as author and param, to identify certain elements of the documentation. For details on javadoc, see
Indentation and White Space
The use of indentation and white space helps to improve the readability of the program. White space refers to the use of blank lines and blank space in a program. It should be used to separate one program element from another, with the goal being to draw attention to the important elements of the program.
- Use a blank line to separate method definitions and to separate a class’s instance variables from its methods.
- Use blank spaces within expressions and statements to enhance their readability
- Be consistent in the way you use white space in your program.
Code should be indented in a way that shows the logical structure of the program. You should use a consistent number of spaces as the size of the indentation tab. The Java Language Specification recommends four spaces.
In general, indentation should represent the contained in relationships within the program. For example, a class definition contains declarations for instance variables and definitions of methods. The declarations and definitions should be indented by the same amount throughout the class definition. The statements contained in the body of a method definition should be indented:
public void instanceMethod(){
System.out.println(”Hello”);
return;
}
An if statement contains an if clause and an else clause, which should be indented:
if(condition)
System.ou t.println(” If part”); // If clause
else
System.out.println(”Else part”); // Else clause
The statements contained in the body of a loop should be indented:
for (int k = 0; k < 100; k++) {
System.out.println(”Hello” + ’k ’); // Loop body
}
Finally, indentation should be used whenever a statement or expression is too long to fit on a single line. Generally, lines should be no longer than 80 characters.
Naming Conventions
The choice of identifiers for various elements within a program can help improve the readability of the program. Identifiers should be descriptive of the element’s purpose. The name of class should be descriptive of the class’s role or function. The name of a method should be descriptive of what the method does.
The way names are spelled can also help improve a program’s readability. Table A.1 summarizes the various conventions recommended by the Java Language Specification and followed by professional Java programmers.
| Identifier Type | Naming Rule | Example |
|---|---|---|
| Class | Nouns in mixed case with the first letter of each internal word capitalized. |
OneRowNim TextField |
| Interfaces | Same as class names. Many interface names end with the suffix able. |
Drawable ActionListener |
| Method | Verbs in mixed case with the first letter in lowercase and the first letter of internal words capitalized. |
actionPerformed() sleep() insertAtFront() |
| Instance Variables | Same as method names. The name should be descriptive of how the variable is used. |
maxWidth isVisible |
| Constants | Constants should be written in uppercase with internal words separated by. |
MAX LENGTH XREF |
| Loop Variables | Temporary variables, such as loop variables, may have single character names: i, j, k. |
int k; int i; |
Use of Braces
Curly braces { } are used to mark the beginning and end of a block of code. They are used to demarcate a class body, a method body, or simply to combine a sequence of statements into a single code block. There are two conventional ways to align braces and we have used both in the text. The opening and closing brace may be aligned in the same column with the enclosed statements indented:
public void sayHello ( )
{
System.out.println(”Hello”);
}
This is the style that’s used in the first part of the book, because it’s easier for someone just learning the syntax to check that the braces match up.
Alternatively, the opening brace may be put at the end of the line where the code block begins, with the closing brace aligned under the beginning of the line where the code block begins:
public void sayHello ( ) {
System.out.println(”Hello”);
}
This is the style that’s used in the last two parts of the book, and it seems the style preferred by professional Java programmers.
Sometimes even with proper indentation, it it difficult to tell which closing brace goes with which opening brace. In those cases, you should put an endof-line comment to indicate what the brace closes:
public void sayHello ( )
{
for (int k = 0; k < 10 ; k++) {
System.out.println(”Hello”);
} // for loop
} // say Hello ( )
File Names and Layout
Java source files should have the .java suffix, and Java bytecode files should have the .class suffix.
A Java source file can only contain a single public class. Private classes and interfaces associated with a public class can be included in the same file.
Source File Organization Layout
All source files should begin with a comment block that contains important identifying information about the program, such as the name of the file, author, date, copyright information, and a brief description of the classes in the file. In the professional software world, the details of this “boilerplate” comment will vary from one software house to another. For the purposes of an academic computing course, the following type of comment block would be appropriate:
/∗
∗ File name: Example.java
∗ Author: J.Programmer
∗ Date: April, 20 1999
∗ Description: This program illustrates basic
∗ coding conventions.
∗/
The beginning comment block should be followed by any package and import statements used by the program:
package java.mypackage;
import java.awt.∗;
The package statement should only be used if the code in the file belongs to the package. None of the examples in this book use the package statement. The import statement allows you to use abbreviated names to refer to the library classes used in your program. For example, in a program that imports java.awt.* we can refer to the java.awt.Button class as simply Button. If the import statement were omitted, we would have to use the fully qualified name.
The import statements should be followed by the class definitions contained in the file. Figure A–1 illustrates how a simple Java source file should be formatted and documented.
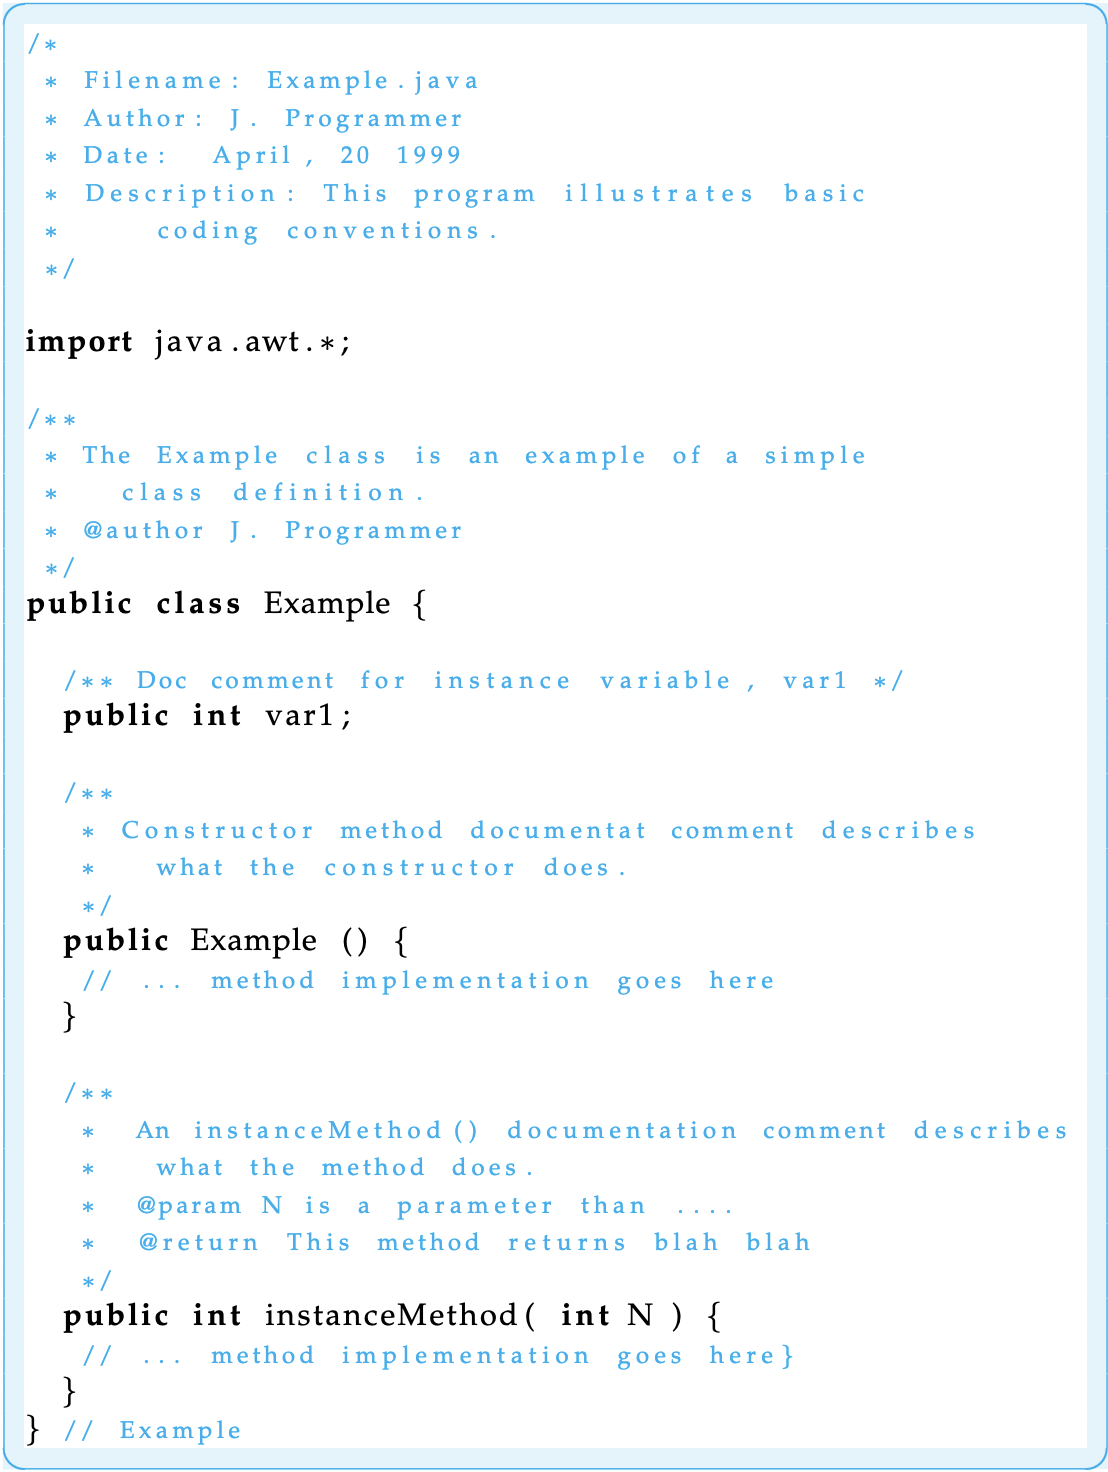 Figure A–1: A sample Java source file.
Statements
Declarations
There are two kinds of declaration statements: field declarations, which include a class’s instance variables, and local variable declarations.
- Put one statement per line, possibly followed by an end-of-line comment if the declaration needs explanation.
- Initialize local variables when they are declared. Instance variables are given default initializations by Java.
- Place variable declarations at the beginning of code blocks in which they are used rather than interspersing them throughout the code block.
The following class definition illustrates these points:
public class Example {
private int size = 0; // Window length and width
private int are a = 0 ; // Window’s current area
public void myMethod ( ) {
int mouseX = 0 ; // Beginning of method block
if (condition){
int mouseY = 0; // Beginning of if block
...
} // if
} // myMethod ( )
} // Example
Executable Statements
Simple statements, such as assignment statements, should be written one per line and should be aligned with the other statements in the block. Compound statements are those that contain other statements. Examples would include if statements, for statements, while statements, and do-while statements. Compound statements should use braces and appropriate indentation to highlight the statement’s structure. Here are some examples of how to code several kinds of compound statements:
if (condition) { //A simple if statement
statement 1;
statement 2;
} // if
if (condition 1) { // An if−else statement
statement 1;
} else if (condition 2){
statement 2;
statemen t 3 ;
} else {
statement 4 ;
statement 5 ;
} // if / else
for (initializer; entry−condition; updater) { //For loop
statement 1 ;
statement 2 ;
} // for
while (condition) { // While statement
statement 1;
statement 2;
} // while
do { // Do−while statement
statement 1;
statement 2;
} while (condition);
Preconditions and Postconditions
A good way to design and document loops and methods is to specify their preconditions and postconditions. A precondition is a condition that must be true before the method (or loop) starts. A postcondition is a condition that must be true after the method (or loop) completes. Although the conditions can be represented formally—using boolean expressions—this is not necessary. It suffices to give a clear and concise statement of the essential facts before and after the method (or loop).
Chapter 6 introduces the use of preconditions and postconditions and Chapters 6 through 8 provide numerous examples of how to use them. It may be helpful to reread some of those examples and model your documentation after the examples shown there.
Sample Programs
For specific examples of well-documented programs used in the text, see the online source code that is available on the accompanying Web site at
Appendix B
The Java Development Kit
The Java Development Kit (JDK) for JavaTM 2 Platform Standard Edition is a set of command-line tools for developing Java programs. It is available for free in versions for recent editions of Microsoft Windows, Linus, Macintosh OS X, and Solaris (Sun Microsystems).
Download information and documentation are available for the entire range of products associated with the JavaTM 2 Platform, Standard Edition (Java SE) at;
This appendix summarizes some of the primary tools available in the JDK. For more detailed information you should consult Sun’s Web site.
Table B.1 provides a summary of some of the JDK tools.
| Tool Name | Description |
|---|---|
| javac | Java compiler. Translates source code into bytecode. |
| java | Java interpreter. Translates and executes bytecode. |
| javadoc | Java documentation generator. Creates HTML pages from documentation comments embedded in Java programs. |
| appletviewer | Appletviewer. Used instead of a browser to run Java applets. |
| jar | Java archive manager. Manages Java archive (JAR) files. |
| jdb | Java debugger. Used to find bugs in a program. |
| javap | Java disassembler. Translates bytecode into Java source code. |
Sun Microsystems provides detailed instructions on how to install JDK for Java SE on computers running any of the above operating systems, including how to set the system’s PATH and CLASSPATH variables. Installation instructions can be located using the above link to downloading information.
The Java Compiler: javac
The Java compiler (javac) translates Java source files into Java bytecode. A Java source file must have the .java extension. The javac compiler will create a bytecode file with the same name but with the .class extension. The javac command takes the following form:
javac [ options ] sourcefiles [ files ]
The brackets in this expression indicate optional parts of the command. Thus, options is an optional list of command-line options (including the -classpath option), and files is an optional list of files, each of which contains a list of Java source files. The files option would be used if you were compiling a very large collection of files, too large to list each file individually on the command line.
Most of the time you would simply list the sourcefiles you are compiling immediately after the word javac, as in the following example:
javac MyAppletClass.java MyHelperClass.java
Given this command, javac will read class definitions contained in MyAppletClass.java and MyHelperClass.java in the current working directory and translate them into bytecode files named MyAppletClass.class and MyHelperClass.class.
If a Java source file contains inner classes, these would be compiled into separate class files. For example, if MyAppletClass.java contained an inner class named Inner, javac would compile the code for the inner class into a file named MyAppletClass$Inner.class.
If you are writing a program that involves several classes, it is not necessary to list each individual class on the command line. You must list the main class—that is, the class where execution will begin. The compiler will perform a search for all the other classes used in the main class. For example, if MyAppletClass uses an instance of MyHelperClass, you can compile both classes with the following command:
javac MyAppletClass.java
In this case, javac will perform a search for the definition of MyHelperClass.
How Java Searches for Class Definitions
When compiling a file, javac needs a definition for every class or interface that’s used in the source file. For example, if you are creating a subclass of java.applet.Applet, javac will need definitions for all of Applet’s superclasses, including Panel, Container, and Component. The definitions for these classes are contained in the java.awt package. Here’s how javac will search for these classes.
The Classpath
Javac will first search among its library files for definitions of classes, such as Applet and Panel. Next, javac will search among the files and directories listed The Classpath on the user’s class path. The class path is a system variable that lists all the user directories and files that should be searched when compiling a user’s program. JDK no longer requires a class path variable. The class path can be set either by using the environment variable CLASSPATH or by using the -classpath option when invoking javac. By default, JDK will check in the current working directory for user classes. It doesn’t require that the CLASSPATH variable be set. If this variable is set, it must include the current directory. The preferred way to set the classpath is by using -classpath option. For example,
javac −classpath ../source: . MyApplet.java
will tell javac to search in both the current directory (.) and in the ../source directory for user source files. Because the details for setting the CLASSPATH variable are system dependent, it’s best to consult the online installation documentation to see exactly how this is done on your system.
During a successful search, javac may find a source file, a class file, or both. If it finds a class file but not source file, javac will use the class file. This would be the case for Java library code. If javac finds a source file but not a class file, it will compile the source and use the resulting class file. This would be the case for the first compilation of one of your source programs. If javac finds both a source and a class file, it determines whether the class file is up-to-date. If so, it uses it. If not, it compiles the source and uses the resulting class file. This would be the case for all subsequent compilations of one of your source programs.
As noted earlier, if your application or applet uses several source files, you need only provide javac with the name of the main application or applet file. It will find and compile all the source files, as long as they are located in a directory that’s listed in the class path.
The Java Interpreter: java
The java interpreter launches a Java application. This command takes one of the following forms:
java |
[ options ] | classname | [ argument . . . ] | |
java |
[ options ] | -jar | file.jar | [ argument . . . ] |
If the first form is used, java starts a Java runtime environment. It then loads the specified classname and runs that class’s main() method, which must be declared as follows:
public static void main ( S t ri n g a rgs [ ] )
The String parameter args[] is an array of strings, which is used to pass any arguments listed on the command line. Command-line arguments are optional.
If the second form of the java command is used, java will load the classes and resources from the specified Java archive (JAR). In this case, the special -jar option flag must be specified. The options can also include many other command-line options, including the -classpath option.
The appletviewer
The appletviewer tool lets you run Java applets without using a Web browser. This command takes the following form:
appletviewer |
[ threads flag ] | [ options ] | url . . . |
The optional threads flag tells Java which of the various threading options to use. This is system dependent. For details on this feature and the command line options, refer to Sun’s Web site.
The appletviewer will connect to one or more HTML documents specified by their Uniform Resource Locators (URLs). It will display each applet referenced in those documents in a separate window. Some example commands would be
appletviewer http://www.domain.edu/˜account/myapplet.html
appletviewer myapplet.html
AppletViewer tags
In the first case, the document’s full path name is given. In the second case, since no host computer is mentioned, appletviewer will assume that the applet is located on the local host and will search the class path for myapplet.html.
Once appletviewer retrieves the HTML document, it will find the applet by looking for either the object, embed, or applet tags within the document. The appletviewer ignores all other HTML tags. It just runs the applet. If it cannot find one of these tags, the appletviewer will do nothing. If it does locate an applet, it starts a runtime environment, loads the applet, and then runs the applet’s init() method. The applet’s init() must have the following method signature:
public void init()
The applet Tag
The applet tag is the original HTML 3.2 tag used for embedding applets within an HTML document. If this tag is used, the applet will be run by the browser, using the browser’s own implementation of the Java Runtime Environment (JRE).
Note, however, that if your applet uses the latest Java language features and the browser is not using the latest version of JRE, the applet may not run correctly. For example, this might happen if your applet makes use of Swing features that are not yet supported in the browser’s implementation of the JRE. In that case, your applet won’t run under that browser.
To ensure that the applet runs with the latest version of the JRE—the one provided by Sun Microsystems—you can also use the object or the embed tags. These tags are used to load the appropriate version of the JRE into the browser as a plugin module. A plugin is a helper program that extends the browser’s functionality.
The applet tag takes the following form:
<applet
code=” yourAppletClass.class”
object=”serializedObjectOrJavaBean”
codebase=”classFileDirectory”
width=”pixelWidth”
height=”pixelHeight”
>
<param name=” . . . ” value=” . . . ”>
. . .
alternate−text
</applet>
You would use only the code or object attribute, not both. For the programs in this book, you should always use the code tag. The code tag specifies where the program will begin execution—that is, in the applet class.
The optional codebase attribute is used to specify a relative path to the applet. It may be omitted if the applet’s class file is in the same directory as the HTML document.
The width and height attributes specify the initial dimensions of the applet’s window. The values specified in the applet tag can be overridden in the applet itself by using the setSize() method, which the applet inherits from the java.awt.Component class.
The param tags are used to specify arguments that can be retrieved when the applet starts running (usually in the applet’s init() method). The methods for retrieving parameters are defined in the java.applet.Applet class.
Finally, the alternative-text portion of the applet tag provides text that would be displayed on the Web page if the appletviewer or browser is unable to locate the applet.
Here’s a simple example of an applet tag:
<applet
code=”HelloWorldApplet . c l a s s ”
codebase=” c l a s s f i l e s ”
width=” 200 ”
hei gh t=” 200 ”
>
<param name=” au thor ” value=” J av a J av a J av a ”>
<param name=”da te ” value=”May 1999 ”>
Sorry , your browser does no t seem t o be a ble t o l o c a t e the HelloWorldApplet .
</apple t>
In this case, the applet’s code is stored in a file name HelloWorldApplet.class, which is stored in the classfiles subdirectory—that is, a subdirectory of the directory containing the HTML file. The applet’s window will be 200×200 pixels. And the applet is passed the name of the program’s author and date it was written. Finally, if the applet cannot be located, the “Sorry . . . ” message will be displayed instead.
The object Tag
The object tag is the HTML 4.0 tag for embedding applets and multimedia objects in an HTML document. It is also an Internet Explorer (IE) 4.x extension to HTML. It allows IE to run a Java applet using the latest JRE plugin from Sun. The object tag takes the following form:
<object
classid =”name of the plugin program”
codebase=”url for the plugin program”
width=”pixelWidth”
height=”pixelHeight”
>
<param name=”code” value=”yourClass.class”>
<param name=” codebase ”value=”classFileDirectory”>
...
alternate−text
</object>
Note that parameters are used to specify your applet’s code and codebase. In effect, these are parameters to the plugin module. An example tag that corresponds to the applet tag for the HelloWorldApplet might be as follows:
<object
classid =”clsid: 8AD9C840−044E−11D1−B3E9−00805F499D93”
codebase=”http://java.sun.com/produc ts/plugin/”
width=”200”
height=”200”
>
<param name=”code” value=”HelloWorldApplet.class”>
<param name=”codebase” value=”classfiles”>
<param name=”author” value=”Java Java Java”>
<param name=”date” value=”May 1999”>
Sorry , your browser does no t seem t o be a ble t o l o c a t e the HelloWorldApplet .
</object>
If the browser has an older version of the plug in than shown in the codebase attribute, the user will be prompted to download the newer version. If the browser has the same or newer version, that version will run. In theory Netscape 6 should also work the same as IE. For further details on how to use the object tag, see Sun’s plugin site at:
The embed Tag
The embed tag is Netscape’s version of the applet and object tags. It is included as an extension to HTML 3.2. It can be used to allow a Netscape 4.x browser to run a Java applet using the latest Java plugin from Sun. It takes the following form:
<embed
type=”Type of program”
code=”yourAppletClass.class”
codebase=”classFileDirectory”
pluginspage=”location of plugin file on the web”
width=”pixelWidth”
height=” pixelHeight”
>
<noembed>
Alternative text
</noembed>
</embed>
The type and pluginspage attributes are not used by the appletviewer, but they are necessary for browsers. They would just be ignored by the appletviewer.
For example, an embed tag for HelloWorldApplet would be as follows:
<EMBED
type=”application/x−java−applet;version=1.4”
width=” 200”
height=”200”
code=”HelloWorldApplet.class”
codebase=”classfiles”
pluginspage=”http://java.sun.com/produc ts/plugin/”
>
<NOEMBED>
Sorry. This page won’t be able to run this applet .
</NOEMBED>
</EMBED>
It may be possible to combine the applet, embed, and object tags in the same HTML file. Sun provides much more information, as well as demo programs on its plugin website:
The Java Archiver jar Tool
The jar tool can be used to combine multiple files into a single JAR archive file. Although the jar tool is a general-purpose archiving and compression tool, it was designed mainly to facilitate the packaging of Java applets and applications into a single file.
The main justification for combining files into a single archive and compressing the archive is to improve download time. The jar command takes the following format:
jar |
[ options ] destination-file | input-file | [ input-files ] |
For an example of its usage, let’s use it to archive the files involved in the WordGuess example in Chapter 9. As you may recall, this example used classes, such as TwoPlayerGame, and interfaces, such as IGame, that were developed in earlier sections of the chapter. So, to help manage the development of WordGuess, it would be useful to have a library containing those files that must be linked together when we compile WordGuess.
This is a perfect use of a jar file. Let’s name our library nplayerlib.jar. We choose this name because the library can be used to create game programs that have N players, including two-player games.
For the two-player game, WordGuess, we want to combine all the .class files needed by WordGuess.java into a single jar file. Here’s a list of the files we want to archive:
CLUIPlayableGame.class
ComputerGame.class
GUIPlayableGame.class
IGame.class
KeyboardReader.class
Player.class
TwoPlayerGame.class
UserInterface.class
Assuming all of these files are contained in a single directory (along with other files, perhaps), then the command we use from within that directory is as follows:
jar cf nplayerlib.jar ∗.class
In this case, the cf options specify that we are creating a jar file named animated.jar that will consist of all the files having the .class suffix. This will create a file named nplayerlib.jar. To list the contents of this file, you can use the following command:
jar tf nplayerlib.jar
Once we have created the jar file, we can copy it into the directory that contains our source code for the WordGuess program. We would then the following commands to include the code contained in the library when we compile and run WordGuess.java
javac −classpath nplayerlib.jar:. WordGuess.java
java −classpath nplayerlib.jar:. WordGuess
These commands, which use the -classpath option, tell javac and java to include code from the nplayerlib.jar. The notation :., links code in the current directory () with the library code.
Once we have created a library, we can also use it for Java applets. For example, suppose we have developed an applet version of the WordGuess game and linked all of the applet’s code into a jar file named wordguessapplet.jar. The following HTML file would allow users to download the applet from their web browser:
<html>
<head><title>WordGuess Applet</head></title>
<body>
<applet
archive=”wordguessapplet.jar”
code=”WordGuessApplet.class”
width=350 height=350
>
<parameter name=”author” value=”Java Java Java”>
<parameter name=”date” value=” April 2005 ”>
</applet>
</body>
</html>
When specified in this way, the browser will take care of downloading the archive file and extracting the individual files needed by the applet. Note that the code attribute must still designate the file where the program will start execution.
The Java Documentation Tool: javadoc
The javadoc tool parses the declarations and documentation comments in a Java source file and generates a set of HTML pages that describes the following elements: public and protected classes, inner classes, interfaces, constructors, methods, and fields.
The javadoc tool can be used on a single file or an entire package of files. Recall that a Java documentation comment is one that begins with /** and ends with */. These are the comments that are parsed by javadoc.
The javadoc tool has many features, and it is possible to use Java doclets to customize your documentation. For full details on using the tool, it is best to consult Sun’s Web site. To illustrate how it might be used, let’s just look at a simple example.
The FirstApplet program from Chapter 1 contains documentation comments. It was processed using the following command:
javadoc FirstApplet.java
javadoc generated the following HTML documents:
| FirstApplet.html | −The main documentation file |
| allclasses −frame.html | −Names and links to all the classes used in FirstApplet |
| overview−tree.html | −Atree showing FirstApplet’s place in the class hierarchy |
| packages.html | −Details on the packages used in FirstApplet |
| index.html | −Top−level HTML document forFirstApplet documentation |
| index−all.html | −Summary of all methods and variables in FirstApplet |
To see how the documentation appears, review the FirstApplet.java source file and the documentation it generated. Both are available at
Appendix C
The ASCII and Unicode Character Sets
Java uses version 2.0 of the Unicode character set for representing character data. The Unicode set represents each character as a 16-bit unsigned integer. It can, therefore, represent 216 = 65,536 different characters. This enables Unicode to represent characters from not only English but also a wide range of international languages. For details about Unicode, see
Unicode supersedes the ASCII character set (American Standard Code for Information Interchange). The ASCII code represents each character as a 7-bit or 8-bit unsigned integer. A 7-bit code can represent only 27 = 128 characters. In order to make Unicode backward compatible with ASCII, the first 128 characters of Unicode have the same integer representation as the ASCII characters.
Table C.1 shows the integer representations for the printable subset of ASCII characters. The characters with codes 0 through 31 and code 127 are nonprintable characters, many of which are associated with keys on a standard keyboard. For example, the delete key is represented by 127, the backspace by 8, and the return key by 13.
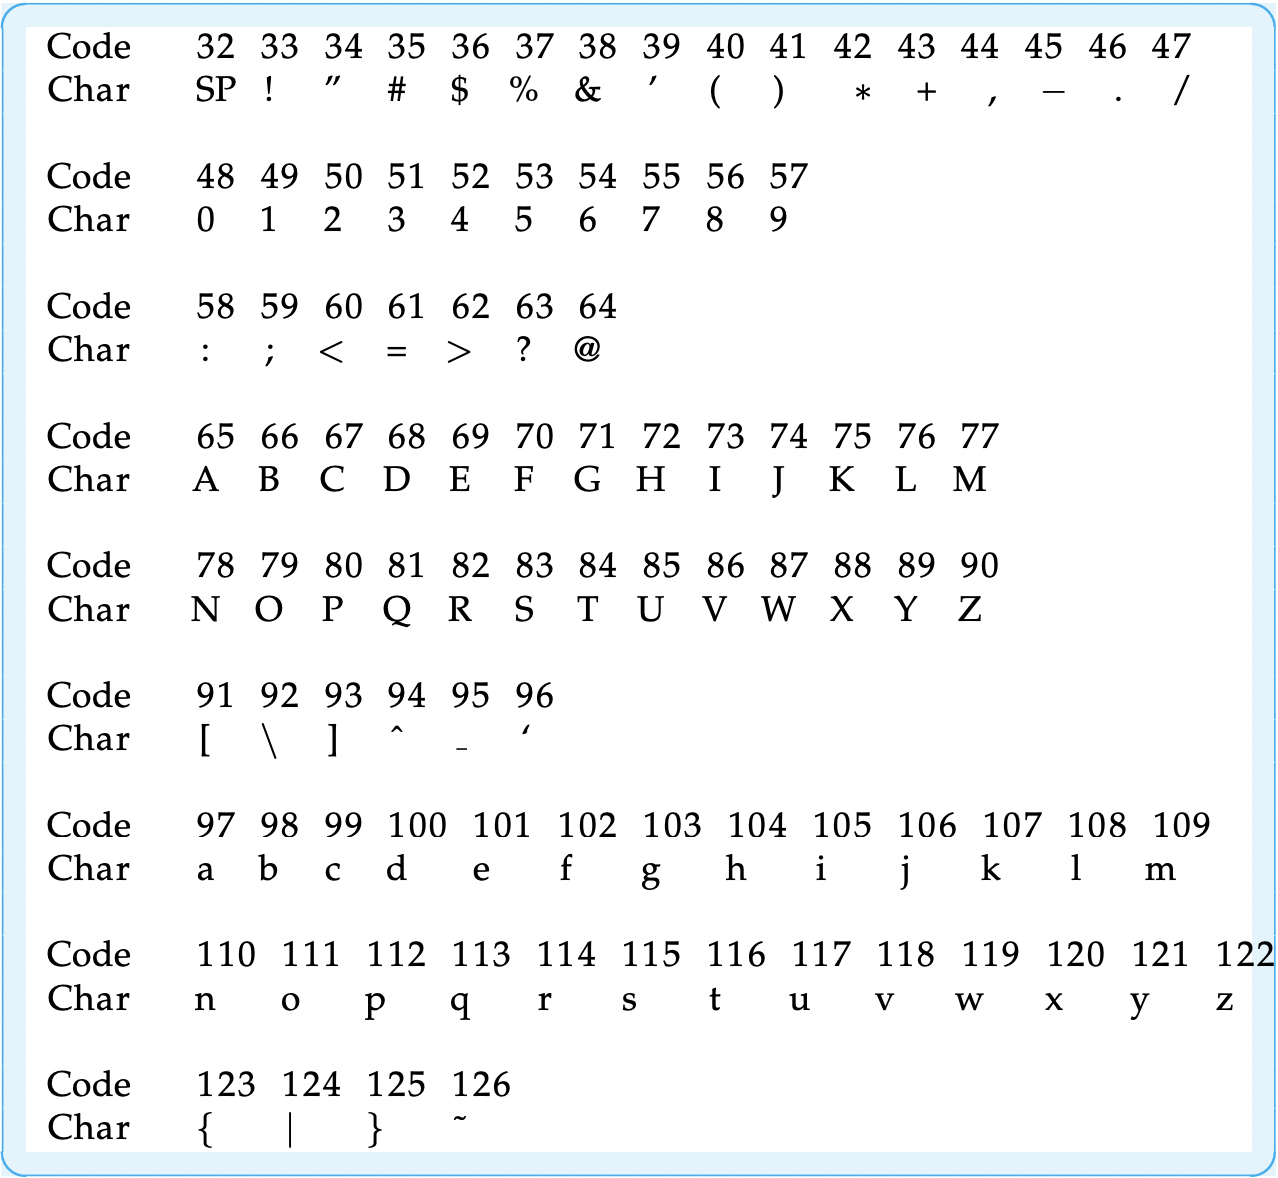 TABLE C.1 ASCII codes for selected characters
Appendix D
Java Keywords
The words shown in Table D.1 are reserved for use as Java keywords and cannot be used as identifiers. The keywords const and goto, which are C++ keywords, are not actually used in Java. They were included mainly to enable better error messages to be generated when they are mistakenly used in a Java program.
The words true, false, and null may look like keywords but are technically considered literals. They also cannot be used as identifiers.
| abstract | continue | for | new | switch |
| assert | default | goto | package | synchronized |
| boolean | do | if | private | this |
| break | double | implements | protected | throw |
| byte | else | import | public | throws |
| case | enum | instanceof | return | transient |
| catch | extends | int | short | try |
| char | final | interface | static | void |
| class | finally | long | strictfp | volatile |
| const | float | native | super | while |
Appendix E
Operator Precedence Hierarchy
Table E.1 summarizes the precedence and associativity relationships for Java operators. Within a single expression, an operator of order m would be evaluated before an operator of order n if m < n. Operators having the same order are evaluated according to their association order. For example, the expression
25 + 5 ∗ 2 + 3
would be evaluated in the order shown by the following parenthesized expression:
( 2 5 + ( 5 ∗ 2 ) ) + 3 ==> ( 2 5 + 1 0 ) + 3 ==> 35 + 3 ==> 38
In other words, because * has higher precedence than +, the multiplication operation is done before either of the addition operations. And because addition associates from left to right, addition operations are performed from left to right.
Most operators associate from left to right, but note that assignment operators associate from right to left. For example, consider the following code segment:
int i, j, k;
i = j = k = 100; //Equivalent to i = (j = (k = 100));
In this case, each variable will be assigned 100 as its value. But it’s important that this expression be evaluated from right to left. First, k is assigned 100. Then its value is assigned to j. And finally j’s value is assigned to i.
For expressions containing mixed operators, it’s always a good idea to use parentheses to clarify the order of evaluation. This will also help avoid subtle syntax and semantic errors.
| Order | Operator | Operation | Association |
|---|---|---|---|
| 0 | () | Parentheses | |
| 1 | ++ -- · | Postincrement, Postdecrement, Dot Operator | L to R |
| 2 | ++ -- + - ! | Preincrement, Predecrement, Unary plus, Unary minus, Boolean NOT | R to L |
| 3 | (type) new | Type Cast, Object Instantiation | R to L |
| 4 | * / % | Multiplication, Division, Modulus | L to R |
| 5 | + - + | Addition, Subtraction, String Concatenation | L to R |
| 6 | < > <= >= | Relational Operators | L to R |
| 7 | == != | Equality Operators | L to R |
| 8 | ∧ | Boolean XOR | L to R |
| 9 | && | Boolean AND | L to R |
| 10 | —— | Boolean OR | L to R |
| 11 | = += -= *= /= %= | Assignment Operators | R to L |
Appendix F
Java Inner Classes
This appendix describes basic features of some advanced elements of the Java language. As for many language features, there are details and subtleties involved in using these features that are not covered here. For further details, you should consult Sun’s online references or other references for a more comprehensive description.
What Are Inner Classes?
Inner classes were introduced in Java 1.1. This features lets you define a class as part of another class, just as fields and methods are defined within classes. Inner classes can be used to support the work of the class in which they are contained.
Java defines four types of inner classes. A nested top-level class or interface is a static member of an enclosing top-level class or interface. Such classes are considered top-level classes by Java.
A member class is a nonstatic inner class. It is not a top-level class. As a fullfledged member of its containing class, a member class can refer to the fields and methods of the containing class, even the private fields and methods. Just as you would expect for the other instance fields and methods of a class, all instances of a member class are associated with an instance of the enclosing class.
A local class is an inner class that’s defined within a block of Java code, such as within a method or within the body of a loop. Local classes have local scope—they can only be used within the block in which they are defined. Local classes can refer to the methods and variables of their enclosing classes. They are used mostly to implement adapters, which are used to handle events.
When Java compiles a file containing a named inner class, it creates separate class files for them with names that include the nesting class as a qualifier. For example, if you define an inner class named Metric inside a top level class named Converter, the compiler will create a class file named Converter$Metric.class for the inner class. If you wanted to access the inner class from some other class (besides Converter), you would use a qualified name: Converter.Metric.
An anonymous class is a local class whose definition and use are combined into a single expression. Rather than defining the class in one statement and using it in another, both operations are combined into a single expression. Anonymous classes are intended for one-time use. Therefore, they don’t contain constructors. Their bytecode files are given names like ConverterFrame$1.class.
Nested Top-Level Versus Member Classes
The Converter class (Figure F–1) shows the differences between a nested toplevel class and a member class. The program is a somewhat contrived example that performs various kinds of metric conversions. The outer Converter class serves as a container for the inner classes, Distance and Weight, which perform specific conversions.
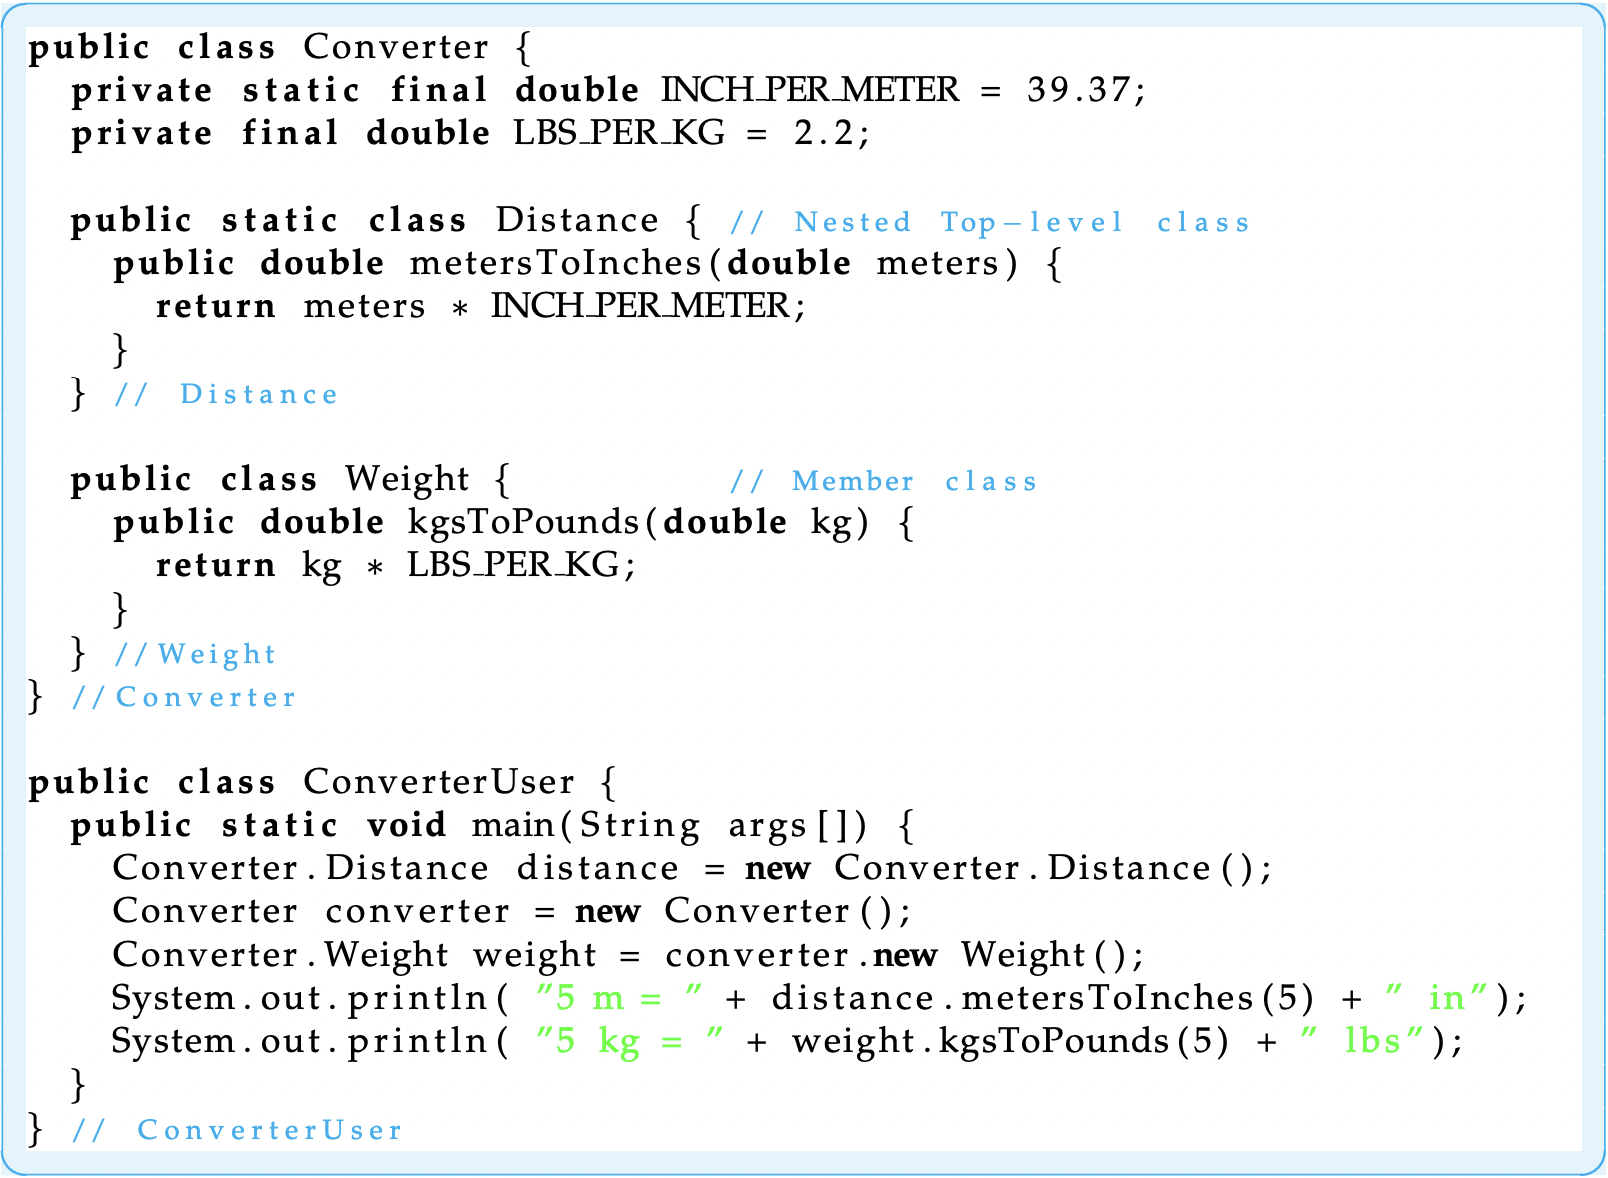 Figure F–1: A Java application containing a top-level nested class.
The Distance class is declared static, so it is a top-level class. It is contained in the Converter class itself. Note the syntax used in ConverterUser.main() to create an instance of the Distance class:
Converter.Distance distance = new Converter.Distance();
A fully qualified name is used to refer to the static inner class via its containing class.
The Weight class is not declared static. It is, therefore, associated with instances of the Converter class. Note the syntax used to create an instance of the Weight class:
Converter converter = new Converter();
Converter.Weight weight = converter.new Weight ();
Before you can create an instance of Weight, you have to declare an instance of Converter. In this example, we have used two statements to create the weight object, which requires using the temporary variable, converter, as a reference to the Converter object. We could also have done this with a single statement by using the following syntax:
Converter.Weight weight = new Converter().new Weight();
Note that in either case the qualified name Converter.Weight must be used to access the inner class from the ConverterUser class.
There are a couple of other noteworthy features in this example. First, an inner top-level class is really just a programming convenience. It behaves just like any other top-level class in Java. One restriction on top-level inner classes is that they can only be contained within other top-level classes, although they can be nested one within the other. For example, we could nest additional converter classes within the Distance class. Java provides special syntax for referring to such nested classes.
Unlike a top-level class, a member class is nested within an instance of its containing class. Because of this, it can refer to instance variables (LBS_PER_KG) and instance methods of its containing class, even to those declared private. By contrast, a top-level inner class can only refer to class variables (INCH_PER_METER)— that is, to variables that are declared static. So you would use a member class if it were necessary to refer to instances of the containing class.
There are many other subtle points associated with member classes, including special language syntax that can be used to refer to nested member classes and rules that govern inheritance and scope of member classes. For these details you should consult the Java Language Specification, which can be accessed online at
Local and Anonymous Inner Classes
In this next example, ConverterFrame, a local class is used to create an ActionEvent handler for the application’s two buttons (Fig. F–2). As we have seen, Java’s event-handling model uses predefined interfaces, such as the ActionListener interface, to handle events. When a separate class is defined to implement an interface, it is sometimes called an adapter class. Rather than defining adapter classes as top-level classes, it is often more convenient to define them as local or anonymous classes.
The key feature of the ConverterFrame program is the createJButton() method. This method is used instead of the JButton() constructor to create buttons and to create action listeners for the buttons. It takes a single String parameter for the button’s label. It begins by instantiating a new JButton, a reference to which is passed back as the method’s return value. After creating an instance button, a local inner class named ButtonListener is defined.
The local class merely implements the ActionListener interface by defining the actionPerformed method. Note how actionPerformed() uses the containing class’s converter variable to acquire access to the metersToInches() and kgsToPounds() methods, which are inner class methods of the Converter class (Fig. F–1). A local class can use instance variables, such as converter, that are defined in its containing class.
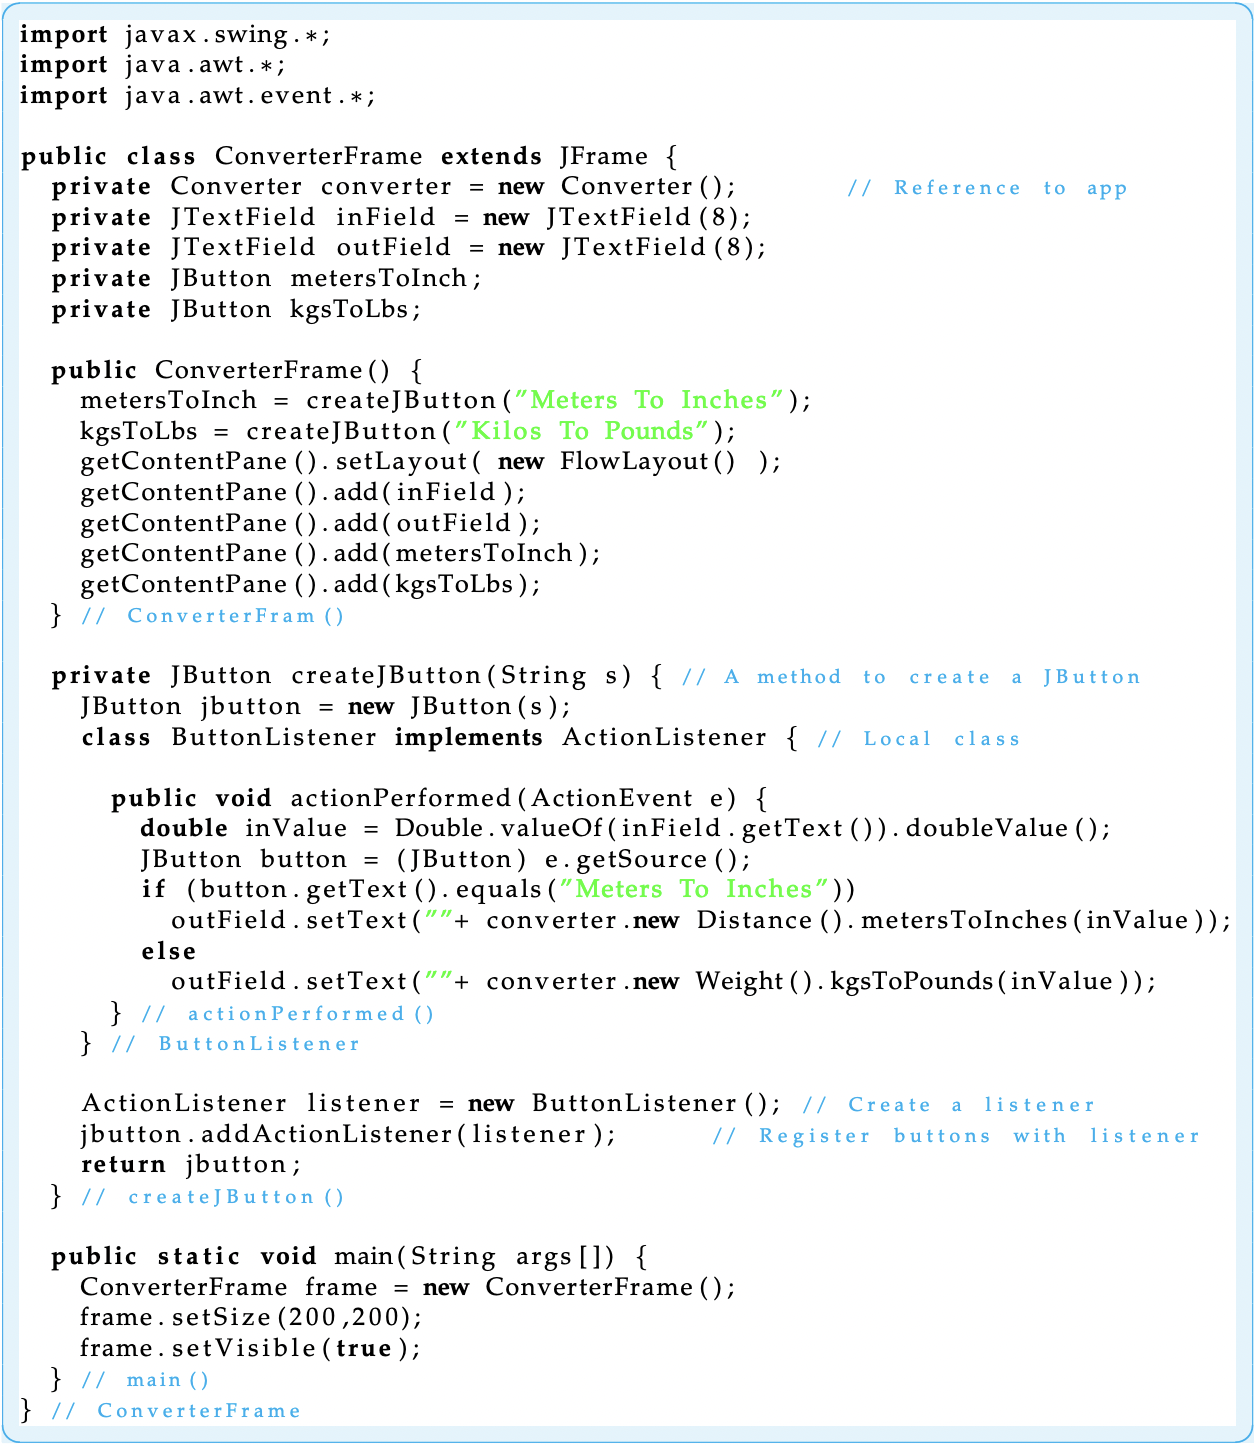
Figure F–2: The use of a local class as an ActionListener adapter.
After defining the local inner class, the createJButton() method creates an instance of the class (listener) and registers it as the button’s action listener. When a separate object is created to serve as listener in this way, it is called an adapter. It implements a listener interface and thereby serves as adapter between the event and the object that generated the event. Any action events that occur on any buttons created with this method will be handled by this adapter. In other words, for any buttons created by the createJButton() method, a listener object is created and assigned as the button’s event listener. By using local classes, the code for doing this is much more compact and efficient.
Local classes have some important restrictions. Although an instance of a local class can use fields and methods defined within the class itself or inherited from its superclasses, it cannot use local variables and parameters defined within its scope unless these are declared final. The reason for this restriction is that final variables receive special handling by the Java compiler. Because the compiler knows that the variable’s value won’t change, it can replace uses of the variable with their values at compile time.
Anonymous Inner Classes
An anonymous inner class is just a local class without a name. Instead of using two separate statements to define and instantiate the local class, Java provides syntax that let’s you do it in one expression. The following code illustrates how this is done:
private JButton createJButton(Strings) { //A method to create a JButton
JButton jbutton = new JButton(s);
jbutton.addActionListener(new ActionListener() { // Anonymous class
public void actionPerformed (ActionEvente) {
double inValue = Double.valueOf(inField.getText()).doubleValue();
JButton button = (JButton)e.getSource();
if (button.getLabel().equals(”Meters To Inches”))
outField.setText(”” + converter.new Distance().me tersToInches(inValue));
else
outField.setText(”” + converter.new Weight().kgsToPounds(inValue));
} //actionPerformed()
}); // ActionListener
return jbutton;
} //create JButton()
Note that the body of the class definition is put right after the new operator. The result is that we still create an instance of the adapter object, but we define it on the fly. If the name following new is a class name, Java will define the anonymous class as a subclass of the named class. If the name following new is an interface, the anonymous class will implement the interface. In this example, the anonymous class is an implementation of the ActionListener interface.
Local and anonymous classes provide an elegant and convenient way to implement adapter classes that are intended to be used once and have relatively short and simple implementations. The choice of local versus anonymous should largely depend on whether you need more than one instance of the class. If so, or if it’s important that the class have a name for some other reason (readability), then you should use a local class. Otherwise, use an anonymous class. As in all design decisions of this nature, you should use whichever approach or style makes your code more readable and more understandable.
Appendix G
Java Autoboxing and Enumeration
This appendix describes some basic properties of autoboxing and enumeration, two of the features added to the Java language with the release of Java 5.0. As for many language features, there are details and subtleties involved in using these features that are not covered here. For further details, you should consult Sun’s online references or other references for a more comprehensive description.
Autoboxing and Unboxing
Autoboxing refers to the automatic storing of a value of primitive type into an object of the corresponding wrapper class. Before autoboxing, it was necessary to explicitly box values into wrapper class objects with code like:
Integer iObj = new Integer(345);
double num = −2.345;
Double dObj = new Double(num);
Java 5.0 automatically creates a wrapper class object from a value of primitive type in many situations where a wrapper class object is expected. The assignments above can be accomplished with the simpler code:
Integer iObj = 3 4 5 ;
double num = −2. 3 4 5;
Double dObj = num;
There is a corresponding feature in Java 5.0 which automatically performs the unboxing of primitive values from wrapper class objects. Instead of the explicit unboxing in:
int m = iObj.intValue();
double x = dObj . doubleValue();
Java 5.0 allows the simpler:
int m = iObj ;
double x = dObj ;
Java 5.0 provides autoboxing of primitive values and automatic unboxing of wrapper class objects in expressions or in arguments of methods, where such a conversion is needed to complete a computation. Beginning programmers are unlikely to encounter many problems that require such conversions. One situation which often requires boxing and unboxing are applications that involve data structures. The generic type data structures of Chapter 16 must store objects but the data to be stored might be represented as values of a primitive type. The code segment below should give you some idea of the type of situation where autoboxing and unboxing can be a genuine help simplifying one’s code:
Stack<Integer> stack = new Stack<Integer>();
for(int k = −1; k > −5; k−−)
stack.push(k);
while (!stack.empty())
System.out.println(Math.abs(stack.pop()));
Notice that the stack.push(k) method is expecting an Integer object so the int value stored in k will be autoboxed into such an object before the method is executed. Also note that the Math.abs() method in the last line of the code fragment is expecting a value of primitive type so the Integer value returned by stack.pop() must be automatically unboxed before the Math.abs() method can be applied.
Sun’s online Java 5.0 documentation can be consulted for a more precise description of where autoboxing and unboxing takes place and a list of some special situations where code allowing autoboxing can lead to confusion and problems.
Enumeration
A new enumeration construct was included in Java 5.0 to make it simpler to represent a finite list of named values as a type. The enum keyword was added as part of this construct. Standard examples of lists of values appropriate for enumerations are the days of the week, months of the year, the four seasons, the planets, the four suits in a deck of cards, and the ranks of cards in a deck of cards. The following declaration of Season enumerated type is an example used by the Sun online documentation.
public enum Season {spring, summer, fall, winter}
Compiling a file that contains only this statement will create a Season.class file that defines a Java type just in the same way that compiling class definitions does. The variables and values of type Season can be referred to in other classes just like other types and values. For example, the following statements are valid statements in a method definition in another class:
Season s1 = winter;
if(s1 == spring)
System.out.println(s1);
Note that the values of enumerated types can be used in assignment statements, equality relations, and it will be printed out exactly as declared in the enum statement.
The enum declaration could also occur inside the definition of a class and be declared as either public or private. In this case the visibility of the type would be determined in a manner similar to inner classes.
A standard way to represent such a finite list of values in Java before the enum construct was to create a list of constants of type int. For example, if one wanted to represent the four seasons you would have to do it inside a definition of a class, say of a class named Calendar. Such a representation might look like:
public class Calendar {
public staticfinal int SPRING = 0 ;
public staticfinal int SUMMER = 1 ;
public staticfinal int FALL = 2 ;
public staticfinal int WINTER = 3 ;
// Other Calendar definitions
} // Calendar
In addition to being a lengthier declaration, note that other classes that wish to refer to this representation would have to use notation something like:
int s1 = Calendar .WINTER;
if (s1 == Calendar.SPRING)
System.out.println(s1);
In addition to being more awkward, note that the println() call will print out an integer in this case. Some additional code would have to be written to be able to print the names of the seasons from the int values used to represent them. It is the case that for methods in the Calendar class, the names of the constants look very much like the values of the enum type.
To illustrate a couple of additional advantages of the enum structure, lets consider using the int representation above in a method definition that describes the start date of a given season. Code for such a method would look something like:
public static String startDate(int s){
switch ( s ){
case SPRING: return ”Vernal Equinox” ;
case SUMMER: return ”Summer S o l s t i c e ” ;
case FALL : return ”Autumnal Equinox” ;
case WINTER : return ”Winter S o l s t i c e ” ;
} //switch
return ”error”;
} // startDate()
This method has a problem referred to as not being typesafe. We would want the startDate() method to be called only with an argument equal to an int value of 0, 1, 2, or 3. There is no way to tell the compiler to make sure that other int values are not used as an argument to this method.
Let’s contrast this with a similar startDate() method that can refer to the Season enumerated type that was defined above. The Calendar class (Figure G– 1) shows the definition of a startDate() method as well as a method to print a list of seasons with corresponding starting dates. Note that the parameter of
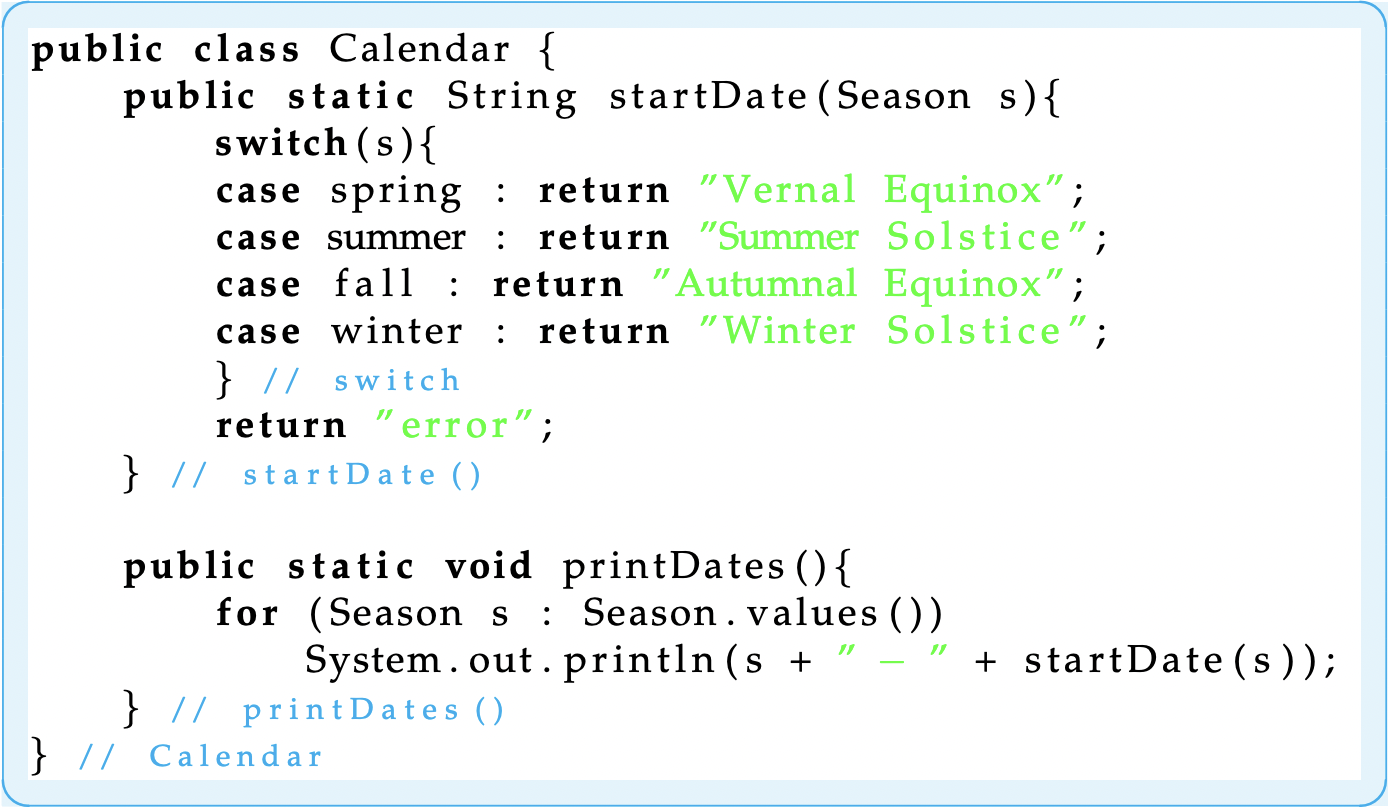
Figure G–1: A Calendar class using the Season.
startDate() is of type Season and so the Java compiler can check that call to this method have an argument of this type. This time the startDate() is typesafe.
The printDates() method illustrates another feature of the enumeration structure. The for loop in this method is the for-in loop which was added to Java 5.0. The expression Season.values() denotes a list of the elements of the type in the order that they were declared. The for-in loop iterates through all the values of the type in the correct order and, in this case, prints out the type name followed by a dash followed by the String computed by the startDate() method. The output when the printDates() method is called is given below:
spring − Vernal Equinox
summer − Summer Solstice
fall − Autumnal Equinox
winter − Winter Solstice
The for-in loop provides a very nice way to iterate through the values of any enumerated type. You may wish to write a corresponding method for the earlier int representation of the seasons for a comparison.
Sun’s online Java 5.0 documentation provides a more precise definition of enumerated types and describes quite a number of other features that we have not alluded to.
Appendix H
Java and UML Resources
Reference Books
- David Flanagan, Java in a Nutshell Edition 5, 5th ed., O’Reilly and Associates 2005. Part of the O’Reilly Java series, this book provides a concise desktop reference to Java and the API.
- James Gosling, Bill Joy, and Guy Steele, The Java Language Specification, 3d ed., Addison-Wesley, 2005. This book, which is part of Addison-Wesley’s Java Series, provides a detailed description of the Java language. An online version is available at
- Martin Fowler, UML Distilled, 3d ed., Addison-Wesley, 2003. This book, which is part of Addison-Wesley’s Object Technology Series, provides a concise introduction to UML.
Online References
- http://www.omg.org/ contains good information on UML.
- http://java.sun.com/j2se is one of Sun Microsystems’ Java Web sites. From this page you can find links to downloads of JDK, API specifications, and documentation on all of Java, including Swing, AWT, and new features of Java 5.0.
- http://java.sun.com/docs/codeconv/ provides a description of coding conventions suggested by the Java Language Specification and followed by the Java programming community. (These are summarized in Appendix A.)
- http://java.sun.com/tutorial provides an online Java tutorial.
- http://www.JARS.com provides reviews and ratings of the best Java applets.
- http://www.java-news-center.org/ is a clearinghouse for Java news, programming examples, debugging tips, and many other useful resources.