
8.2: Investigation
- Page ID
- 28703

Activity A: Ground level air temperature
To begin Part A, type <https://climatereanalyzer.org/> into the address bar of your web browser.
What you should see will look like the figure to the right (Figure 8.2.1). Now select “Today’s Weather Maps” from the menu on the left side of the globe. By default, this displays the average air surface temperature for the entire globe for today. Be careful about moving the cursor over the list. Doing so can unintentionally change the data being displayed on the globe. To see the rest of the planet, click on the globe (this rotates it) or scroll the page down for a flat map of the world.
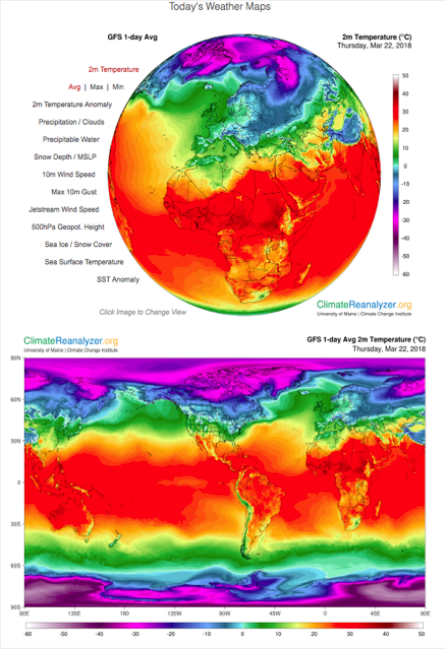
Questions to investigate with this map
- What is the general relationship between temperature and latitude?
- Where are the warmest and coldest places on the globe? For these places estimate their temperature and give their location in latitude and longitude. Find at least three areas for both warmest and coldest.
Next, select the 2 m Temperature Anomaly from the menu to the left of the globe. This displays the variation from the 1979-2000 average of the daily temperature for the current date. This should look like Figure 8.2.2. Variations from normal for the world, the Northern and Southern hemispheres, tropics, Arctic, and Antarctic are shown under both the globe and the flat map.
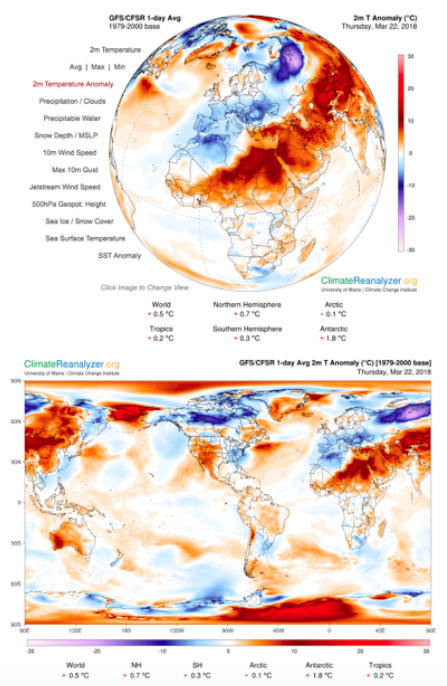
Questions to investigate with this map
- Were the places you identified in question 2 warmer or colder than the average for this day?
- By how much did they vary from normal?
- How did the average temperature for today for the world, for each hemisphere, for the tropics, the Arctic, and the Antarctic compare to the 1979-2000 average for this date?
Activity B – Sea surface temperature
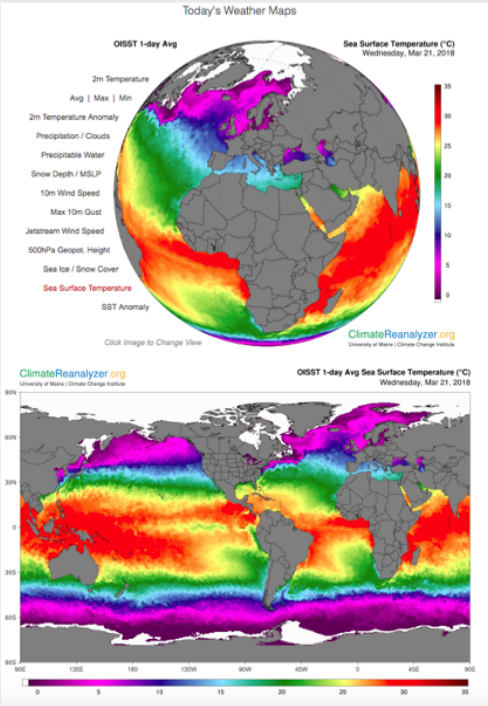
Select sea surface temperature from the menu to the left of the globe. This displays today’s sea surface temperature (SST) for the entire planet (Figure 8.2.3)
How the data used to construct this map was derived is explained in the narrative below the map.
Select sea surface temperature from the menu to the left of the globe. This displays today’s sea surface temperature (SST) for the entire planet (Figure 8.2.3)
How the data used to construct this map was derived is explained in the narrative below the map.
Questions to investigate with this map
- What is the general relationship between SST and latitude?
- Where was the ocean the warmest, where was it the coldest?
- How was the data shown on this map collected?
Select SST Anomaly from the menu to the left of the globe. This displays the difference between today’s average sea surface temperature (SST) and the average SST for this same date from 1971 to 2000 (Figure 8.2.4).
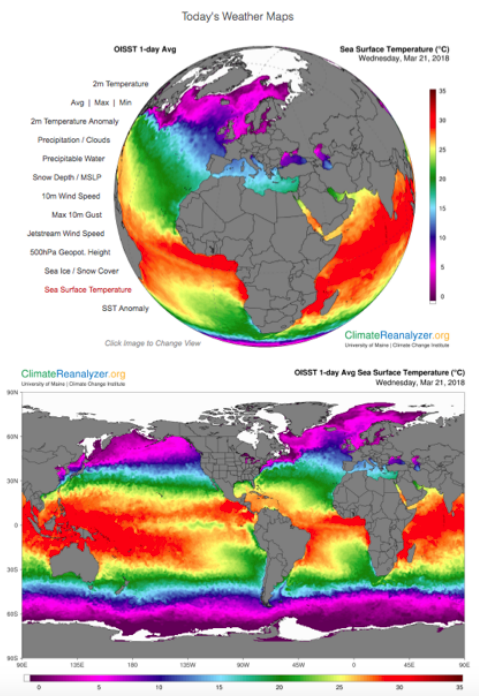
SST anomalies for the world, both hemispheres, and the oceans are listed below both the globe and the map.
Questions to investigate with this map
- How does the SST for the places you identified in question 7 compare to what is normal for this date?
- By how much did they vary?
- How did the SST for today for the world, for each hemisphere, for the North Atlantic, for the North Pacific, and for the Equatorial Pacific compare to the 1971-2000 average for this date?