Engineering LibreTexts

2.1.8: Potentiometers and Rheostats

  • Page ID
    52885
  • \( \newcommand{\vecs}[1]{\overset { \scriptstyle \rightharpoonup} {\mathbf{#1}} } \)

    \( \newcommand{\vecd}[1]{\overset{-\!-\!\rightharpoonup}{\vphantom{a}\smash {#1}}} \)

    \( \newcommand{\id}{\mathrm{id}}\) \( \newcommand{\Span}{\mathrm{span}}\)

    ( \newcommand{\kernel}{\mathrm{null}\,}\) \( \newcommand{\range}{\mathrm{range}\,}\)

    \( \newcommand{\RealPart}{\mathrm{Re}}\) \( \newcommand{\ImaginaryPart}{\mathrm{Im}}\)

    \( \newcommand{\Argument}{\mathrm{Arg}}\) \( \newcommand{\norm}[1]{\| #1 \|}\)

    \( \newcommand{\inner}[2]{\langle #1, #2 \rangle}\)

    \( \newcommand{\Span}{\mathrm{span}}\)

    \( \newcommand{\id}{\mathrm{id}}\)

    \( \newcommand{\Span}{\mathrm{span}}\)

    \( \newcommand{\kernel}{\mathrm{null}\,}\)

    \( \newcommand{\range}{\mathrm{range}\,}\)

    \( \newcommand{\RealPart}{\mathrm{Re}}\)

    \( \newcommand{\ImaginaryPart}{\mathrm{Im}}\)

    \( \newcommand{\Argument}{\mathrm{Arg}}\)

    \( \newcommand{\norm}[1]{\| #1 \|}\)

    \( \newcommand{\inner}[2]{\langle #1, #2 \rangle}\)

    \( \newcommand{\Span}{\mathrm{span}}\) \( \newcommand{\AA}{\unicode[.8,0]{x212B}}\)

    \( \newcommand{\vectorA}[1]{\vec{#1}}      % arrow\)

    \( \newcommand{\vectorAt}[1]{\vec{\text{#1}}}      % arrow\)

    \( \newcommand{\vectorB}[1]{\overset { \scriptstyle \rightharpoonup} {\mathbf{#1}} } \)

    \( \newcommand{\vectorC}[1]{\textbf{#1}} \)

    \( \newcommand{\vectorD}[1]{\overrightarrow{#1}} \)

    \( \newcommand{\vectorDt}[1]{\overrightarrow{\text{#1}}} \)

    \( \newcommand{\vectE}[1]{\overset{-\!-\!\rightharpoonup}{\vphantom{a}\smash{\mathbf {#1}}}} \)

    \( \newcommand{\vecs}[1]{\overset { \scriptstyle \rightharpoonup} {\mathbf{#1}} } \)

    \( \newcommand{\vecd}[1]{\overset{-\!-\!\rightharpoonup}{\vphantom{a}\smash {#1}}} \)

    \(\newcommand{\avec}{\mathbf a}\) \(\newcommand{\bvec}{\mathbf b}\) \(\newcommand{\cvec}{\mathbf c}\) \(\newcommand{\dvec}{\mathbf d}\) \(\newcommand{\dtil}{\widetilde{\mathbf d}}\) \(\newcommand{\evec}{\mathbf e}\) \(\newcommand{\fvec}{\mathbf f}\) \(\newcommand{\nvec}{\mathbf n}\) \(\newcommand{\pvec}{\mathbf p}\) \(\newcommand{\qvec}{\mathbf q}\) \(\newcommand{\svec}{\mathbf s}\) \(\newcommand{\tvec}{\mathbf t}\) \(\newcommand{\uvec}{\mathbf u}\) \(\newcommand{\vvec}{\mathbf v}\) \(\newcommand{\wvec}{\mathbf w}\) \(\newcommand{\xvec}{\mathbf x}\) \(\newcommand{\yvec}{\mathbf y}\) \(\newcommand{\zvec}{\mathbf z}\) \(\newcommand{\rvec}{\mathbf r}\) \(\newcommand{\mvec}{\mathbf m}\) \(\newcommand{\zerovec}{\mathbf 0}\) \(\newcommand{\onevec}{\mathbf 1}\) \(\newcommand{\real}{\mathbb R}\) \(\newcommand{\twovec}[2]{\left[\begin{array}{r}#1 \\ #2 \end{array}\right]}\) \(\newcommand{\ctwovec}[2]{\left[\begin{array}{c}#1 \\ #2 \end{array}\right]}\) \(\newcommand{\threevec}[3]{\left[\begin{array}{r}#1 \\ #2 \\ #3 \end{array}\right]}\) \(\newcommand{\cthreevec}[3]{\left[\begin{array}{c}#1 \\ #2 \\ #3 \end{array}\right]}\) \(\newcommand{\fourvec}[4]{\left[\begin{array}{r}#1 \\ #2 \\ #3 \\ #4 \end{array}\right]}\) \(\newcommand{\cfourvec}[4]{\left[\begin{array}{c}#1 \\ #2 \\ #3 \\ #4 \end{array}\right]}\) \(\newcommand{\fivevec}[5]{\left[\begin{array}{r}#1 \\ #2 \\ #3 \\ #4 \\ #5 \\ \end{array}\right]}\) \(\newcommand{\cfivevec}[5]{\left[\begin{array}{c}#1 \\ #2 \\ #3 \\ #4 \\ #5 \\ \end{array}\right]}\) \(\newcommand{\mattwo}[4]{\left[\begin{array}{rr}#1 \amp #2 \\ #3 \amp #4 \\ \end{array}\right]}\) \(\newcommand{\laspan}[1]{\text{Span}\{#1\}}\) \(\newcommand{\bcal}{\cal B}\) \(\newcommand{\ccal}{\cal C}\) \(\newcommand{\scal}{\cal S}\) \(\newcommand{\wcal}{\cal W}\) \(\newcommand{\ecal}{\cal E}\) \(\newcommand{\coords}[2]{\left\{#1\right\}_{#2}}\) \(\newcommand{\gray}[1]{\color{gray}{#1}}\) \(\newcommand{\lgray}[1]{\color{lightgray}{#1}}\) \(\newcommand{\rank}{\operatorname{rank}}\) \(\newcommand{\row}{\text{Row}}\) \(\newcommand{\col}{\text{Col}}\) \(\renewcommand{\row}{\text{Row}}\) \(\newcommand{\nul}{\text{Nul}}\) \(\newcommand{\var}{\text{Var}}\) \(\newcommand{\corr}{\text{corr}}\) \(\newcommand{\len}[1]{\left|#1\right|}\) \(\newcommand{\bbar}{\overline{\bvec}}\) \(\newcommand{\bhat}{\widehat{\bvec}}\) \(\newcommand{\bperp}{\bvec^\perp}\) \(\newcommand{\xhat}{\widehat{\xvec}}\) \(\newcommand{\vhat}{\widehat{\vvec}}\) \(\newcommand{\uhat}{\widehat{\uvec}}\) \(\newcommand{\what}{\widehat{\wvec}}\) \(\newcommand{\Sighat}{\widehat{\Sigma}}\) \(\newcommand{\lt}{<}\) \(\newcommand{\gt}{>}\) \(\newcommand{\amp}{&}\) \(\definecolor{fillinmathshade}{gray}{0.9}\)

    Some applications require the use of variable resistances. One example is a basic volume control, but other examples include equipment calibration and user adjustable parameters such as the bass, treble and balance controls on a home audio system. Adjustable resistances fall under two categories, potentiometers and rheostats. Generally, these would be the same physical device, with the application and usage determining its name.

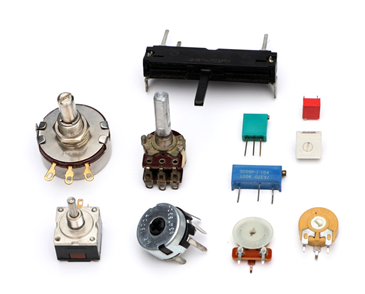
    A potentiometer is a resistor with three leads. Along with the typical end leads, there is a third lead referred to as the wiper or tap. This third lead is connected to a small metallic arm that makes contact with the resistive material and which can be moved along the length of the material. Potentiometers, or pots for short, often are formed in a circular shape (rotary travel) but they can also be in the form of a straight line (linear travel). Several different types are shown in Figure 3.8.1 . The larger circular units with shafts and the straight unit at the top are designed to be adjusted by the end user (appropriately stylish knobs being attached to said shafts, of course), while the smaller units are intended to be adjusted only by a technician (note the small adjustment screw slots intended to receive fine screwdrivers). The smaller units are designed to be mounted directly on a printed circuit board while the user adjustable units are mounted on a front panel, and have wiring lugs instead of straight leads.

    clipboard_ec9316e7b85de2d5609d9f6c0fd572dd2.png

    Figure 3.8.1 : A variety of potentiometers.

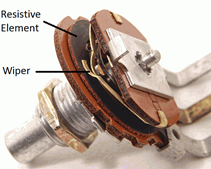
    A cutaway view of a rotary panel mount pot with its back casing removed is shown in Figure 3.8.2 .

    clipboard_ec984ddfc27ea6c8db540e73f70d68c19.png

    Figure 3.8.2 : Cutaway view of a rotary potentiometer.

    Most circular potentiometers utilize a 270\(^{\circ}\) rotation from end to end, also known as “3/4 turn”. Some precision pots used for calibration may use an internal worm gear to move the wiper and achieve 20 or more turns to shuttle the wiper from one end to the other. This results in the ability to make very fine adjustments. The rectangular units in the right-center of Figure 3.8.1 are examples of this type.

    The schematic symbol for a basic potentiometer is shown in Figure 3.8.3 . For convenience, its terminals are labeled A and B for the two ends, and W for the wiper arm.

    clipboard_e1f8d5ffb59b718f247756dcc192cf49d.png

    Figure 3.8.3 : Schematic symbol for a potentiometer, with labels.

    A pot can be visualized as two resistors in sequence with a tap between them. The total resistance never changes. What does change is the ratio of the two pieces.

    \[R_{AB} = R_{AW} + R_{WB} \label{3.6} \]

    At the extreme left of travel, \(R_{AW}\) will be 0 and \(R_{WB}\) will be equal to \(R_{AB}\). At the extreme right, \(R_{AW}\) will equal \(R_{AB}\) and \(R_{WB}\) will be 0. If the wiper is precisely in the middle, then \(R_{AW} = R_{WB} = R_{AB}/2\), and so on1.

    As a result, potentiometers are very useful as controllable voltage dividers (hence the name). Sometimes it is desirable to control two signals simultaneously from a single knob (e.g., one volume knob for a hi-fi stereo controls both the left and right channels). For this application, multiple resistive elements can be stacked and use a common shaft to control all of the wiper arms in tandem. These are known as ganged potentiometers. The tall, round unit in the left-center of Figure 3.8.1 is a dual gang pot. Note that it has a total of six solder lugs, three for the top element and three for the back element. Finally, unlike fixed resistors, pots are available in limited sizes. Typical values use multiples of 1 or 5 for the total resistance (for example, 1 k\( \Omega \), 5 k\( \Omega \), 10 k\( \Omega \), etc.) although a limited selection of other sizes are also available.

    If only the wiper and only one of the two end terminals is used, then the device is referred to as a rheostat. Rheostats are often used to limit current. The value of the rheostat ranges from 0 up to the nominal value of the potentiometer. The schematic symbols for a rheostat are shown in Figure 3.8.4 . The ANSI symbol is shown at the left and the IEC version at the right.

    clipboard_e06fc9dba07f51f81f9df7641c04f261b.pngclipboard_ea3aec4c101ec820e085fa7a2abad4454.png

    Figure 3.8.4 : Schematic symbols for a rheostat: ANSI (right) and IEC (left).

    Time for a couple of examples.

    Example 3.8.1

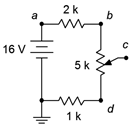
    For the circuit depicted in Figure 3.8.5 , determine the maximum and minimum voltages for \(V_c\), as well as its value when the pot is adjusted to midway (assume linear taper).

    clipboard_ef1feba48a0232dbc714064252fe2b513.png

    Figure 3.8.5 : Circuit for Example 3.8.1 .

    The voltage divider rule states that the voltage across any resistor or group of resistors in a series loop is proportional to their resistance compared to the total resistance in that loop. The total resistance in this circuit is 8 k\( \Omega \). The voltage at node \(c\) will depend on the setting of the pot. The maximum voltage occurs when the wiper is all the way up, contacting node \(b\).

    \[V_c (max) = E \frac{R_i}{R_T} \nonumber \]

    \[V_c (max ) = 16 V \frac{6 k \Omega}{ 8 k \Omega} \nonumber \]

    \[V_c (max ) = 12 \text{ volts} \nonumber \]

    For the minimum case, the wiper is set all the way down, contacting node \(d\).

    \[V_c (min) = E \frac{R_i}{R_T} \nonumber \]

    \[V_c (min) = 16V \frac{1 k \Omega}{ 8 k \Omega} \nonumber \]

    \[V_c (min) = 2 \text{ volts} \nonumber \]

    For the midway case, the pot can be treated as two 2.5 k\( \Omega \) resistors.

    \[V_c (mid ) = E \frac{R_i}{R_T} \nonumber \]

    \[V_c (mid ) = 16 V \frac{3.5k \Omega}{ 8 k \Omega} \nonumber \]

    \[V_c (mid ) = 7 \text{ volts} \nonumber \]

    Note that the mid-position achieves a voltage midway between the extremes.

    Thus the pot allows a range of voltage adjustment between a minimum of 2 volts and a maximum of 12 volts. The upper and lower fixed resistors serve to set these limits. The larger the values of these resistors compared to the value of the pot, the more narrow the range of adjustment. If these two resistors were excluded, the pot would allow the entire range of adjustment, from ground (0 volts) up to the power supply value of 16 volts.

    Example 3.8.2

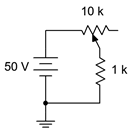
    The potentiometer in the circuit of Figure 3.8.6 is connected as a rheostat. Determine the maximum and minimum current in the circuit.

    clipboard_e124d621a972a07360f78b4a805e3c3e9.png

    Figure 3.8.6 : Circuit for Example 3.8.2 .

    The rheostat will present a resistance value between 0 \( \Omega \) and 10 k\( \Omega \). The maximum current case occurs when the wiper is set to the extreme left, producing 0 \( \Omega \).

    \[I (max) = \frac{E}{R_T} \nonumber \]

    \[I (max) = \frac{50 V}{1 k \Omega} \nonumber \]

    \[I (max) = 50 mA \nonumber \]

    For the minimum case, the wiper is set all the way to the right, producing the full 10 k\( \Omega \).

    \[I (min) = \frac{E}{R_T} \nonumber \]

    \[I (min) = \frac{50 V}{11 k \Omega} \nonumber \]

    \[I (min) = 4.545 mA \nonumber \]

    References

    1This 50/50 division is true if the pot has a linear taper, meaning that the resistance change is proportional to the wiper position. While this is typical, it is possible to have a taper that is not linear for special applications, such as audio taper. In these devices the resistance ratio at mid-position might be something like 10/90 instead of 50/50. This would be desired for a volume control because the human ear responds to changes in sound pressure in a logarithmic fashion. Using a linear taper pot would result in a volume control that is too sensitive at one end and yet produces hardly no change at the other end.


    This page titled 2.1.8: Potentiometers and Rheostats is shared under a CC BY-NC-SA license and was authored, remixed, and/or curated by James M. Fiore.

    • Was this article helpful?