7: Graphical User Interface
- Page ID
- 89350
\( \newcommand{\vecs}[1]{\overset { \scriptstyle \rightharpoonup} {\mathbf{#1}} } \)
\( \newcommand{\vecd}[1]{\overset{-\!-\!\rightharpoonup}{\vphantom{a}\smash {#1}}} \)
\( \newcommand{\dsum}{\displaystyle\sum\limits} \)
\( \newcommand{\dint}{\displaystyle\int\limits} \)
\( \newcommand{\dlim}{\displaystyle\lim\limits} \)
\( \newcommand{\id}{\mathrm{id}}\) \( \newcommand{\Span}{\mathrm{span}}\)
( \newcommand{\kernel}{\mathrm{null}\,}\) \( \newcommand{\range}{\mathrm{range}\,}\)
\( \newcommand{\RealPart}{\mathrm{Re}}\) \( \newcommand{\ImaginaryPart}{\mathrm{Im}}\)
\( \newcommand{\Argument}{\mathrm{Arg}}\) \( \newcommand{\norm}[1]{\| #1 \|}\)
\( \newcommand{\inner}[2]{\langle #1, #2 \rangle}\)
\( \newcommand{\Span}{\mathrm{span}}\)
\( \newcommand{\id}{\mathrm{id}}\)
\( \newcommand{\Span}{\mathrm{span}}\)
\( \newcommand{\kernel}{\mathrm{null}\,}\)
\( \newcommand{\range}{\mathrm{range}\,}\)
\( \newcommand{\RealPart}{\mathrm{Re}}\)
\( \newcommand{\ImaginaryPart}{\mathrm{Im}}\)
\( \newcommand{\Argument}{\mathrm{Arg}}\)
\( \newcommand{\norm}[1]{\| #1 \|}\)
\( \newcommand{\inner}[2]{\langle #1, #2 \rangle}\)
\( \newcommand{\Span}{\mathrm{span}}\) \( \newcommand{\AA}{\unicode[.8,0]{x212B}}\)
\( \newcommand{\vectorA}[1]{\vec{#1}} % arrow\)
\( \newcommand{\vectorAt}[1]{\vec{\text{#1}}} % arrow\)
\( \newcommand{\vectorB}[1]{\overset { \scriptstyle \rightharpoonup} {\mathbf{#1}} } \)
\( \newcommand{\vectorC}[1]{\textbf{#1}} \)
\( \newcommand{\vectorD}[1]{\overrightarrow{#1}} \)
\( \newcommand{\vectorDt}[1]{\overrightarrow{\text{#1}}} \)
\( \newcommand{\vectE}[1]{\overset{-\!-\!\rightharpoonup}{\vphantom{a}\smash{\mathbf {#1}}}} \)
\( \newcommand{\vecs}[1]{\overset { \scriptstyle \rightharpoonup} {\mathbf{#1}} } \)
\( \newcommand{\vecd}[1]{\overset{-\!-\!\rightharpoonup}{\vphantom{a}\smash {#1}}} \)
\(\newcommand{\avec}{\mathbf a}\) \(\newcommand{\bvec}{\mathbf b}\) \(\newcommand{\cvec}{\mathbf c}\) \(\newcommand{\dvec}{\mathbf d}\) \(\newcommand{\dtil}{\widetilde{\mathbf d}}\) \(\newcommand{\evec}{\mathbf e}\) \(\newcommand{\fvec}{\mathbf f}\) \(\newcommand{\nvec}{\mathbf n}\) \(\newcommand{\pvec}{\mathbf p}\) \(\newcommand{\qvec}{\mathbf q}\) \(\newcommand{\svec}{\mathbf s}\) \(\newcommand{\tvec}{\mathbf t}\) \(\newcommand{\uvec}{\mathbf u}\) \(\newcommand{\vvec}{\mathbf v}\) \(\newcommand{\wvec}{\mathbf w}\) \(\newcommand{\xvec}{\mathbf x}\) \(\newcommand{\yvec}{\mathbf y}\) \(\newcommand{\zvec}{\mathbf z}\) \(\newcommand{\rvec}{\mathbf r}\) \(\newcommand{\mvec}{\mathbf m}\) \(\newcommand{\zerovec}{\mathbf 0}\) \(\newcommand{\onevec}{\mathbf 1}\) \(\newcommand{\real}{\mathbb R}\) \(\newcommand{\twovec}[2]{\left[\begin{array}{r}#1 \\ #2 \end{array}\right]}\) \(\newcommand{\ctwovec}[2]{\left[\begin{array}{c}#1 \\ #2 \end{array}\right]}\) \(\newcommand{\threevec}[3]{\left[\begin{array}{r}#1 \\ #2 \\ #3 \end{array}\right]}\) \(\newcommand{\cthreevec}[3]{\left[\begin{array}{c}#1 \\ #2 \\ #3 \end{array}\right]}\) \(\newcommand{\fourvec}[4]{\left[\begin{array}{r}#1 \\ #2 \\ #3 \\ #4 \end{array}\right]}\) \(\newcommand{\cfourvec}[4]{\left[\begin{array}{c}#1 \\ #2 \\ #3 \\ #4 \end{array}\right]}\) \(\newcommand{\fivevec}[5]{\left[\begin{array}{r}#1 \\ #2 \\ #3 \\ #4 \\ #5 \\ \end{array}\right]}\) \(\newcommand{\cfivevec}[5]{\left[\begin{array}{c}#1 \\ #2 \\ #3 \\ #4 \\ #5 \\ \end{array}\right]}\) \(\newcommand{\mattwo}[4]{\left[\begin{array}{rr}#1 \amp #2 \\ #3 \amp #4 \\ \end{array}\right]}\) \(\newcommand{\laspan}[1]{\text{Span}\{#1\}}\) \(\newcommand{\bcal}{\cal B}\) \(\newcommand{\ccal}{\cal C}\) \(\newcommand{\scal}{\cal S}\) \(\newcommand{\wcal}{\cal W}\) \(\newcommand{\ecal}{\cal E}\) \(\newcommand{\coords}[2]{\left\{#1\right\}_{#2}}\) \(\newcommand{\gray}[1]{\color{gray}{#1}}\) \(\newcommand{\lgray}[1]{\color{lightgray}{#1}}\) \(\newcommand{\rank}{\operatorname{rank}}\) \(\newcommand{\row}{\text{Row}}\) \(\newcommand{\col}{\text{Col}}\) \(\renewcommand{\row}{\text{Row}}\) \(\newcommand{\nul}{\text{Nul}}\) \(\newcommand{\var}{\text{Var}}\) \(\newcommand{\corr}{\text{corr}}\) \(\newcommand{\len}[1]{\left|#1\right|}\) \(\newcommand{\bbar}{\overline{\bvec}}\) \(\newcommand{\bhat}{\widehat{\bvec}}\) \(\newcommand{\bperp}{\bvec^\perp}\) \(\newcommand{\xhat}{\widehat{\xvec}}\) \(\newcommand{\vhat}{\widehat{\vvec}}\) \(\newcommand{\uhat}{\widehat{\uvec}}\) \(\newcommand{\what}{\widehat{\wvec}}\) \(\newcommand{\Sighat}{\widehat{\Sigma}}\) \(\newcommand{\lt}{<}\) \(\newcommand{\gt}{>}\) \(\newcommand{\amp}{&}\) \(\definecolor{fillinmathshade}{gray}{0.9}\)Introduction
Graphical User Interfaces, or GUIs, are tools that improve how the user can interact with a code by modifying the appearances of inputs, messages, or other notices. As a result, users can type inputs or interact with codes through pop-up windows instead of using the command window. The following section will discuss various GUI commands, such as menu, input dialog, and message box.
GUI is a powerful way to improve the usability of a code. By using a GUI, it is easier for users to input and read data and removes the need for users to interact directly with the command window. This capability makes it easier for users to input data and much easier to write codes which allow users to select from several options.
The list dialog Command (listdlg)
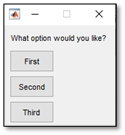
The listdlg command enables the user to select from several predetermined options from the user to select from several predetermined choices for inputs. This command replaces the command “menu“, which is no longer recommended for creating lists to select from in MATLAB. The menu function may still be present in codes more than a few years old and is useful to understand. If using menu, the following format creates a prompt accompanied by buttons with each listed option within the command. An example of this with an accompanying output is shown below.
>> a = menu('What option would you like?','First','Second','Third');
The listdlg syntax is similar to the older menu command. An example of the listdlg is shown below that outputs the same menu as the above example. First, a variable is created which is assigned an array of each list entry that will be in the menu. After the list is defined, the format of the list and the name of the list variable are entered into the listdlg function.
list = {'First','Second','Third'};a = listdlg('ListString',list); Adding options to the basic “ListString” selection enables further customization of the command. The option “PromptString” allows an instruction to be printed on the output as well. Additionally, the “SelectionMode” function allows for customization of the number of options that can be selected in the list. These features are shown added to the ongoing example below.
list = {'First','Second','Third'};a = listdlg('PromptString',{'Select an Option:'}, 'SelectionMode','single','ListString',list);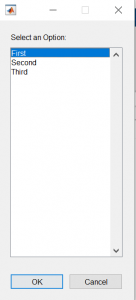
This code would generate the following textbox within MATLAB. Once the user selects one of the options, the variable a will be renamed to correspond with the selected option. Note that the variable will be named based on the order of the selected option, and not based on the text placed in each box. For this example, if the user selects the first box labeled “First”, the variable a will be assigned the value a=1. This enables the author of the code to place any text within the box and not have it affect what the variable is named.
The Input Dialog (inputdlg) Command
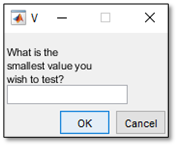
The input dialog function is like the menu command in the fact that it enables the user to interact with their codes and can interact with their codes through a pop-up window. Instead of selecting from a button as in the menu command, the input dialog command enables the user to input data or values into their code in a textbox. The following example shows how to format the input dialog command. The format for this command is slightly more complex than the menu command due to its increased features. The first portion of the code contained in brackets and quotations and highlighted in yellow is the message which will be displayed in the textbox. The second portion highlighted in blue shows the message which can be displayed at the top of the textbox. The green portion shows how many characters as tall and long the textbox will be. In most applications, a relatively small box with dimensions around 1×20 characters is enough. The second example of the inputdlg function depicts how to input two values into the function. Note that each message is separated by a comma.
x = inputdlg ({'What is the smallest value you wish to test?'},'value', [1 20]);


The Message Box (msgbox) Command
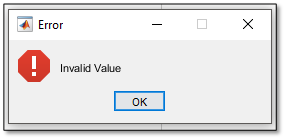
The msgbox function creates a message box that can display a message in a pop-up or can modify the fprintf function to display a message in a pop-up. An example of a msgbox function that displays a message and an image is shown below. Visit the Mathworks msgbox webpage to view a more complete listing of images available for the msgbox function. Within the msgbox function, the text highlighted in yellow is the main message in the box. The text highlighted in green in the second set of parentheses is the title which appears next to the MATLAB logo in the top header of the pop-up. The third piece of data highlighted in blue is the code for the image which appeared in the msgbox.
f = msgbox('Invalid Value', 'Error','error');
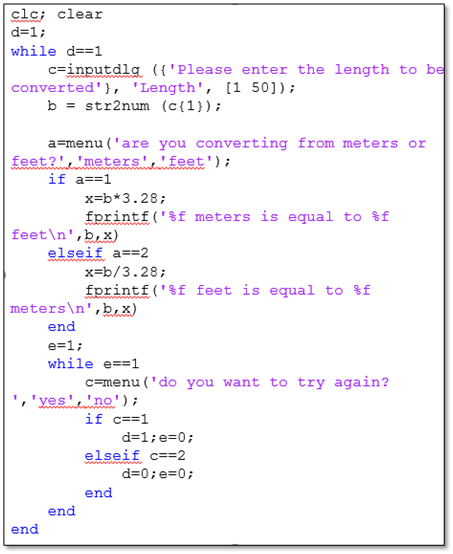
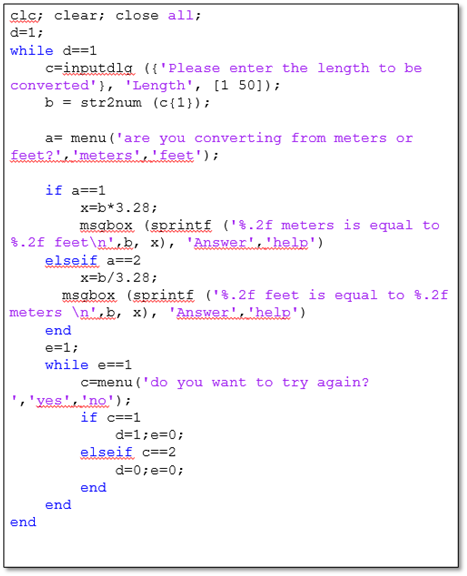
Examples
The following code is a unit converter developed by an Iowa State faculty member. This code can be modified to include a msgbox function to increase the code’s usability, as shown in the second version. This example also demonstrates various elements of MATLAB addressed thus far, such as while loops, if statements, and nested loops.