
10.7: The Interaction Hierarchy
- Page ID
- 45862

A graphical element responds to events by setting callbacks or interactions. We have already presented how to set callbacks. In this section we will detail the interactions.
The root class of all Roassal interactions is ROInteraction. An interaction is set to an element by sending the @ message with a subclass of ROInteraction or an instance of such a class as parameter. There are diverse interactions that can be applied to an element such as RODraggable or ROGrowable. RODraggable allows an element to be dragged by the mouse and ROGrowable makes an element increase its size when clicked.
An element may have more than one interaction. For example, we can apply both RODraggable or ROGrowable to an element. The following code illustrates this. Click the element to make it bigger or drag it on the view.
| view element |
view := ROView new.
element := ROElement new size: 10.
element
    + ROBox;
    @ RODraggable;
    @ ROGrowable.
view add: element.
view open.
Some interactions are more complex to set up, like popup elements which are displayed when the mouse is over an element.
From the available interactions in Roassal, only a few examples are presented here.
ROAbstractPopup
ROAbstractPopup allows elements to react to mouse over events by displaying a popup. There are two kinds of popups, (i) ROPopup, which by default displays a box with the printString value of the element model; and (ii) ROPopupView which displays a custom view.
To add a popup to an element just send the @ message with the ROPopup class as argument. It is also possible to set up a custom text using the text: message with a string as parameter.
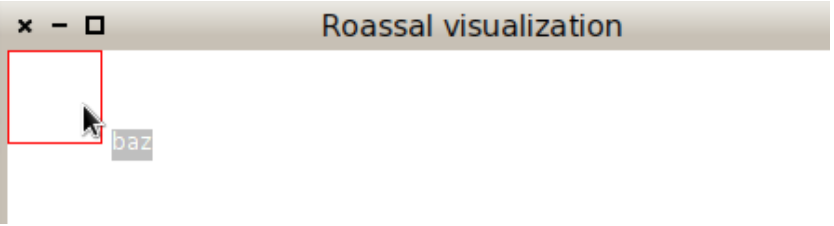
In the following example, we create an element by sending the spriteOn: message to the ROElement class, with an arbitrary string as its model. The resulting element has size 50, a red border and is draggable by the mouse. We finally add the ROPopup to the element.
view := ROView new.
el := ROElement spriteOn: 'baz'.
el @ ROPopup. "Or with custom text -> (ROPopup text: 'this is custom text')"
view add: el.
view open.
ROPopupView is slightly more complex as it needs the definition of the view to popup. This interaction can be created by sending the view: message to the ROPopupView class with the new view to be displayed. The parameter can also be a block that defines a view. When the mouse is over an element, the block is evaluated using the same element as parameter, allowing the view to be dynamically created.
The following example creates a view with five elements. Each one reacts when the mouse is placed over it by displaying a popup. The popup view is defined as a block that creates a view with the same number of nodes as the element model where the mouse is. For example, and as Figure \(\PageIndex{2}\) shows, when passing the mouse over the node “3”, a popup with three gray boxes appears.
view := ROView new.
elements := ROElement spritesOn: (1 to: 5).
"create the view to popup"
viewToPopup := [ :el | | v |
                        v := ROView new.
                        "Add as many elements as the value represented"
                        v addAll: (ROElement forCollection: (1 to: el model)).
                        v elementsDo: [ :e | e size: 20; + ROBox ].
                        ROGridLayout on: v elements.
                        v ].
elements do: [ :e | e + ROLabel; @ (ROPopupView view: viewToPopup)].
view addAll: elements.
ROHorizontalLineLayout on: view elements.
view open.

RODynamicEdge
A recurrent need when visualizing data elements and their relations is showing outgoing edges when the mouse points to an element. Instead of trying to get the right mixture of callbacks when entering or leaving the element, the interaction RODynamicEdge considerably eases the task.
The following example makes some lines appear when the mouse hovers over some elements:
| rawView el1 el2 el3 |
rawView := ROView new.
rawView add: (el1 := ROBox element size: 20).
rawView add: (el2 := ROBox element size: 20).
rawView add: (el3 := ROBox element size: 20).
ROCircleLayout on: (Array with: el1 with: el2 with: el3).
el1 @ RODraggable.
el2 @ RODraggable.
el3 @ RODraggable.
el1 @ (RODynamicEdge toAll: (Array with: el2 with: el3) using: (ROLine arrowed color:
    Color red)).
rawView open
ROAnimation
Animations are also interactions in Roassal (i.e., ROAnimation is a subclass of ROInteraction). All animations are subclasses of ROAnimation. Some animations allow elements to be translated either linearly at a constant speed (ROLinearMove), with an acceleration (ROMotionMove), or following a mathematical function (ROFunctionMove). ROZoomInMove and ROZoomOutMove perform an animation zooming in or out.
Each animation has a number of cycles to complete, executing each one by sending the doStep message. A ROAnimation also allows one to set a block to be executed after the animation is finished, using the after: message. It is important to notice that any action to be carried out after the animation is finished must be set before the animation is triggered, otherwise it will not be executed.
view := ROView new.
element := ROElement new.
element size: 10.
element + (ROEllipse color: Color green).
view add: element.
element translateBy: 30@20.
ROFunctionMove new
    nbCycles: 360;
    blockY: [ :x | (x * 3.1415 / 180) sin * 80 + 50 ];
    on: element.
view open.
Figure ? presents ROLinearMove. The following code allows an element to follow a sinus curve using the ROFunctionMove.