
7.2: The Main Code Browser
- Page ID
- 39606
Many different class browsers have been developed over the years for Pharo. Pharo simplifies this story by offering a single browser that integrates various views. Figure \(\PageIndex{1}\) shows the browser as it appears when you first open it.

The four small panes at the top of the browser represent a hierarchic view of the methods in the system, much in the same way as the Mac OS X Finder in column mode provide a view of the files on the disk. The leftmost pane lists packages of classes; select one (say Kernel) and the pane immediately to the right will then show all of the classes in that package.
Similarly, if you select one of the classes in the second pane, say, Boolean (see Figure \(\PageIndex{2}\)), the third pane will show all of the protocols defined for that class, as well as a virtual protocol --all--. Protocols are a way of categorizing methods; they make it easier to find and think about the behaviour of a class by breaking it up into smaller, conceptually coherent pieces. The fourth pane shows the names of all of the methods defined in the selected protocol. If you then select a method name, the source code of the corresponding method appears in the large pane at the bottom of the browser, where you can view it, edit it, and save the edited version. If you select class Boolean, protocol controlling and the method or:, the browser should look like Figure \(\PageIndex{3}\).


Unlike directories in a file browser, the four top panes of the browser are not quite equal. Whereas classes and methods are part of the Smalltalk language, packages and protocols are not: they are a convenience introduced by the browser to limit the amount of information that needs to be shown in each pane. For example, if there were no protocols, the browser would have to show a list of all of the methods in the selected class; for many classes this list would be too large to navigate conveniently.
Because of this, the way that you create a new package or a new protocol is different from the way that you create a new class or a new method. To create a new package, right-click in the package pane and select Add package.... To create a new protocol, right-click in the protocol pane and select Add protocol.... Enter the name of the new thing in the dialog, and you are done: there is nothing more to a package or a protocol than its name and its contents.
In contrast, to create a new class or a new method, you will actually have to write some Smalltalk code. If you click the currently selected package (in the left-most pane), the bottom browser pane will display a class creation template (Figure \(\PageIndex{4}\)). You create a new class by editing this template: replace Object by the name of the existing class of which you wish to create a subclass, replace NameOfSubclass by the name that you would like to give to your new subclass, and fill in the instance variable names if you know them. The package for the new class is by default the currently selected package, but you can change this too if you like. If you already have the browser focused on the class that you wish to subclass, you can get the same template with slightly different initialization by right-clicking in the class pane, and selecting Add Class. You can also just edit the definition of an existing class, changing the class name to something new. In all cases, when you accept the new definition, the new class (the one whose name follows the #) is created (as is the corresponding metaclass). Creating a class also creates a global variable that references the class, which is why you can refer to all of the existing classes by using their names.

Can you see why the name of the new class has to appear as a Symbol (i.e., prefixed with #) in the class creation template, but after the class is created, code can refer to the class by using the name as an identifier (without the #)?
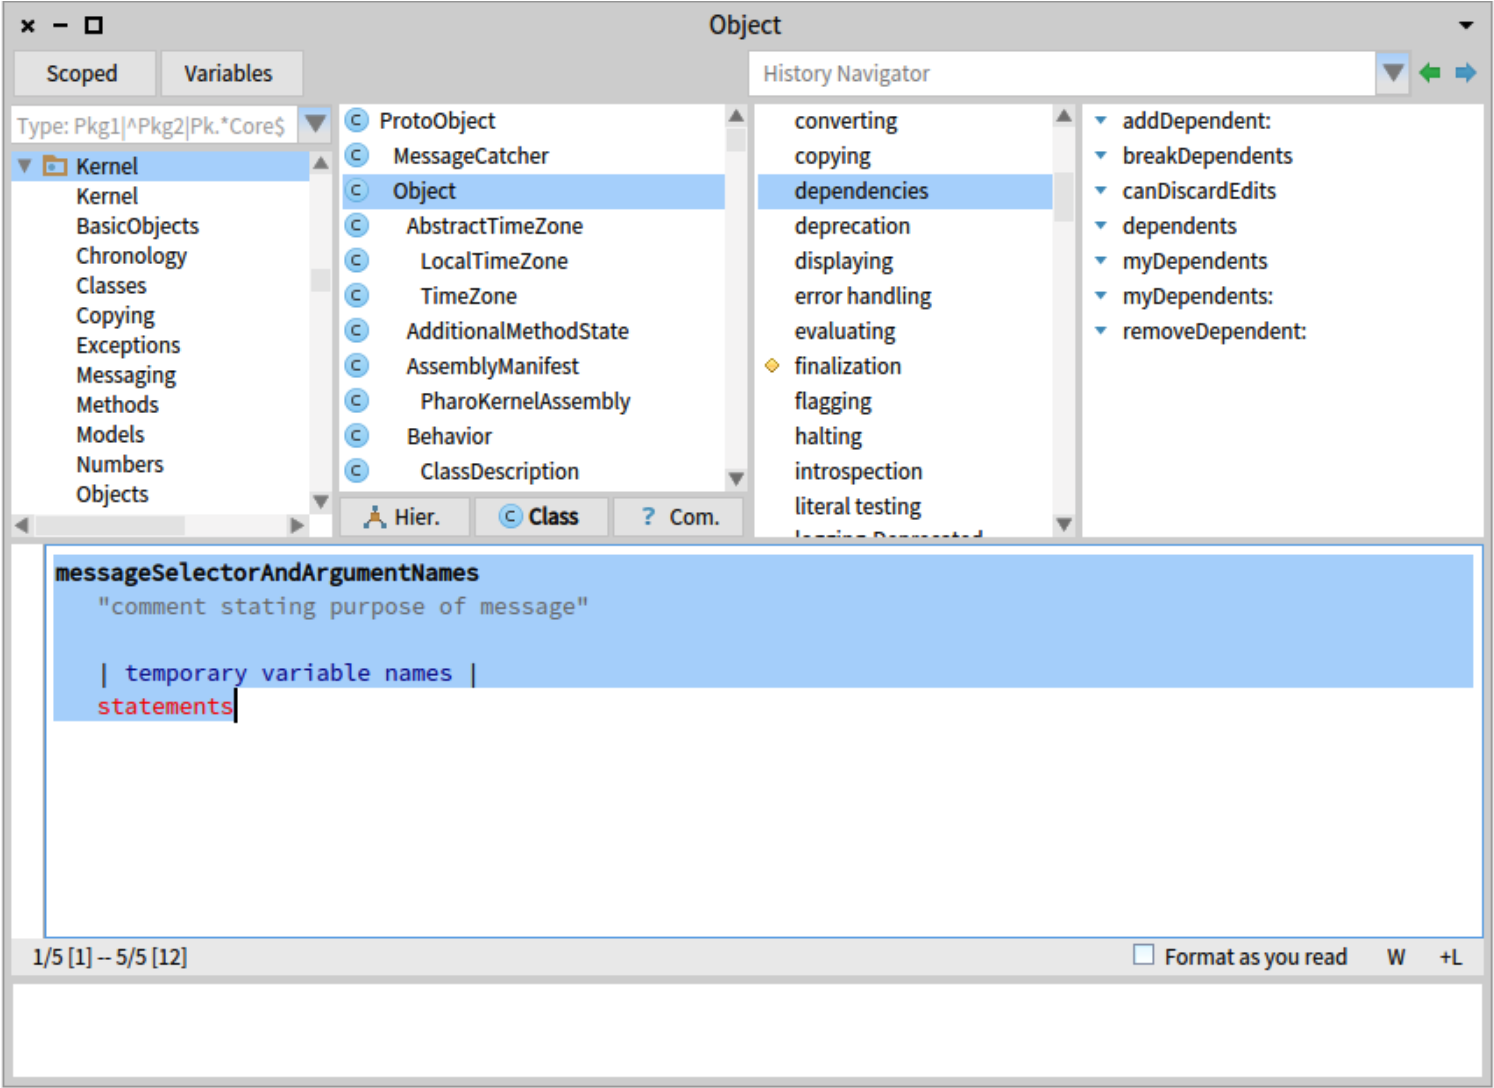
The process of creating a new method is similar. First select the class in which you want the method to live, and then select a protocol. The browser will display a method-creation template, as shown in Figure \(\PageIndex{5}\), which you can fill-in or edit.
Navigating the code space
The browser provides several tools for exploring and analyzing code. These tools can be accessed by right-clicking in the various contextual menus, or, in the case of the most frequently used tools, by means of keyboard shortcuts.
Opening a new browser window
Sometimes you want to open multiple browser windows. When you are writing code you will almost certainly need at least two: one for the method that you are typing, and another to browse around the system to see how things work. You can open a browser on a class named by any selected text using the CMD-b keyboard shortcut.
To do
Try this: In a playground window, type the name of a class (for instance Morph), select it, and then press CMD-b. This trick is often useful; it works in any text window.
Message senders
While writing new code, refactoring existing code, or while trying to learn how to use unfamiliar libraries, you will frequently want to know the senders and implementors of various messages.
There are several ways of discovering where in the codebase a message is used, by listing its senders:
- From the method pane. Select a method in the method pane of the browser. You can then right-click on it and select
Senders of...(b,n)in the context menu. Alternatively, you can also use the shortcutCMD-b CMD-nto do the same thing (that’s what theb,nin the menu item stands for). To help remember this shortcut, think: browse senders. - From the code pane. Highlight a particular message in the source code. This can be done in a code pane of a browser, in a Playground window, or in any text window. If you want to find the senders of a keyword message, you highlight all of the keywords in the message, including arguments. Then, you can right-click on the highlighted selector and choose
Code search... > senders of it (n). Alternatively, you can use the shortcutCMD-ninstead of right-clicking. - Using Spotter. Bring up a particular method in
Spotter(pressSHIFT-Enterto bring up the Spotter search box, type in the message selector, arrow down to a particular Implementor of that message, and pressCMD-right arrowto focus the search on it.) A list of Senders now appears in the search results.
Only a handful of senders are shown by default, but you can view the full list by clicking on the arrow next to the Senders category (or arrow down to the Senders list and expand it by pressing CMD-SHIFT-right arrow).
Let’s try some of these in action.
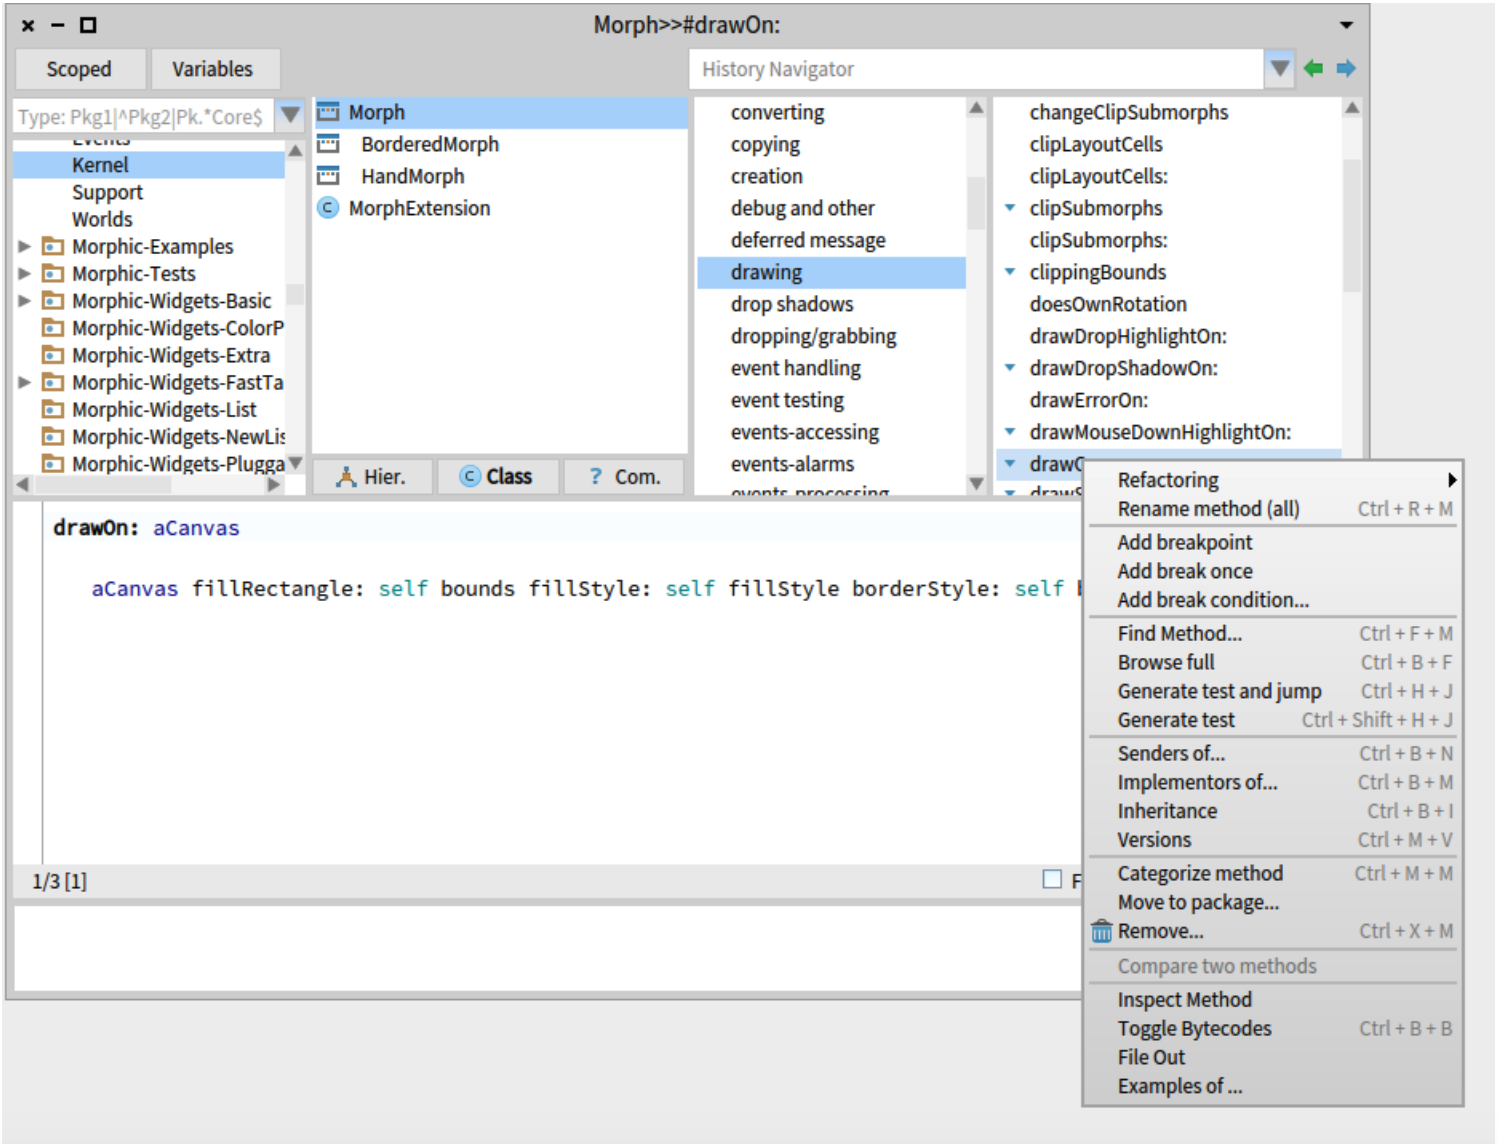
Open a browser on the Morph class, select the Morph>>drawOn: method in the method pane. If you now press CMD-b CMD-n (or right-click in the method pane and select Senders of... (Figure \(\PageIndex{6}\))), a browser will open with the list of all methods in the image that send the selected message (Figure \(\PageIndex{7}\)).

Now look at the third sender on the list, Canvas>>draw:. You can see that this method sends drawOn: to whatever object is passed to it as an argument, which could potentially be an instance of any class at all. Dataflow analysis can help figure out the class of the receiver of some messages, but in general, there is no simple way for the browser to know which message-sends might cause which methods to be executed. For this reason, the Senders browser shows exactly what its name suggests: all of the senders of the message with the chosen selector. The senders browser is nevertheless extremely useful when you need to understand how you can use a method: it lets you navigate quickly through example uses. Since all of the methods with the same selector should be used in the same way, all of the uses of a given message ought to be similar.
To do
Switch to the Dictionary class in the browser (remember, you can right-click in the package or class pane and select Find class..., or just use the CMD-f CMD-c shortcut), and select the addAll: method in the method pane.
- Answer
-
Add texts here. Do not delete this text first.
Looking at the source code, suppose you wanted to see all of the senders of the at: key put: value message. You can simply highlight the whole message send, and press CMD-n (or right-click and select Code Search > senders of it (n)), to bring up the list of senders (see Figure \(\PageIndex{8}\)).

Message implementors
Similarly, you may come across a message, and want to see how it’s implemented. This is what the Implementors browser is for. It works in the same way as the Senders browser, but instead lists all of the classes that implement a method with the same selector.
- From the method pane. Select a method in the method pane. You can then bring up the Implementors browser by right-clicking on the method and selecting
Implementors of...(b,m)in the context menu (or use the shortcutCMD-b CMD-m). To help remember this shortcut, think: browse implementors. - From the code pane. Highlight a particular message in the source code (or any text window). If you want to find the implementors of a keyword message, you highlight all of the keywords in the message. Then, you can right-click on the highlited selector and choose
Code search... > implementors of it (m)from the menu (or just use the shortcutCMD-n). - Using Spotter. Bring up a method in Spotter (press
SHIFT-Enterto bring up the Spotter search box, and start typing the message selector). The Implementors category will show up in the search results, showing the first handful of implementors. To see the full list, click on the arrow to the right of Implementors category (or arrow down to Implementors and pressSHIFT-CMD-right arrow).
Try this out: Press SHIFT-Enter and type drawOn: in the Spotter search box. You should see a list showing 5 out of 100 implementors of that method. It shouldn’t be all that surprising that so many classes implement this method: drawOn: is the message that is understood by every object that is capable of drawing itself on the screen.
Notice that if you only typed drawOn and left out the colon (:), the number of implementors in the search results is larger. This is because Spotter is doing a partial search, and including any methods that have ’drawOn’ in the name, such as drawOn:offset:, drawOnAthensCanvas:, and so on. This is useful for when you want to find a method but can only remember a part of its name.
Method inheritance and overriding
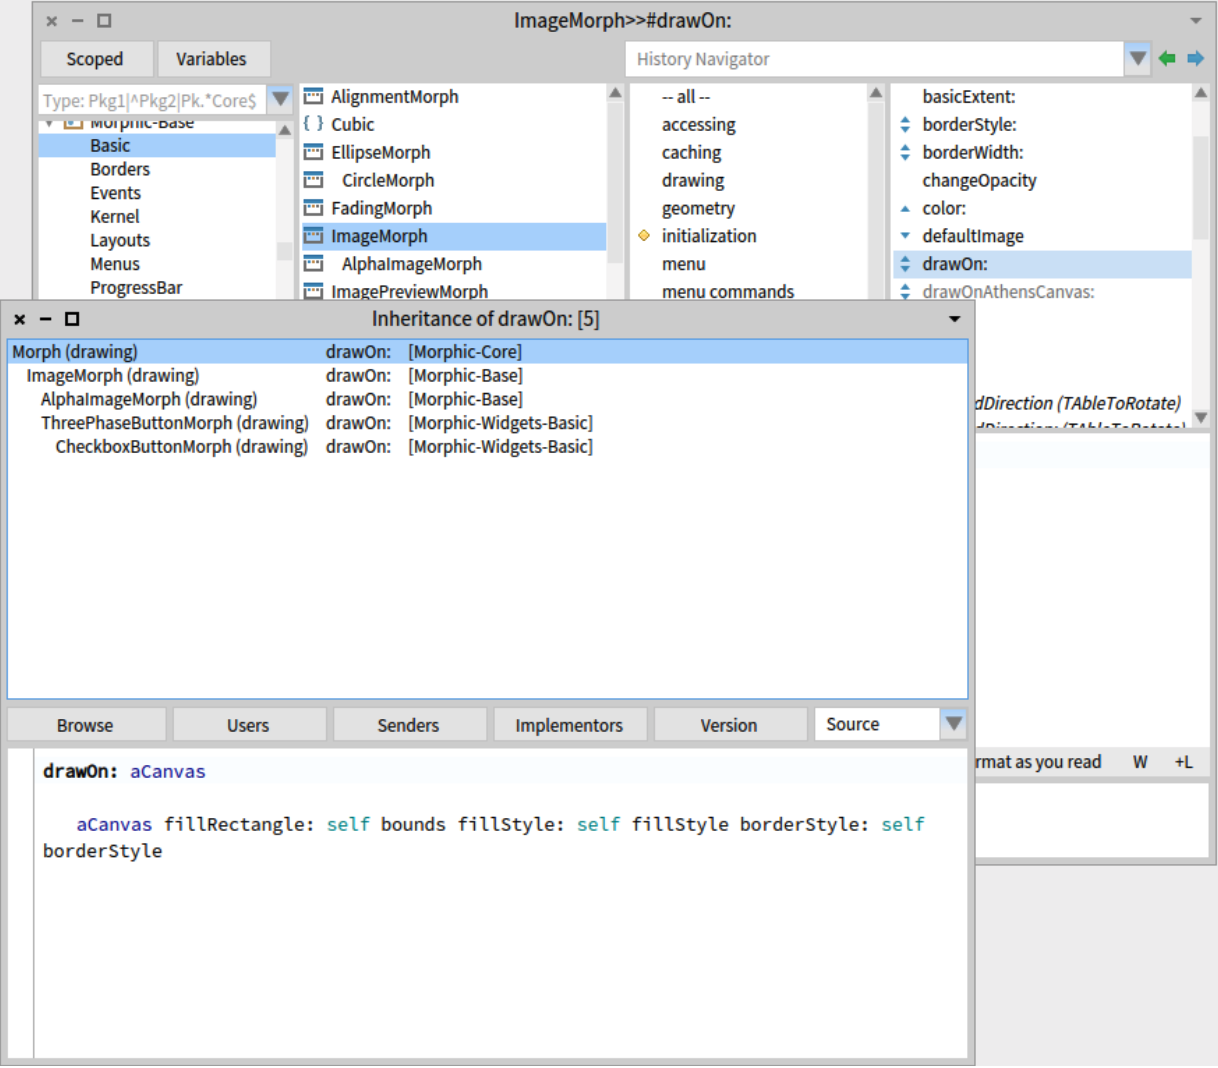
The inheritance browser displays all the methods overridden by the displayed method. To see how it works, select the ImageMorph>>drawOn: method in the browser. Note the arrow icons next to the method name (Figure \(\PageIndex{9}\)). The upward-pointing arrow tells you that ImageMorph>>drawOn: overrides an inherited method (i.e., Morph>>drawOn:), and the downward-pointing arrow tells you that it is overridden by subclasses. (You can also click on the icons to navigate to these methods.) Now right-click on it in the method pane, and select Inheritance. The inheritance browser shows you the hierarchy of overridden methods (see Figure \(\PageIndex{9}\)).
Hierarchy view
By default, the browser presents a list of packages in the leftmost pane. However it is possible to switch to a class hierarchy view. Simply select a particular class of interest, such as ImageMorph and then click on the Hierarchy button (Hier.). You will then see in the second pane a class hierarchy displaying all superclasses and subclasses of the selected class.
Notice that the package pane is disabled, and the packages are greyed out. When you are in Hierarchy view, you cannot change packages. To be able to change them again, toggle out of the Hierarchy view by clicking on the Hierarchy button again.
In Figure \(\PageIndex{10}\), the hierarchy view reveals that the direct superclass of ImageMorph is Morph.

Finding variable references
By right-clicking on a class in the class pane, and selecting Analyze > Inst var references... or Analyze > Class var refs..., you can find out where an instance variable or a class variable is used. You can also have access to those views by clicking on the Variables button, above the package list. Once you click on the button or select the menu item, you will be presented with a dialog that invites you to choose a variable from all of the variables defined in the current class, and all of the variables that it inherits. The list is in inheritance order; it can often be useful to bring up this list just to remind yourself of the name of an instance variable. If you click outside the list, it will go away and no variable browser will be created. If you click on a variable, bounds for example, a Message Browser will be created (Figure \(\PageIndex{11}\)).

You can use a similar method to look at direct variable assignments (that is, places that modify the variable without using accessor methods). Right-click on the class and select Analyze > Inst var assignments.
Bytecode source
You have the possibility of browsing the bytecode of a method. To do that, right-click on your method and select Toggle Bytecodes, or use the shortcut CMD-b CMD-b (see Figure \(\PageIndex{12}\)). Reselect the method again to get back to the normal view.

Refactorings
The contextual menus offer a large number of standard refactorings. Simply right-click in any of the four panes to see the currently available refactoring operations. See Figure \(\PageIndex{13}\).

Refactoring was formerly available only in a special browser called the refactoring browser, but it can now be accessed from any browser.
Browser menus
Many additional functions are available by right-clicking in the browser panes. Even if the labels on the menu items are the same, their meaning may be context dependent. For example, the package pane, the class pane, the protocol pane and the method pane all have a File out menu item. However, they do different things: the package pane’s File out menu item files out the whole package, the class pane’s item files out the whole class, the protocol pane’s item files out the whole protocol, and the method pane’s item files out just the displayed method.
Although this may seem obvious, it can be a source of confusion for beginners.
Possibly the most useful menu item is Find class... (f,c) in the package or class panes. Most of us do not know the package contents of the whole system, and it is much faster to type CMD-f CMD-c followed by the first few characters of the name of a class than to guess which package it might be in.
The History Navigator pulldown, found above the protocol and method panes, can also help you quickly go back to a class or method that you have browsed recently, even if you have forgotten its name.
Another useful method in the class pane is Find method (CMD-f CMD-m), which brings up a menu of all the methods in the class and gives you a search box.
Alternatively, if you are searching for a particular method of the selected class, it is often quicker to browse the --all-- protocol, place the mouse in the method pane, and type the first letter of the name of the method that you are looking for. This will usually scroll the pane so that the sought-for method name is visible.
To do
Try both ways of navigating to OrderedCollection>>removeAt:
There are many other options available in the menus. It pays to spend a few minutes working with the browser and seeing what is there.
Browsing programmatically
The class SystemNavigation provides a number of utility methods that are useful for navigating around the system. Many of the functions offered by the system browser are implemented by SystemNavigation.
Open a playground and evaluate the following code to browse the senders of drawOn::
SystemNavigation default browseAllSendersOf: #drawOn:
To restrict the search for senders to the methods of a specific class:
SystemNavigation default browseAllSendersOf: #drawOn: localTo: ImageMorph
Because the development tools are objects, they are completely accessible from programs and you can develop your own tools or adapt the existing tools to your needs.
The programmatic equivalent to the Implementors of... menu item is:
SystemNavigation default browseAllImplementorsOf: #drawOn:
To do
To learn more about what is available, explore the class SystemNavigation
with the browser.