
10.6: Exercises
- Page ID
- 25317

10.6.1: Analysis Problems
1. For the circuit of Figure \(\PageIndex{1}\), determine \(I_D\) and \(V_{DS}\). \(I_{DSS}\) = 40 mA, \(V_{GS(off)}\) = −4 V, \(V_{DD}\) = 26 V, \(V_{GG}\) = −2 V, \(R_G\) = 220 k\(\Omega\), \(R_D\) = 1.2 k\(\Omega\).
2. For the circuit of Figure \(\PageIndex{1}\), determine \(I_D\) and \(V_{DS}\). \(I_{DSS}\) = 20 mA, \(V_{GS(off)}\) = −3 V, \(V_{DD}\) = 22 V, \(V_{GG}\) = −1 V, \(R_G\) = 390 k\(\Omega\), \(R_D\) = 1 k\(\Omega\).
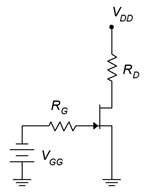
Figure \(\PageIndex{1}\)
3. For the circuit of Figure \(\PageIndex{2}\), determine \(I_D\), \(V_G\) and \(V_D\). \(I_{DSS}\) = 24 mA, \(V_{GS(off)}\) = −6 V, \(V_{DD}\) = 36 V, \(R_G\) = 220 k\(\Omega\), \(R_S\) = 2 k\(\Omega\), \(R_D\) = 1.8 k\(\Omega\).
4. For the circuit of Figure \(\PageIndex{2}\), determine \(I_D\), \(V_S\) and \(V_{DS}\). \(I_{DSS}\) = 18 mA, \(V_{GS(off)}\) = −3 V, \(V_{DD}\) = 30 V, \(R_G\) = 270 k\(\Omega\), \(R_S\) = 2.7 k\(\Omega\), \(R_D\) = 3.3 k\(\Omega\).
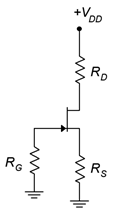
Figure \(\PageIndex{2}\)
5. For Figure \(\PageIndex{3}\), determine \(I_D\), \(V_G\) and \(V_D\). \(I_{DSS}\) = 16 mA, \(V_{DD}\) = 25 V, \(V_{GS(off)}\) = −3 V, \(V_{SS}\) = −6 V, \(R_G\) = 560 k\(\Omega\), \(R_S\) = 2 k\(\Omega\), \(R_D\) = 3.6 k\(\Omega\).
6. For Figure \(\PageIndex{3}\), determine \(I_D\), and \(V_{DS}\). \(I_{DSS}\) = 16 mA, \(V_{DD}\) = 25 V, \(V_{GS(off)}\) = −3 V, \(V_{SS}\) = −9 V, \(R_G\) = 680 k\(\Omega\), \(R_S\) = 2 k\(\Omega\), \(R_D\) = 2.7 k\(\Omega\).
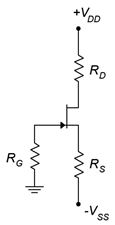
Figure \(\PageIndex{3}\)
7. For Figure \(\PageIndex{4}\), determine \(I_D\), \(V_G\) and \(V_D\). \(I_{DSS}\) = 16 mA, \(V_{DD}\) = 25 V, \(V_{GS(off)}\) = −3 V, \(V_{EE}\) = −9 V, \(R_G\) = 810 k\(\Omega\), \(R_E\) = 2 k\(\Omega\), \(R_D\) = 2.7 k\(\Omega\).
8. For the circuit of Figure \(\PageIndex{4}\), determine \(I_D\) and \(V_{DS}\). \(I_{DSS}\) = 40 mA, \(V_{GS(off)}\) = −4 V, \(V_{DD}\) = 30 V, \(V_{EE}\) = −6 V, \(R_G\) = 750 k\(\Omega\), \(R_E\) = 500 \(\Omega\), \(R_D\) = 1.8 k\(\Omega\).
10.6.2: Design Problems
9. Using the circuit of Figure \(\PageIndex{2}\), determine a value for \(R_S\) to set \(I_D\) to 4 mA. \(I_{DSS}\) = 10 mA, \(V_{GS(off)}\) = −2 V, \(V_{DD}\) = 20 V, \(R_G\) = 430 k\(\Omega\), \(R_D\) = 1.8 k\(\Omega\).
10. Using the circuit of Figure \(\PageIndex{1}\), determine a value for \(V_{GG}\) to set \(I_D\) to 2 mA. \(I_{DSS}\) = 10 mA, \(V_{GS(off)}\) = −4 V, \(V_{DD}\) = 28 V, \(R_G\) = 470 k\(\Omega\), \(R_D\) = 4.7 k\(\Omega\).
11. Using the circuit of Figure \(\PageIndex{4}\), determine a value for \(R_E\) to set \(I_D\) to 4 mA. \(I_{DSS}\) = 18 mA, \(V_{GS(off)}\) = −3 V, \(V_{DD}\) = 25 V, \(V_{EE}\) = −12 V, \(R_G\) = 330 k\(\Omega\), \(R_D\) = 2.2 k\(\Omega\).
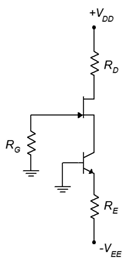
Figure \(\PageIndex{4}\)
12. Using the circuit of Figure \(\PageIndex{4}\), determine values for \(R_E\) and \(R_D\) to set \(I_D\) to 5 mA and \(V_D\) to 6 V. \(I_{DSS}\) = 20 mA, \(V_{GS(off)}\) = −4 V, \(V_{DD}\) = 32 V, \(V_{EE}\) = −10 V, \(R_G\) = 390 k\(\Omega\).
10.6.3: Challenge Problems
13. Following the derivation of Equation 10.4.2, derive Equation 10.4.4.
14. Using the circuit of Figure \(\PageIndex{3}\), determine values for \(R_S\) and \(V_{SS}\) to set \(I_D\) to 4 mA. \(I_{DSS}\) = 16 mA, \(V_{GS(off)}\) = −4 V, \(V_{DD}\) = 30 V, \(R_G\) = 680 k\(\Omega\), \(R_D\) = 2 k\(\Omega\).
10.6.4: Computer Simulation Problems
15. Perform a DC operating point simulation on the circuit of Problem 7 to verify the results. The J111 will be sufficient.
16. Perform a DC operating point simulation on the circuit of Problem 10 to verify the results. The J111 will be sufficient.
10.6.5: Department of Marginal Utility
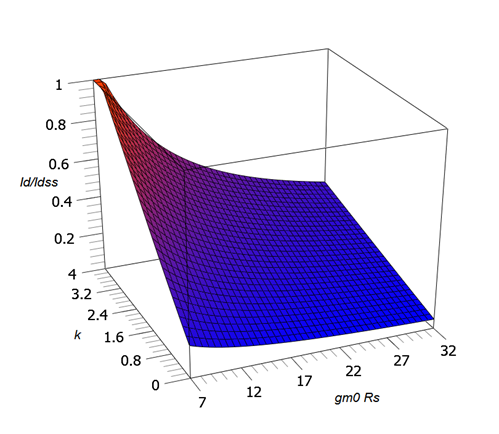
Figure \(\PageIndex{5}\): Combination Bias Surface Plot.
The graphs of Figure 10.4.13 represent three slices from this surface.
Looks cool, but...