4.4: Piping and Instrumentation Diagrams - Standard Pitfalls
- Page ID
- 22385
Introduction
Piping and Instrumentation Diagrams (P&ID) are standardized in many ways, and there are some fundamental safety features that are absolute requirements for all P&IDs. Unfortunately, many people forget these features in their designs unintentionally. Lacking these safety features could lead to serious engineering problems. It is important to eliminate these pitfalls when designing a P&ID.
In the following sections, different pitfalls of P&IDs will be discussed. The equipment design section will concentrate on how equipment might be accidentally neglected and misplaced while designing a safe and functional process. The design process section will describe how a lack of consideration of process conditions would lead to serious design pitfalls. Overspecification and underspecification of equipment and design will be discussed. There are also some miscellanous pitfalls associated with interpretation and inherent problems of the P&ID itself. Examples are introduced at the end to illustrate common errors and pitfalls of P&IDs.
P&ID Production Pitfalls
Most of the common pitfalls of P&ID production result from the engineer forgetting that the design on paper represents a real physical process and that there are practical and physical limitations that need to be considered in the process design. The following are some errors to be particularly careful of when drawing up a P&ID:
Equipment Design
Safety valves
Safety valves are part of the essential valves system for P&IDs. Together with isolation valves, they are an absolute requirement for instrument design. Safety valves are required to install for all gas, steam, air and liquid tanks regardless of the tank's function for pressure relief purposes. Engineers should be aware of their system's set pressure, relief pressure, percent overpressure, maximum allowable pressures etc. when selecting a safety valve. The US law requires all tanks of pressure greater than 3 psig to have safety valves installed.
Different pressure tanks require different safety valves to best fit their safety design. Therefore, engineers must be very careful in selecting the right safety valves for their systems. However, when constructing a P&ID, engineers sometimes forget adding safety valves to their design, and this could cause serious problems. For example, if one forgets to add a pressure relief valve or safety valve on a reaction tank of gas and liquid, the extra pressure accumulating would exceed the preset pressure limits for safety design. This could lead to a serious explosion!
A pressure relief valve is symbolized by two triangles orientated at 90 degrees to each other, as shown below.
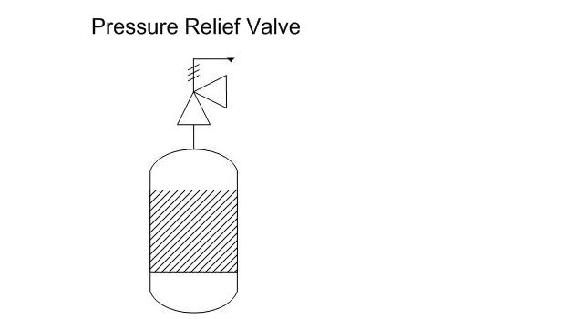
This eliminated excess pressure that might build up inside a reactor.
Isolation valves
The isolation valve is used to isolate a portion from the system when inspection, repair or maintenance is required. Isolation valves are placed around the junctions in the distribution system. They are also part of the absolute requirement for P&ID construction. Engineers should be aware of their system's pressure, voltage, process medium, pipe sizing and flow rates when selecting the right isolation valves that work under the conditions for their system.
If engineers forget to add isolation valves on their P&ID design, serious problems would occur when the system needs to be partially shut down for maintance or other reasons. There would be no way to control the unit's operation other than existing flow valves. Some upstream production problems could affect downstream production since appropriate isolation valves are not installed for safety and production purposes.
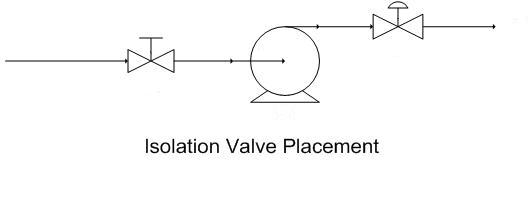
Notice that the automatic valve after the pump is a flow valve, while the manual valve before the pump is an isolation valve. One example of this use is for cleaning. If some parts of the pump cannot be cleaned in place, the pump will need to be taken apart. The isolation valve can cut off the flow to the pump, allowing it to be safely taken apart.
Valves and pumps
Some of the most commonly used pieces of process equipment that show up on P&IDs are valves. Valves control the flow of fluid through pipes by opening to allow flow or closing to stop flow. One of the problems associated with valves on P&IDs is the sheer number of them and deciding where to place them in the process.
A common mistake with valve placement has to do with the interaction between valves and pumps. It is important that valves be placed after pumps in a given pipe. When a valve is placed before a pump, should the valve close and the pump has not been shut off, there will not be a constant supply of fluid to pump. This is known as starving the pump. Starving the pump can create a disturbance known as cavitation, and it is very hard on the equipment and can cause the pump to break. Placing valves after the pump ensure that even if the pump does not shut off, it is still filled with the proper fluid.

These same principles apply to valve placement with respect to compressors. Placing a control valve upstream of a compressor eliminates your ability to control pressure in the pipeline downstream of the compressor and introduces a risk of starving the compressor.
Agitators
A point that is very easy to miss, and very expensive if it is missed, is that if a vessel is equipped with an agitator, the vessel must be filled enough to submerge the agitator before the motor is turned on. Agitators are designed to operate against the resistance of fluid. Without this resistance, the agitator will rotate much faster than the equipment is designed for. This rotation may result in hitting the harmonic frequency of the structure, compromising its integrity and causing the agitator to rip from its foundation. This creates not only a fiscal predicament (not only ruining the agitator but also the vessel), but a safety nightmare. When designing a process, one must make sure he or she knows and accounts for how much fluid must be in an agitated vessel to avoid this situation. This can easily be solved by adding a level sensor to the tank that the agitator is being used in.
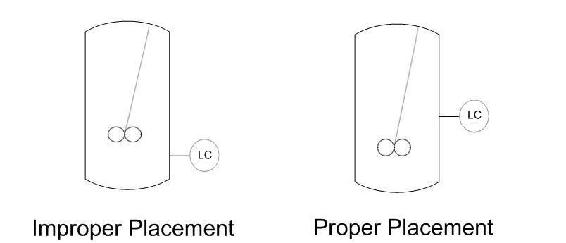
When placing the level sensor on the tank, make sure to place the sensor above the level of the agitator. This will ensure that the agitator is submerged in the fluid. It would be incorrect to place the level sensor below the agitator.
Instrument selection and placement
Instruments are designed to operate properly under specific conditions. Every instrument has a range over which it functions properly, and instruments must be selected that are appropriate for their applications. For example, a pressure gauge might have a working range of 5 psig - 50 psig. You would not want to use this gauge for sensitive measurements in the range 3 - 6 psig. Instrument material must also be considered during the selection process. If the substance being monitored is corrosive, for example, the instrument must be made of a corrosion-resistant material.
Once an appropriate instrument has been selected, it must be appropriately placed. For example, a level control is not useful in a pipe because there is no need to measure any water level inside of a pipe, much like a flow controller is not useful in a storage tank because there is no flow. Similarly, a flow controller should not be placed on a valve, but instead downsteam from the valve. However, level controls are useful in storage tanks and reactors, while flow controllers are useful in pipelines. Instruments must be selected and placed to reliably provide useful information and to accurately control the process.
Equipment Selection
When creating a P&ID, the equipment that is selected to be used is very important, not only to maintain a smooth process but also for safety purposes. Each and every piece of equipment from 100,000 liter storage tanks to temperature sensors has Operational Limitations. These are the conditions under which a given piece of equipment operates as expected, with safe, consistent, and reproducible results. For example, when storing a highly pressurized gas at 2,000 psig, one wouldn't want to use a storage tank that has been pressure tested up to 3 psig. The process conditions are way outside the operational limitations and would pose a serious safety hazard. The same goes for sensors and gauges of all types. On a pressurized vessel at 2,000 psig, it would be no good to use a pressure control system that has a sensor that is meant to measure up to 100 psig, the results would not be accurate.
Operational limitations can usually be found in the equipment manual sent by the manufacturer or possibly on the manufacturer's website. If it is not found in either place, an engineer is obligated to contact the manufacturer and find the operational limitations before using a piece of equipment in a process. More can be found on equipment selection for some (but by no means all) equipment below:
- Temperature Sensors
- Pressure Sensors
- Level Sensors
- Flow Sensors
- Composition Sensors
- pH and Viscosity Sensors
- Biosensors
- Valves
Process Design
Unit operation input/output
Providing clearly specified inputs and outputs to and from process units is vital. For the safety of the system, proper control and the prevention of disaster, it is important to show where each substance came from and where it is going. The P&ID must show all material streams to and from separation units, heat exchangers, and reactors.
For example, if the P&ID is not clearly denoted in a reaction to create construction explosive materials, then a large and perhaps fatal calamity can occur at the chemical plant. The exiting streams of a plant may pour into a river which may violate environmental regulations. Therefore, specifying inputs and outputs is imperative in a P&ID.
Pressure and flow
The movement of fluid is essential in many production lines. Transporting material from a tank to a reactor, a reactor to a distillation column or from a column into a tanker truck all involve the movement of fluids. When designing P&IDs, a process engineer must decide how they are going to attack this problem, namely whether or not a pump is needed to move the fluid.
The main issue here is pressure. Fluid, both gaseous and liquid, moves down the pressure gradient from high pressure to low pressure. The rule of thumb is that if the source of the fluid has a much higher pressure than the destination of the fluid, a pump is not needed. Even if the source has a pressure only a fraction higher than that of the destination, a pump may yet be needed for the fluid to flow through the pipes, from the source to the destination. However, the flow and pressure from the source must also be compared to the needs of the process. For example, if a inlet flow has highly fluctuating pressure, a pump or valve should be used to regulate the pressure for the process. Also, if the diameter of the pipe does not remain constant and is fluctuating as well, perhaps due to outside pressure or force, a pump should be used to control the pressure inside the system.
A common mistake young process engineers make is when charging a pressurized vessel, they do not use a pump powerful enough to overcome that pressure. This causes backflow and can ruin process equipment. This problem is especially prevalent in recycle streams. In some situations it may be appropriate to use a check valve (a valve allowing fluid to flow through into it from only one direction), to add an additional barrier against backflow. An example of such a situation would be when a fuel is to be mixed with air for combustion: if any air were to backflow to the fuel source, a dangerous, explosive situation would arise. In this case the use of a check valve would be appropriate.
An example of when a pump is never needed is when liquid from one vessel at ambient pressure is being transported to another vessel at ambient pressure that is at a lower elevation. This is known as a gravity feed and utilizing gravity feeds where possible can significantly decrease the cost of a process. As long as the pressure at the exit of the pipe is lower than the pressure created by gravity, a gravity feed can be used. An example of such a gravity feed is the flushing of a toilet, by which the water from the cistern at a higher elevation falls to the water closet at the lower elevation.
Underspecification
For safety and control purposes, redundancy is desirable in control systems. A process lacking in suitable redundancy would be underspecified. For example, a reactor containing an exothermic reaction would be underspecified if it only contained a temperature control. The potential danger posed by an exothermic reaction warrents a high degree of safety: if one controller were to malfunction, a backup must be in place. A pressure control should also be included, and perhaps a level control as well depending on the specific process.
Overspecification
On the flipside of underspecification is overspecification. Adding too many controllers and valves on vessels and lines is unnecessary and costly. Since process control is highly dependent upon the situation, it is difficult to set specific limits on the necessary amount of specification. However, a controller should not be used unless there is a specific need for it. Misused redundancy is a common example of overspecification. It is unlikely that a water storage tank needs level, temperature, and pressure controllers. A degree of freedom analysis, as shown in a distillation column example, can be helpful in determining the exact number of controllers, sensors, actuators, and valves that will be necessary to adequately control a process.
Problems When Using a P&ID
Other than equipment and production pitfalls, there are also some general P&ID interpration and inherent problems.
Interpretation of P&IDs
Although it is essential for P&IDs to represent the right instruments with the right references, many P&IDs do not support scaling or do not require scaling as part of the system. P&IDs are drawn in a way that equipment and piping are displayed for ease of interpretation. They do not show the physical placement and location of different systems or the actual sizes and length of equipment and pipelines.
Experience tells us that many engineers have overlooked certain pieces of equipment or over-estimated the size of equipment and piping, leading to calculation and construction errors. For example, an engineer could be designing new equipment on the existing P&ID and not realize that existing equipment is so densely populated that extra equipment will not fit. It is important to check the physical space of an area before adding equipment to a process.
Inherent Problems of P&IDs
There are a few problems with P&IDs that are only solved by being conscious of them. One problem is that P&IDs are constantly being updated, revised, changed, and added to. When reading a P&ID it is always important to check the date it was last revised and if there is a later revision available. Making adjustments to equipment that isn't there anymore not only causes confusion and frustration, but is a waste of everyone's time. Moreover, making sure you are using the most recent edition to the P&ID will ensure that you do not purchase equipment to install that has already been installed.
Usually, companies will have a computer database with the most current P&IDs. Before modifying or working with an old paper copy of a P&ID, check to make sure it is up to date with the most current revisions.
Another problem with P&IDs is that even if they are well made and technically perfect, complex processes often appear cluttered. There is an inordinate amount of information contained in a P&ID, and as such P&IDs are next to impossible to take in at a glance. It is important to carefully study each document to fully understand the process. The mistake of assuming you gained all the information off of a P&ID from simply scanning it can leave you with mental holes that you don't even realize you have. This can be avoided by reading the P&ID carefully on the first pass and constantly referring back to it when questions arise.
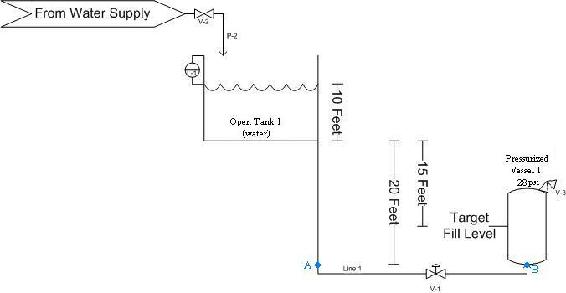
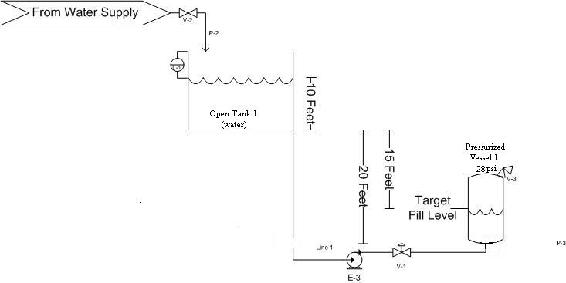
A pipe connects a water tank (open to the atmosphere) and a vessel pressurized to 28psi. The open tank has 10 feet of water in it. A level control system ensures that the 10 foot level is maintained in the open tank. The bottom of the pressurized vessel is 20 feet below the bottom of the open tank and starts with no water in it. The goal is to fill the pressurized vessel up to 5 feet. Due to a poor design by the project engineer, the water is fed into the bottom of the pressurized vessel. Given that the density of water is 62.4 lbm/ft^3 and the gravitational constant is 32.2 ft/s^2, is a pump needed? If so, where should it be placed? Assume that there is no pressure drop due to friction against the pipe and that the air pressure of the pressurized tank remains at a constant 15psi. The figure below may be helpful in visualizing the process. (Hint: Remember in English units, a “fudge factor” is needed when using P = ρ*g*h)
Solution
First, we must determine the pressure at the stream exit (point B). When the vessel is full, we know that the pressure created by the water is:
\[P=\frac{\rho g h}{32.2} \nonumber \]
Plugging in 62.4 for the density, 32.2 for g and 5 for h, we find that the pressure caused by the water is 312 lbf/ft^2. Dividing by 144 to convert to psi, we see this is equivalent to 2.2 psi. When we add the 28psi from the air pressure in the vessel, we get a grand total of 30.2 psi at the pipe exit.
The pressure in the feed pipe at the height of the exit to the pressurized vessel (point A) is again given by:
\[P=\frac{\rho g h}{32.2} \nonumber \]
Only this time, the top of the water is 30 feet above the pipe exit instead of 5 feet. Plugging in this value, we find that the pressure is 1872 lbf/ft2. After converting, we find this is equivalent to 13psi. Since the water tank is open, we must also add 14.7psi for atmospheric pressure. This gives us a total pressure of 27.7psi.
The pressure of the feed at point A in the diagram is LESS than the pressure at point B, so a pump is needed. The pump should be placed BEFORE the valve labelled V-1 on the pipe as shown below. This is to prevent starving the pump when the valve closes.
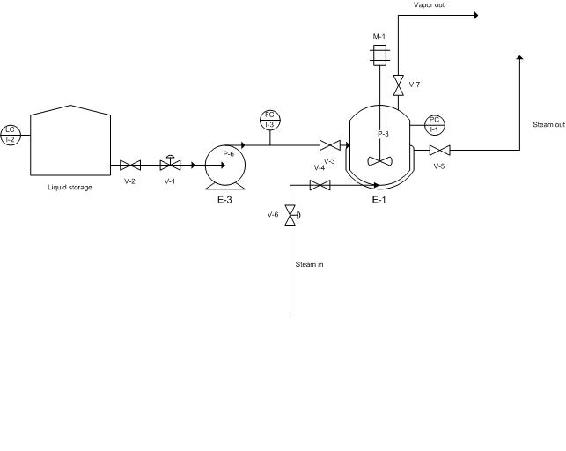
There are several errors in the following P&ID, which shows a vessel where a liquid is vaporized using heat transfered from steam passing through a surrounding jacket. Identify the errors and explain why they are mistakes.
Solution
- Control valve V-1 should be after the pump, not before. Placing a pump after a control valve takes away your control of the flow rate and can also damage the pump if the valve is shut off while the pump is running.
- Vessel E-1 is only being monitored with a pressure control. This is not adequate redundancy for process control. There should also be a temperature control (to make sure the vessel is at an appropriate temperature for vaporization) and a level control (to make sure the agitator is always submerged in liquid).
- Although the vaporization takes place at ambient pressure, there should be a safety valve on the vessel. What if there is a malfunction and too much vapor is produced?
- The input and output streams for vessel E-1 are not sufficiently labeled. The source of input streams and destination of output streams should be specified to ensure adequate control of a process.
- There should be a flow meter and control valve on the vapor stream exiting the vaporization vessel so that you can monitor and control the amount of vapor exiting.
References
- Center for Chemical Process Safety. (March 2006). Process Safety Beacon: Pressure Relief Systems - Do You See Any Hazards? CEP
- Melhem, G.A. and Howell, P. (September 2005). Designing Emergency Relief Systems for Runaway Reactions. CEP
- Ulrich, G.D. and Vasudevan, P.T. (July 2006). Predesign With Safety in Mind. CEP
- Williams, J.P. (September 2004). Reliability for Safety Instrumented Systems. CEP
Contributors and Attributions
- Authors: Angela Yeung, Curt Longcore, Ben Van Kuiken, Jeffrey Carey
- Stewards: Eric Black, Megan Boekeloo, Daniel Carter, Stacy Young


