
6.3: Examples
- Page ID
- 91477
\( \newcommand{\vecs}[1]{\overset { \scriptstyle \rightharpoonup} {\mathbf{#1}} } \)
\( \newcommand{\vecd}[1]{\overset{-\!-\!\rightharpoonup}{\vphantom{a}\smash {#1}}} \)
\( \newcommand{\dsum}{\displaystyle\sum\limits} \)
\( \newcommand{\dint}{\displaystyle\int\limits} \)
\( \newcommand{\dlim}{\displaystyle\lim\limits} \)
\( \newcommand{\id}{\mathrm{id}}\) \( \newcommand{\Span}{\mathrm{span}}\)
( \newcommand{\kernel}{\mathrm{null}\,}\) \( \newcommand{\range}{\mathrm{range}\,}\)
\( \newcommand{\RealPart}{\mathrm{Re}}\) \( \newcommand{\ImaginaryPart}{\mathrm{Im}}\)
\( \newcommand{\Argument}{\mathrm{Arg}}\) \( \newcommand{\norm}[1]{\| #1 \|}\)
\( \newcommand{\inner}[2]{\langle #1, #2 \rangle}\)
\( \newcommand{\Span}{\mathrm{span}}\)
\( \newcommand{\id}{\mathrm{id}}\)
\( \newcommand{\Span}{\mathrm{span}}\)
\( \newcommand{\kernel}{\mathrm{null}\,}\)
\( \newcommand{\range}{\mathrm{range}\,}\)
\( \newcommand{\RealPart}{\mathrm{Re}}\)
\( \newcommand{\ImaginaryPart}{\mathrm{Im}}\)
\( \newcommand{\Argument}{\mathrm{Arg}}\)
\( \newcommand{\norm}[1]{\| #1 \|}\)
\( \newcommand{\inner}[2]{\langle #1, #2 \rangle}\)
\( \newcommand{\Span}{\mathrm{span}}\) \( \newcommand{\AA}{\unicode[.8,0]{x212B}}\)
\( \newcommand{\vectorA}[1]{\vec{#1}} % arrow\)
\( \newcommand{\vectorAt}[1]{\vec{\text{#1}}} % arrow\)
\( \newcommand{\vectorB}[1]{\overset { \scriptstyle \rightharpoonup} {\mathbf{#1}} } \)
\( \newcommand{\vectorC}[1]{\textbf{#1}} \)
\( \newcommand{\vectorD}[1]{\overrightarrow{#1}} \)
\( \newcommand{\vectorDt}[1]{\overrightarrow{\text{#1}}} \)
\( \newcommand{\vectE}[1]{\overset{-\!-\!\rightharpoonup}{\vphantom{a}\smash{\mathbf {#1}}}} \)
\( \newcommand{\vecs}[1]{\overset { \scriptstyle \rightharpoonup} {\mathbf{#1}} } \)
\(\newcommand{\longvect}{\overrightarrow}\)
\( \newcommand{\vecd}[1]{\overset{-\!-\!\rightharpoonup}{\vphantom{a}\smash {#1}}} \)
\(\newcommand{\avec}{\mathbf a}\) \(\newcommand{\bvec}{\mathbf b}\) \(\newcommand{\cvec}{\mathbf c}\) \(\newcommand{\dvec}{\mathbf d}\) \(\newcommand{\dtil}{\widetilde{\mathbf d}}\) \(\newcommand{\evec}{\mathbf e}\) \(\newcommand{\fvec}{\mathbf f}\) \(\newcommand{\nvec}{\mathbf n}\) \(\newcommand{\pvec}{\mathbf p}\) \(\newcommand{\qvec}{\mathbf q}\) \(\newcommand{\svec}{\mathbf s}\) \(\newcommand{\tvec}{\mathbf t}\) \(\newcommand{\uvec}{\mathbf u}\) \(\newcommand{\vvec}{\mathbf v}\) \(\newcommand{\wvec}{\mathbf w}\) \(\newcommand{\xvec}{\mathbf x}\) \(\newcommand{\yvec}{\mathbf y}\) \(\newcommand{\zvec}{\mathbf z}\) \(\newcommand{\rvec}{\mathbf r}\) \(\newcommand{\mvec}{\mathbf m}\) \(\newcommand{\zerovec}{\mathbf 0}\) \(\newcommand{\onevec}{\mathbf 1}\) \(\newcommand{\real}{\mathbb R}\) \(\newcommand{\twovec}[2]{\left[\begin{array}{r}#1 \\ #2 \end{array}\right]}\) \(\newcommand{\ctwovec}[2]{\left[\begin{array}{c}#1 \\ #2 \end{array}\right]}\) \(\newcommand{\threevec}[3]{\left[\begin{array}{r}#1 \\ #2 \\ #3 \end{array}\right]}\) \(\newcommand{\cthreevec}[3]{\left[\begin{array}{c}#1 \\ #2 \\ #3 \end{array}\right]}\) \(\newcommand{\fourvec}[4]{\left[\begin{array}{r}#1 \\ #2 \\ #3 \\ #4 \end{array}\right]}\) \(\newcommand{\cfourvec}[4]{\left[\begin{array}{c}#1 \\ #2 \\ #3 \\ #4 \end{array}\right]}\) \(\newcommand{\fivevec}[5]{\left[\begin{array}{r}#1 \\ #2 \\ #3 \\ #4 \\ #5 \\ \end{array}\right]}\) \(\newcommand{\cfivevec}[5]{\left[\begin{array}{c}#1 \\ #2 \\ #3 \\ #4 \\ #5 \\ \end{array}\right]}\) \(\newcommand{\mattwo}[4]{\left[\begin{array}{rr}#1 \amp #2 \\ #3 \amp #4 \\ \end{array}\right]}\) \(\newcommand{\laspan}[1]{\text{Span}\{#1\}}\) \(\newcommand{\bcal}{\cal B}\) \(\newcommand{\ccal}{\cal C}\) \(\newcommand{\scal}{\cal S}\) \(\newcommand{\wcal}{\cal W}\) \(\newcommand{\ecal}{\cal E}\) \(\newcommand{\coords}[2]{\left\{#1\right\}_{#2}}\) \(\newcommand{\gray}[1]{\color{gray}{#1}}\) \(\newcommand{\lgray}[1]{\color{lightgray}{#1}}\) \(\newcommand{\rank}{\operatorname{rank}}\) \(\newcommand{\row}{\text{Row}}\) \(\newcommand{\col}{\text{Col}}\) \(\renewcommand{\row}{\text{Row}}\) \(\newcommand{\nul}{\text{Nul}}\) \(\newcommand{\var}{\text{Var}}\) \(\newcommand{\corr}{\text{corr}}\) \(\newcommand{\len}[1]{\left|#1\right|}\) \(\newcommand{\bbar}{\overline{\bvec}}\) \(\newcommand{\bhat}{\widehat{\bvec}}\) \(\newcommand{\bperp}{\bvec^\perp}\) \(\newcommand{\xhat}{\widehat{\xvec}}\) \(\newcommand{\vhat}{\widehat{\vvec}}\) \(\newcommand{\uhat}{\widehat{\uvec}}\) \(\newcommand{\what}{\widehat{\wvec}}\) \(\newcommand{\Sighat}{\widehat{\Sigma}}\) \(\newcommand{\lt}{<}\) \(\newcommand{\gt}{>}\) \(\newcommand{\amp}{&}\) \(\definecolor{fillinmathshade}{gray}{0.9}\)Here are examples from Chapter 6 to help you understand these concepts better. These were taken from the real world and supplied by FSDE students in Summer 2021. If you’d like to submit your own examples, please send them to the author eosgood@upei.ca.
Example 6.3.1: Internal Forces – Submitted by Emma Christensen
1. Problem
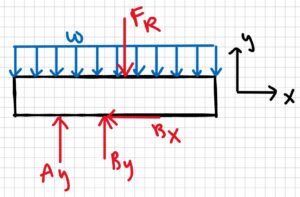
The setup that holds the solar panels at the UPEI FSDE is modeled below. Considering beam S (1.9 m length), find the internal forces at point C. Assume the intensity of the solar panel on the beam is 200 N/m.
Sketch:

Model:

2. Draw
Free-body diagram:
3. Knowns and Unknowns
Knowns
- w = 220 N/m
- OA = 0.5 m
- AC = 0.2 m
- AB = 0.4 m
- L = 1.9 m
Unknowns: Nc, Vc, Mc
4. Approach
Use equilibrium equations. First solve for reaction forces, then make a cut at C and solve for the internal forces.
5. Analysis
\[w=\frac{F}{L}\\F=wL\\F_R=220N/m\cdot 1.9m\\F_R=418N\\\sum F_X=0=B_X\]
Find reaction forces:
\[\sum M_A=0=B_y(0.4m)-F_R(0.55m)\\(0.4m)B_y=418N(0.55m)\\B_y=\frac{229.9 N\cdot m}{0.4m}\\B_y=574.75N\]
\[\sum F_y=0=-F_R+A_y+B_y\\A_y=F_R-B_y\\A_y=418N-574.74N\\A_y=-156.75N\]
The answer we got for Ay is negative, which means that the arrow should be drawn in the other direction. We will change it for our next sketch.
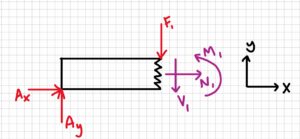
Make a cut at C:
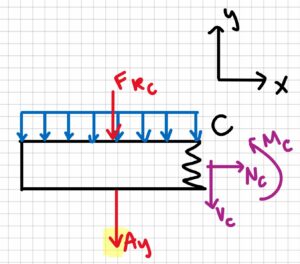
Now solve for the internal forces:
\[\sum F_x=0\:\:;\:\:N_c=0\\\sum F_y=0=-A_y-V_c-(w\cdot L)\\V_c=-156.75N-(220N/m\cdot0.95m)\\V_c=-346.75 N\\\sum M_c=A_y(0.2m)+M_c+(F_{Rc}\cdot 0.475m)\\M_c=-156.75 N (0.2m)-(220N/m\cdot 0.95m\cdot 0.475m)\\M_c=-130.625N\cdot m\]
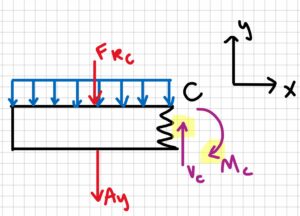
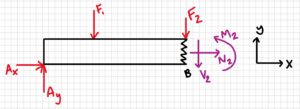
Final FBD, showing the arrows in the correct directions:
6. Review
It makes sense that Ay and By are in different directions, because the resultant force Fr of the solar panel on the beam is not between A and B. It also makes sense that the moment at C is in the clockwise direction rather than the counterclockwise directions, when you think about the direction of the forces applied to the beam.
Example 6.3.2: Shear/Moment Diagrams – Submitted by Deanna Malone
1. Problem
A beam that is simply supported has two point loads acting on it. One acts 2 m from point A and the other acts at 2.5 m from C. Point B is in the middle of the beam. The first point load is 500 N and the second is 300 N. What are the internal forces at point B? Solve for reaction forces and include a shear/moment diagram.

2. Draw
Sketch:
Free-body diagram:

3. Knowns and Unknowns
Knowns:
- F1 = 500 N
- F2 = 300 N
Unknowns: Ay, Ax, Cy, VB, MB, NB
4. Approach
Shear/moment equations, EOM equations
5. Analysis
Solve for reaction forces:
(Ax, Cy)
\begin{aligned}
\sum F_{x}=0=A_{x}=0 \\
\sum M_{A}=0 &=-F_{1} \cdot 2 m-F_{2} \cdot 5.5 m+C_{y} \cdot 8 m \\
C_{y}=&+F_{1} \cdot 2 m+F_{2} \cdot 5.5 m \\
C_{y} &=\frac{500 N \cdot 2 m+300 N \cdot 5.5 m}{8 m} \\
C_{y} &=331.25 \mathrm{~N}
\end{aligned}
(Ay)
\begin{aligned}
\sum F_{y}=0 &=A_{y}+C_{y}-F_{1}-F_{2} \\
A_{y} &=F_{1}+F_{2}-C_{y} \\
A_{y} &=500 \mathrm{~N}+300 \mathrm{~N} – 331.25 \mathrm{~N} \\
A_{y} &=468.75 \mathrm{~N}
\end{aligned}
Cut 1: at B
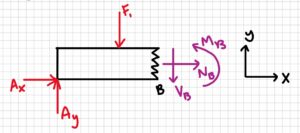
\begin{aligned}
\sum F_{X}=0=A_{X} &+N_{B}=0 \\
& N_{B}=0 \\
\sum F_{y}=0 &=A_{y}-V_{B}-F_{1} \\
V_{B} &=A_{y}-F_{1} \\
V_{B} &=468.75 N – 500 N \\
V_{B}=-31.25 N
\end{aligned}
\begin{aligned}
\sum M_{B}=& 0=-A_{y}(4 m)+F_{1}(2 m)+M_{B} \\
& M_{B}=A_{y}(4 m)-F_{1}(2 m) \\
& M_{B}=468.75 N(4 m)-500 N(2 m) \\
M_{B} &=875 \mathrm{~N} \cdot \mathrm{m}
\end{aligned}
Cut 2: At the point where F1 is applied
\begin{aligned}
\sum M_{1}=0 &=-A_{y}(2 m)+M_{1}=0 \\
M_{1} &=A_{y}(2 m) \\
M_{1} &=468.75 N(2 m) \\
M_{1} &=937.5 \mathrm{~N} \cdot m
\end{aligned}
Cut 3: At the point where F2 is applied
\begin{aligned}
\sum M_{2}=0 =-A_{y}(5.5 \mathrm{~m})+F_{1}(3.5 \mathrm{~m})+M_{2} \\
M_{2} &=A_{y}(5.5 \mathrm{~m})-F_{1}(3.5 \mathrm{~m}) \\
M_{2} &=468.75 \mathrm{~N}(5.5 \mathrm{~m})-500 \mathrm{~N}(3.5 \mathrm{~m}) \\
M_{2} &=828.125 \mathrm{~N} \cdot \mathrm{m}
\end{aligned}
Answer: NB = 0, VB = -31.25 N, MB = 875 Nm
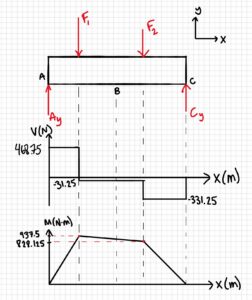
6. Review
The reaction forces make sense as they offset the applied forces. The shear/moment diagrams returned to zero so they are correct too. The moment found at B is in the moment diagram, it is smaller than the maximum.