15.5: Few Final Tidbits
- Page ID
- 92208
\( \newcommand{\vecs}[1]{\overset { \scriptstyle \rightharpoonup} {\mathbf{#1}} } \)
\( \newcommand{\vecd}[1]{\overset{-\!-\!\rightharpoonup}{\vphantom{a}\smash {#1}}} \)
\( \newcommand{\id}{\mathrm{id}}\) \( \newcommand{\Span}{\mathrm{span}}\)
( \newcommand{\kernel}{\mathrm{null}\,}\) \( \newcommand{\range}{\mathrm{range}\,}\)
\( \newcommand{\RealPart}{\mathrm{Re}}\) \( \newcommand{\ImaginaryPart}{\mathrm{Im}}\)
\( \newcommand{\Argument}{\mathrm{Arg}}\) \( \newcommand{\norm}[1]{\| #1 \|}\)
\( \newcommand{\inner}[2]{\langle #1, #2 \rangle}\)
\( \newcommand{\Span}{\mathrm{span}}\)
\( \newcommand{\id}{\mathrm{id}}\)
\( \newcommand{\Span}{\mathrm{span}}\)
\( \newcommand{\kernel}{\mathrm{null}\,}\)
\( \newcommand{\range}{\mathrm{range}\,}\)
\( \newcommand{\RealPart}{\mathrm{Re}}\)
\( \newcommand{\ImaginaryPart}{\mathrm{Im}}\)
\( \newcommand{\Argument}{\mathrm{Arg}}\)
\( \newcommand{\norm}[1]{\| #1 \|}\)
\( \newcommand{\inner}[2]{\langle #1, #2 \rangle}\)
\( \newcommand{\Span}{\mathrm{span}}\) \( \newcommand{\AA}{\unicode[.8,0]{x212B}}\)
\( \newcommand{\vectorA}[1]{\vec{#1}} % arrow\)
\( \newcommand{\vectorAt}[1]{\vec{\text{#1}}} % arrow\)
\( \newcommand{\vectorB}[1]{\overset { \scriptstyle \rightharpoonup} {\mathbf{#1}} } \)
\( \newcommand{\vectorC}[1]{\textbf{#1}} \)
\( \newcommand{\vectorD}[1]{\overrightarrow{#1}} \)
\( \newcommand{\vectorDt}[1]{\overrightarrow{\text{#1}}} \)
\( \newcommand{\vectE}[1]{\overset{-\!-\!\rightharpoonup}{\vphantom{a}\smash{\mathbf {#1}}}} \)
\( \newcommand{\vecs}[1]{\overset { \scriptstyle \rightharpoonup} {\mathbf{#1}} } \)
\( \newcommand{\vecd}[1]{\overset{-\!-\!\rightharpoonup}{\vphantom{a}\smash {#1}}} \)
\(\newcommand{\avec}{\mathbf a}\) \(\newcommand{\bvec}{\mathbf b}\) \(\newcommand{\cvec}{\mathbf c}\) \(\newcommand{\dvec}{\mathbf d}\) \(\newcommand{\dtil}{\widetilde{\mathbf d}}\) \(\newcommand{\evec}{\mathbf e}\) \(\newcommand{\fvec}{\mathbf f}\) \(\newcommand{\nvec}{\mathbf n}\) \(\newcommand{\pvec}{\mathbf p}\) \(\newcommand{\qvec}{\mathbf q}\) \(\newcommand{\svec}{\mathbf s}\) \(\newcommand{\tvec}{\mathbf t}\) \(\newcommand{\uvec}{\mathbf u}\) \(\newcommand{\vvec}{\mathbf v}\) \(\newcommand{\wvec}{\mathbf w}\) \(\newcommand{\xvec}{\mathbf x}\) \(\newcommand{\yvec}{\mathbf y}\) \(\newcommand{\zvec}{\mathbf z}\) \(\newcommand{\rvec}{\mathbf r}\) \(\newcommand{\mvec}{\mathbf m}\) \(\newcommand{\zerovec}{\mathbf 0}\) \(\newcommand{\onevec}{\mathbf 1}\) \(\newcommand{\real}{\mathbb R}\) \(\newcommand{\twovec}[2]{\left[\begin{array}{r}#1 \\ #2 \end{array}\right]}\) \(\newcommand{\ctwovec}[2]{\left[\begin{array}{c}#1 \\ #2 \end{array}\right]}\) \(\newcommand{\threevec}[3]{\left[\begin{array}{r}#1 \\ #2 \\ #3 \end{array}\right]}\) \(\newcommand{\cthreevec}[3]{\left[\begin{array}{c}#1 \\ #2 \\ #3 \end{array}\right]}\) \(\newcommand{\fourvec}[4]{\left[\begin{array}{r}#1 \\ #2 \\ #3 \\ #4 \end{array}\right]}\) \(\newcommand{\cfourvec}[4]{\left[\begin{array}{c}#1 \\ #2 \\ #3 \\ #4 \end{array}\right]}\) \(\newcommand{\fivevec}[5]{\left[\begin{array}{r}#1 \\ #2 \\ #3 \\ #4 \\ #5 \\ \end{array}\right]}\) \(\newcommand{\cfivevec}[5]{\left[\begin{array}{c}#1 \\ #2 \\ #3 \\ #4 \\ #5 \\ \end{array}\right]}\) \(\newcommand{\mattwo}[4]{\left[\begin{array}{rr}#1 \amp #2 \\ #3 \amp #4 \\ \end{array}\right]}\) \(\newcommand{\laspan}[1]{\text{Span}\{#1\}}\) \(\newcommand{\bcal}{\cal B}\) \(\newcommand{\ccal}{\cal C}\) \(\newcommand{\scal}{\cal S}\) \(\newcommand{\wcal}{\cal W}\) \(\newcommand{\ecal}{\cal E}\) \(\newcommand{\coords}[2]{\left\{#1\right\}_{#2}}\) \(\newcommand{\gray}[1]{\color{gray}{#1}}\) \(\newcommand{\lgray}[1]{\color{lightgray}{#1}}\) \(\newcommand{\rank}{\operatorname{rank}}\) \(\newcommand{\row}{\text{Row}}\) \(\newcommand{\col}{\text{Col}}\) \(\renewcommand{\row}{\text{Row}}\) \(\newcommand{\nul}{\text{Nul}}\) \(\newcommand{\var}{\text{Var}}\) \(\newcommand{\corr}{\text{corr}}\) \(\newcommand{\len}[1]{\left|#1\right|}\) \(\newcommand{\bbar}{\overline{\bvec}}\) \(\newcommand{\bhat}{\widehat{\bvec}}\) \(\newcommand{\bperp}{\bvec^\perp}\) \(\newcommand{\xhat}{\widehat{\xvec}}\) \(\newcommand{\vhat}{\widehat{\vvec}}\) \(\newcommand{\uhat}{\widehat{\uvec}}\) \(\newcommand{\what}{\widehat{\wvec}}\) \(\newcommand{\Sighat}{\widehat{\Sigma}}\) \(\newcommand{\lt}{<}\) \(\newcommand{\gt}{>}\) \(\newcommand{\amp}{&}\) \(\definecolor{fillinmathshade}{gray}{0.9}\)User Defined Types
User defined types are always based on system-supplied data type. They can enforce data integrity and they allow nulls.
To create a user-defined data type in SQL Server, choose types under “Programmability” in your database. Next, right click and choose ‘New’ –>‘User-defined data type’ or execute the sp_addtype system stored procedure. After this, type:
sp_addtype ssn, ‘varchar(11)’, ‘NOT NULL’
This will add a new user-defined data type called SIN with nine characters.
In this example, the field EmployeeSIN uses the user-defined data type SIN.
CREATE TABLE SINTable
(
EmployeeID        INT Primary Key,
EmployeeSIN       SIN,
CONSTRAINT        CheckSIN
CHECK (EmployeeSIN LIKE ‘ [0-9][0-9][0-9] – [0-9][0-9] [0-9] – [0-9][0-9][0-9] ‘)
)
ALTER TABLE
You can use ALTER TABLE statements to add and drop constraints.
- ALTER TABLE allows columns to be removed.
- When a constraint is added, all existing data are verified for violations.
In this example, we use the ALTER TABLE statement to the IDENTITY property to a ColumnName field.
USE HOTEL
GO
ALTER TABLE  tblHotel
ADD CONSTRAINT unqName UNIQUE (Name)
Use the ALTER TABLE statement to add a column with the IDENTITY property such as ALTER TABLE TableName.
ADD
ColumnName         int    IDENTITY(seed, increment)
DROP TABLE
The DROP TABLE will remove a table from the database. Make sure you have the correct database selected.
DROP TABLE tblHotel
Executing the above SQL DROP TABLE statement will remove the table tblHotel from the database.
Key Terms
DDL: abbreviation for data definition language
DML: abbreviation for data manipulation language
SEQUEL: acronym for Structured English Query Language; designed to manipulate and retrieve data stored in IBM’s quasi-relational database management system, System R
Structured Query Language (SQL): a database language designed for managing data held in a relational database management system
Exercises
- Using the information for the Chapter 9 exercise, implement the schema using Transact SQL (show SQL statements for each table). Implement the constraints as well.
- Create the table shown here in SQL Server and show the statements you used.
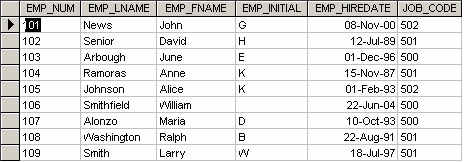
Table: EmployeeATTRIBUTE (FIELD) NAME DATA DECLARATION EMP_NUM CHAR(3) EMP_LNAME VARCHAR(15) EMP_FNAME VARCHAR(15) EMP_INITIAL CHAR(1) EMP_HIREDATE DATE JOB_CODE CHAR(3) Table \(\PageIndex{1}\): Copy and Paste Caption here. (Copyright; author via source) - Having created the table structure in question 2, write the SQL code to enter the rows for the table shown in Table \(\PageIndex{1}\).

Use Figure \(\PageIndex{2}\) to answer questions 4 to 10.
- Write the SQL code to change the job code to 501 for the person whose personnel number is 107. After you have completed the task, examine the results, and then reset the job code to its original value.
- Assuming that the data shown in the Employee table have been entered, write the SQL code that lists all attributes for a job code of 502.
- Write the SQL code to delete the row for the person named William Smithfield, who was hired on June 22, 2004, and whose job code classification is 500. (Hint: Use logical operators to include all the information given in this problem.)
- Add the attributes EMP_PCT and PROJ_NUM to the Employee table. The EMP_PCT is the bonus percentage to be paid to each employee.
- Using a single command, write the SQL code that will enter the project number (PROJ_NUM) = 18 for all employees whose job classification (JOB_CODE) is 500.
- Using a single command, write the SQL code that will enter the project number (PROJ_NUM) = 25 for all employees whose job classification (JOB_CODE) is 502 or higher.
- Write the SQL code that will change the PROJ_NUM to 14 for those employees who were hired before January 1, 1994, and whose job code is at least 501. (You may assume that the table will be restored to its original condition preceding this question.)
Also see Appendix C: SQL Lab with Solution

