3.3: Paragraphs
- Page ID
- 93892
\( \newcommand{\vecs}[1]{\overset { \scriptstyle \rightharpoonup} {\mathbf{#1}} } \)
\( \newcommand{\vecd}[1]{\overset{-\!-\!\rightharpoonup}{\vphantom{a}\smash {#1}}} \)
\( \newcommand{\dsum}{\displaystyle\sum\limits} \)
\( \newcommand{\dint}{\displaystyle\int\limits} \)
\( \newcommand{\dlim}{\displaystyle\lim\limits} \)
\( \newcommand{\id}{\mathrm{id}}\) \( \newcommand{\Span}{\mathrm{span}}\)
( \newcommand{\kernel}{\mathrm{null}\,}\) \( \newcommand{\range}{\mathrm{range}\,}\)
\( \newcommand{\RealPart}{\mathrm{Re}}\) \( \newcommand{\ImaginaryPart}{\mathrm{Im}}\)
\( \newcommand{\Argument}{\mathrm{Arg}}\) \( \newcommand{\norm}[1]{\| #1 \|}\)
\( \newcommand{\inner}[2]{\langle #1, #2 \rangle}\)
\( \newcommand{\Span}{\mathrm{span}}\)
\( \newcommand{\id}{\mathrm{id}}\)
\( \newcommand{\Span}{\mathrm{span}}\)
\( \newcommand{\kernel}{\mathrm{null}\,}\)
\( \newcommand{\range}{\mathrm{range}\,}\)
\( \newcommand{\RealPart}{\mathrm{Re}}\)
\( \newcommand{\ImaginaryPart}{\mathrm{Im}}\)
\( \newcommand{\Argument}{\mathrm{Arg}}\)
\( \newcommand{\norm}[1]{\| #1 \|}\)
\( \newcommand{\inner}[2]{\langle #1, #2 \rangle}\)
\( \newcommand{\Span}{\mathrm{span}}\) \( \newcommand{\AA}{\unicode[.8,0]{x212B}}\)
\( \newcommand{\vectorA}[1]{\vec{#1}} % arrow\)
\( \newcommand{\vectorAt}[1]{\vec{\text{#1}}} % arrow\)
\( \newcommand{\vectorB}[1]{\overset { \scriptstyle \rightharpoonup} {\mathbf{#1}} } \)
\( \newcommand{\vectorC}[1]{\textbf{#1}} \)
\( \newcommand{\vectorD}[1]{\overrightarrow{#1}} \)
\( \newcommand{\vectorDt}[1]{\overrightarrow{\text{#1}}} \)
\( \newcommand{\vectE}[1]{\overset{-\!-\!\rightharpoonup}{\vphantom{a}\smash{\mathbf {#1}}}} \)
\( \newcommand{\vecs}[1]{\overset { \scriptstyle \rightharpoonup} {\mathbf{#1}} } \)
\(\newcommand{\longvect}{\overrightarrow}\)
\( \newcommand{\vecd}[1]{\overset{-\!-\!\rightharpoonup}{\vphantom{a}\smash {#1}}} \)
\(\newcommand{\avec}{\mathbf a}\) \(\newcommand{\bvec}{\mathbf b}\) \(\newcommand{\cvec}{\mathbf c}\) \(\newcommand{\dvec}{\mathbf d}\) \(\newcommand{\dtil}{\widetilde{\mathbf d}}\) \(\newcommand{\evec}{\mathbf e}\) \(\newcommand{\fvec}{\mathbf f}\) \(\newcommand{\nvec}{\mathbf n}\) \(\newcommand{\pvec}{\mathbf p}\) \(\newcommand{\qvec}{\mathbf q}\) \(\newcommand{\svec}{\mathbf s}\) \(\newcommand{\tvec}{\mathbf t}\) \(\newcommand{\uvec}{\mathbf u}\) \(\newcommand{\vvec}{\mathbf v}\) \(\newcommand{\wvec}{\mathbf w}\) \(\newcommand{\xvec}{\mathbf x}\) \(\newcommand{\yvec}{\mathbf y}\) \(\newcommand{\zvec}{\mathbf z}\) \(\newcommand{\rvec}{\mathbf r}\) \(\newcommand{\mvec}{\mathbf m}\) \(\newcommand{\zerovec}{\mathbf 0}\) \(\newcommand{\onevec}{\mathbf 1}\) \(\newcommand{\real}{\mathbb R}\) \(\newcommand{\twovec}[2]{\left[\begin{array}{r}#1 \\ #2 \end{array}\right]}\) \(\newcommand{\ctwovec}[2]{\left[\begin{array}{c}#1 \\ #2 \end{array}\right]}\) \(\newcommand{\threevec}[3]{\left[\begin{array}{r}#1 \\ #2 \\ #3 \end{array}\right]}\) \(\newcommand{\cthreevec}[3]{\left[\begin{array}{c}#1 \\ #2 \\ #3 \end{array}\right]}\) \(\newcommand{\fourvec}[4]{\left[\begin{array}{r}#1 \\ #2 \\ #3 \\ #4 \end{array}\right]}\) \(\newcommand{\cfourvec}[4]{\left[\begin{array}{c}#1 \\ #2 \\ #3 \\ #4 \end{array}\right]}\) \(\newcommand{\fivevec}[5]{\left[\begin{array}{r}#1 \\ #2 \\ #3 \\ #4 \\ #5 \\ \end{array}\right]}\) \(\newcommand{\cfivevec}[5]{\left[\begin{array}{c}#1 \\ #2 \\ #3 \\ #4 \\ #5 \\ \end{array}\right]}\) \(\newcommand{\mattwo}[4]{\left[\begin{array}{rr}#1 \amp #2 \\ #3 \amp #4 \\ \end{array}\right]}\) \(\newcommand{\laspan}[1]{\text{Span}\{#1\}}\) \(\newcommand{\bcal}{\cal B}\) \(\newcommand{\ccal}{\cal C}\) \(\newcommand{\scal}{\cal S}\) \(\newcommand{\wcal}{\cal W}\) \(\newcommand{\ecal}{\cal E}\) \(\newcommand{\coords}[2]{\left\{#1\right\}_{#2}}\) \(\newcommand{\gray}[1]{\color{gray}{#1}}\) \(\newcommand{\lgray}[1]{\color{lightgray}{#1}}\) \(\newcommand{\rank}{\operatorname{rank}}\) \(\newcommand{\row}{\text{Row}}\) \(\newcommand{\col}{\text{Col}}\) \(\renewcommand{\row}{\text{Row}}\) \(\newcommand{\nul}{\text{Nul}}\) \(\newcommand{\var}{\text{Var}}\) \(\newcommand{\corr}{\text{corr}}\) \(\newcommand{\len}[1]{\left|#1\right|}\) \(\newcommand{\bbar}{\overline{\bvec}}\) \(\newcommand{\bhat}{\widehat{\bvec}}\) \(\newcommand{\bperp}{\bvec^\perp}\) \(\newcommand{\xhat}{\widehat{\xvec}}\) \(\newcommand{\vhat}{\widehat{\vvec}}\) \(\newcommand{\uhat}{\widehat{\uvec}}\) \(\newcommand{\what}{\widehat{\wvec}}\) \(\newcommand{\Sighat}{\widehat{\Sigma}}\) \(\newcommand{\lt}{<}\) \(\newcommand{\gt}{>}\) \(\newcommand{\amp}{&}\) \(\definecolor{fillinmathshade}{gray}{0.9}\)The <p> Tag
Most Web pages are text documents. In written languages such as English, letters are grouped into words, words are organized into sentences, and sentences are structured into cohesive paragraphs. HTML provides a way for content to be marked as a paragraph. By default, browsers render text marked as a paragraph with a single blank line preceding and following the text. Text inside a paragraph is also aligned to the left margin of the page and is word-wrapped inside the browser window.
In order to format a block of text as a paragraph, the <p> (paragraph) tag surrounds the enclosed text. The general format for this tag is given shown below.
<p>Text</p>
Any amount of text can appear between the opening and closing tags. When displayed in the browser, the enclosed text is single spaced and preceded and followed by a single blank line to separate it from surrounding page content. The <p> tag is classified as a container and block-level element.
You can see the effects of <p> tags in the Web page shown above which displays text as three separate paragraphs. These tags are added in the editor as shown below.
<p>A Web page begins with preliminary sections of code that identifies it as an HTML5 document. Also included is a title which appears in the browser's Title Bar.</p><p>All content that appears in the browser window is coded in the body section of the page. Text information, graphic images, links, and other page content are added to the page and are surrounded by HTML tags to order and structure them for presentation.</p><p>It is important to note that content is arranged on the page only through HTML tags coded in the document. Otherwise, all content runs together as an unformatted string of text.</p>
The text is now easily readable because organization is brought to its information content. Note that back-to-back paragraphs are separated by a single blank line even though each <p> tag itself produces a blank line before and after a paragraph. The browser collapses into a single blank line: the one that follows a paragraph and the one that precede the next.
Note that on this and subsequent pages complete coding for a Web page may not be shown in order to focus on the code being discussed. Still, it is assumed that the code shown is surrounded by the page preliminaries down through the<body>tag and by the closing</body>and</html>tags.)
The <blockquote> Tag
The <blockquote> tag offers a way to indent a block of text, to offset it from surrounding content for special emphasis as would be done for a quoted citation from which the tag gets its name. This container tag indents its enclosed text a fixed number of pixels (approximately 40 pixels) from the left and right margins. Its enclosed text is word-wrapped and preceded and followed by a blank line. The general format for the <blockquote> tag is shown below.
<blockquote>text</blockquote>
According to HTML 5 standards, the <blockquote> is used to mark content that is quoted from another source. In practice, the <blockquote> should be used only in the correct context to mark a block quotation. For our purposes, it currently serves as a convenient way to indent any block of text.
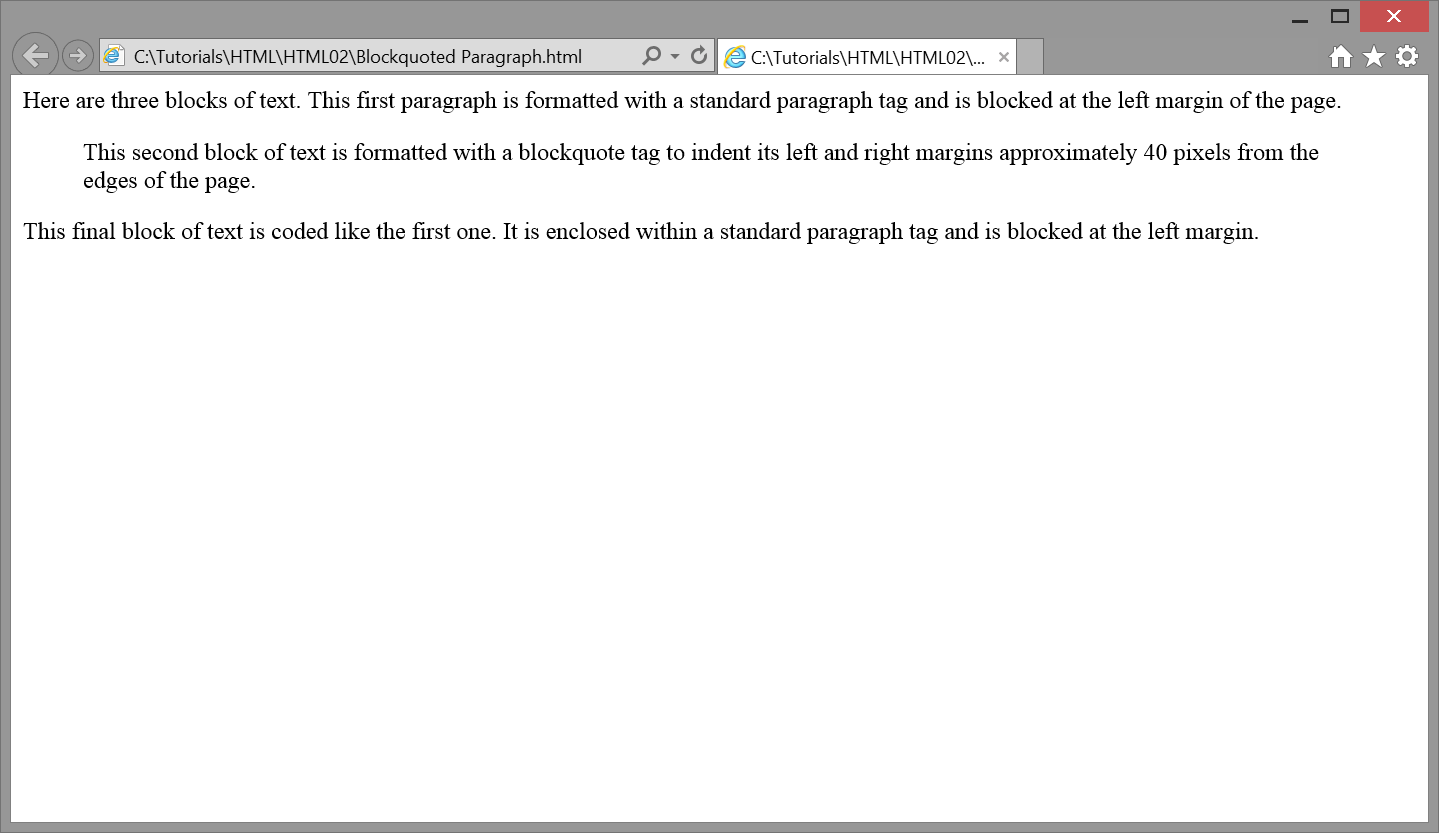
In the following example, a <blockquote> tag offsets the middle paragraph from surrounding text. Browser output is shown in Figure \(\PageIndex{1}\).
<p>Here are three blocks of text. This first paragraph is formatted with a standard paragraph tag and is blocked at the left margin of the page.</p><blockquote>This second block of text is formatted with a blockquote tag to indent its left and right margins approximately 40 pixels from the edges of the page.</blockquote><p>This final block of text is coded like the first one. It is enclosed within a standard paragraph tag and is blocked at the left margin.</p>

Figure \(\PageIndex{1}\): Applying the <blockquote> tag to a paragraph. ("MGA Web Development Tutorials" by Floyd, Kevin; Kwak, Myungjae; and Stines, Alan, Computer Science and Information Technology Ancillary Materials. 4, GALILEO Open Learning Materials is licensed under CC BY-SA 4.0)
Similar to the way it appears in the browser, the above editor coding shows the blockquoted text offset with blank lines and indented. As you know, this editor formatting is not required and has no effect on browser output that is controlled solely by HTML tags. Nevertheless, it is good practice to arrange editor coding to resemble browser output the best way possible for visual indication of the display relationships among sections of page content. It makes it easier to spot missing or miscoded tags when editor coding is well spaced and indented.
Nested Blockquotes
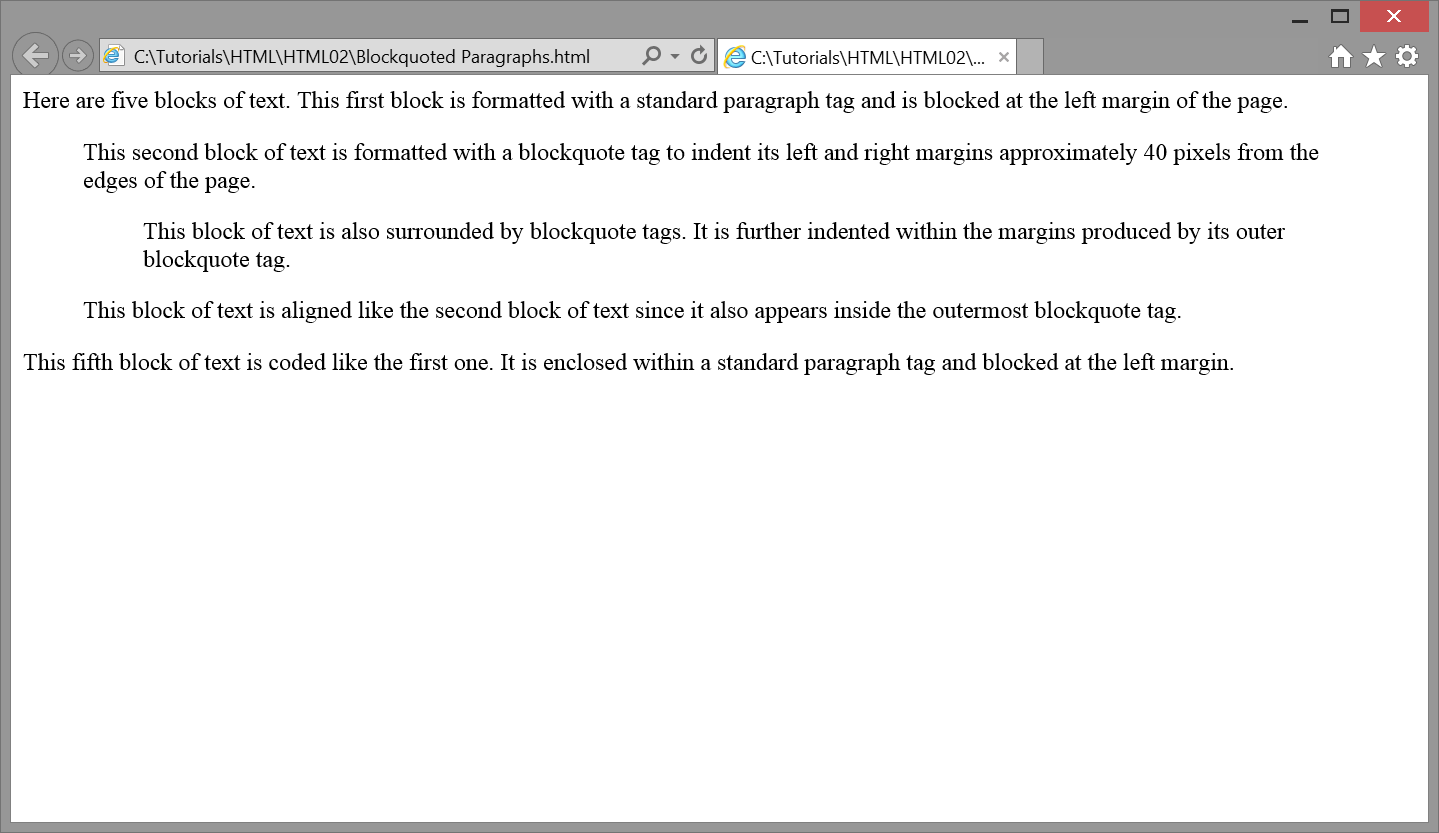
In the following example, <blockquote> tags are used to offset three blocks of text. The middle one is further indented inside its outer blockquoted paragraphs. Browser output is shown in Figure \(\PageIndex{2}\).
<p>Here are five blocks of text. This first block is formatted with a standard paragraph tag and is blocked at the left margin of the page.</p><blockquote>This second block of text is formatted with a blockquote tag to indent its left and right margins approximately 40 pixels from the edges of the page.<blockquote>This block of text is also surrounded by blockquote tags. It is further indented within the margins produced by its outer blockquote tag.</blockquote>This block of text is aligned like the second block of text since it also appears inside the outermost blockquote tag.</blockquote><p>This fifth block of text is coded like the first one. It is enclosed within a standard paragraph tag and blocked at the left margin.<p>

Figure \(\PageIndex{2}\): Text formatted with nested <blockquote> tags. ("MGA Web Development Tutorials" by Floyd, Kevin; Kwak, Myungjae; and Stines, Alan, Computer Science and Information Technology Ancillary Materials. 4, GALILEO Open Learning Materials is licensed under CC BY-SA 4.0)
In this example, the two <blockquote> tags are nested; that is, a <blockquote> tag appears inside a <blockquote> tag.The outer <blockquote> tag surrounds and indents its three contained text blocks approximately 40 pixels from the left and right margins of the page. The inner <blockquote> tag indents its enclosed text an additional 40 pixels from the margins established by the outer tag. Any additional nested tags further indent their enclosed text from the previous margins.
When nesting <blockquote> tags inside one another, make sure that opening and closing tags are properly paired, and that inner tags are fully closed inside their next outer-most enclosing tags. As in the case with <p> tags, back-to-back <blockquote> tags have their preceding and following blank lines collapsed to a single blank line.
Remember that the <blockquote> tag should not be used to just indent text. Instead it should only be used when displaying large blocks of quoted text within a web document. In a later tutorial, you will learn style sheet methods that can be used for indenting text.
Deprecated (OLD) Tags and Attributes
HTML 5 is a replacement for the older XHTML and HTML4 languages. In addition to adding many new elements and features, HTML 5 retains many of the tags found in previous HTML versions. Still, many older styling attributes are no longer supported officially by HTML 5. Many of these attributes may still be recognized by browsers which support compatibility with older HTML versions. For example, the <p> tag historically included the align attribute to control text alignment. For instance, by setting this attribute to <p align="center"> the text on each line of a paragraph is centered rather than aligned at the left margin.
In HTML 5, the align attribute is not supported. It is recommended that you refrain from using it and other styling attributes which have been phased out. Instead, newer style sheet declarations should be used to produce the same effect. Still, deprecated attributes are described in these tutorials since you may encounter them on existing Web pages even though most attributes are not valid under HTML 5 standards.
Certain HTML tags are also deprecated under HTML 5. Tags that are being phased out are presented since you will likely encounter them in existing pages. These tags may display properly in modern browsers, but newer alternatives should be used in their place. Furthermore, HTML 5 changes the contextual meaning of some older tags. These tags should now be used in the context where they are appropriate, instead of simply being used for styling purposes.
Deprecated (OLD) align Attribute
By default, paragraph text displayed in a browser is word wrapped and blocked at the left margin of the page. It is possible, however, to block text at the right margin, to center it, or to justify all lines by expanding them to both margins. These alignment options are specified by coding the align attribute inside a block-level tag. The general format for coding this attribute along with its possible values are:
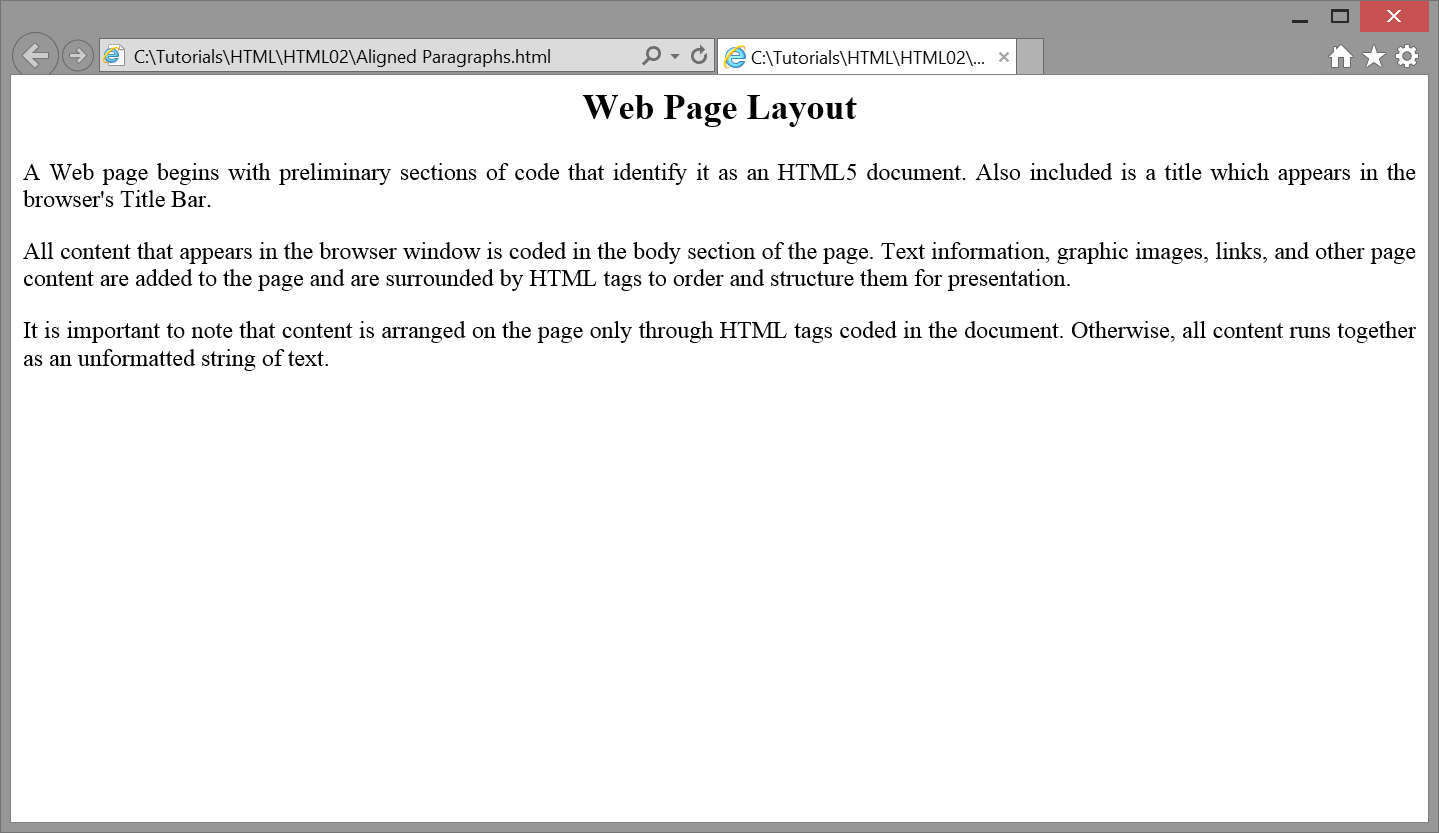
align="left|center|right|justify"The keyword align is assigned one of the quoted alignment values. For example, the following code centers the heading of the previous example page and justifies all paragraph lines by expanding them to the right margin. Browser output is shown in Figure \(\PageIndex{3}\).
<h2 align="center">Web Page Layout</h2><p align="justify">A Web page begins with preliminary sections of code that identifies it as an HTML5 document. Also included is a title which appears in the browser's Title Bar.</p><p align="justify">All content that appears in the browser window is coded in the body section of the page. Text information, graphic images, links, and other page content are added to the page and are surrounded by HTML tags to order and structure them for presentation.</p><p align="justify">It is important to note that content is arranged on the page only through HTML tags coded in the document. Otherwise, all content runs together as an unformatted string of text.</p>

Figure \(\PageIndex{3}\): Web page formatted with aligned paragraphs in browser.
Be aware that the align attribute is deprecated under current HTML5 standards. It is presented here as a quick and easy way to align paragraphs and will serve as a convenient, but temporary, styling method until you learn how to code and integrate style sheets on your Web pages.

