
10.2: Roassal Core Model
- Page ID
- 43716

The root of each visualization is an instance of the class ROView, which is the container for all the graphical components to be rendered. Such components are instances of a subclass of ROAbstractComponent, typically instances of ROElement and ROEdge. Usually, a graphical component holds a reference to a domain object. Some visual properties (such as the size or color) may be directly deduced from the domain object. We will shortly come back to that point. For now, we will illustrate the basic and fundamental operations.
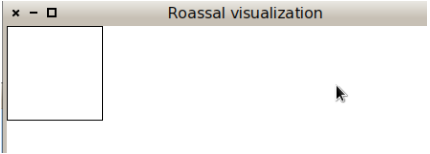
Adding an element. The very first step in seeing graphical components, is to add them to a view, and then open the view. This is exactly what the following code snippet does.
view := ROView new.
element := ROElement new size: 100.
view add: element.
view open.
It creates and opens a visualization with a single element of a square size of 100 pixels. However, by executing this code nothing appears in the visualization. The element has effectively been added to the view, but we have not told the element how it should be rendered.
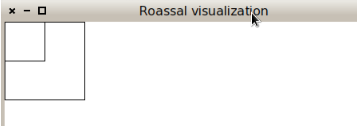
Adding a Shape. The visual aspect of an element is given by shapes, instances of subclasses of ROShape. By default, every element has no shape1. Let’s add some shape (a border) to our element:
view := ROView new.
element := ROElement new size: 100.
element addShape: ROBorder. "added line"
view add: element.
view open.
Unsurprisingly, adding a shape to an element is simply carried out by sending the addShape: message with the shape we want to add. Since this is a frequent operation, one can use the + message to achieve the same effect. We could have instead written element + ROBorder.
In this example we added the ROBorder shape. As its name suggests, ROBorder adds a squared border to the ROElement. By default, the color for a ROBorder is black. Many other shapes are available, including customizable labels, circles or filled rectangles. Such shapes may also be composed to create sophisticated visual aspects. The notion of shapes will be detailed in Section 11.3.
Reacting to events. Currently, our lonely element cannot do much. To make our element aware of user actions, such as clicking, drag-and-drop, keystroking, we need to specify event callbacks.
As in most user interface and graphical frameworks, each action a user may perform generates an event. Such an event is an instance of a subclass of an ROEvent. To make the graphical element responsive with an event, a block has to be associated to an event class and attached to the graphical element.
For example, to make our square responsive to user clicks, we need to add an event handler, i.e., the block that will be executed when the event occurs:
view := ROView new.
element := ROElement new size: 100.
element + ROBorder.
"Open an inspector when clicking"
element on: ROMouseClick do: [ :event | event inspect ].
view add: element.
view open.
Clicking on the square will now open an inspector. In the meantime, we favor the message + over addShape: since it is shorter and just as informative.
Interaction for complex response. Although widely used in common graphical frameworks, directly answering to user actions is often too simple for handling complex situations. Consider dragging-and-dropping, which happens by moving the mouse while maintaining a mouse button pressed. Although a common operation, drag-and-drop is quite complex. For example, the mouse movement in pixels needs to be projected in the plan of the element and the visualization needs to be refreshed. Since this is a common operation, we will save the programmer from using a construct like element on: ROMouseDrag do: [ ... ]. Instead, we provide interactions, a lightweight mechanism to reuse and compose event handlers. Making our non-movable element draggable is simply done with element @ RODraggable. The @ method is a shortcut for addInteraction:. We will detail other interactions in Section 11.7.
RODraggable is a subclass of ROInteraction, the root of all the interactions in Roassal. RODraggable allows an element to react to a mouse drag. Our small example is refined as:
view := ROView new.
element := ROElement new size: 100.
element
    + ROBorder     "-> add shape"
    @ RODraggable. "-> add interaction"
view add: element.
view open.
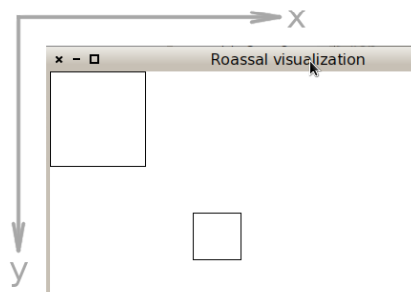
More Elements. Interesting visualizations are likely to contain a large number of elements. Elements may be added either with successive invocations of add: on a ROView, or in one shot by sending addAll:. Consider:
view := ROView new.
element1 := ROElement new size: 100.
element2 := ROElement new size: 50.
elements := Array with: element1 with: element2.
elements do: [ :el | el + ROBorder @ RODraggable ].
view addAll: elements.
view open.
The code above opens a window with two square elements, with the origin at the top left corner. We first create two elements of size 50 and 100, respectively, and add them to the view using the addAll: message. We make the two elements with borders and both are draggable. Note that in our example the shape and the interaction are added before opening the view. It can be done afterwards. Even once added and rendered, graphical components are free to be modified.
An element may be translated by sending translateBy: or translateTo: with a point as parameter. The parameter representing the step or the position in pixels. The axes are defined as shown in Figure \(\PageIndex{1}\), the x-axis increases from left to right and the y-axis from top to bottom.
view := ROView new.
element1 := ROElement new size: 100.
element2 := ROElement new size: 50.
elements := Array with: element1 with:
    element2.
elements do: [ :el | el + ROBorder @
    RODraggable ].
view addAll: elements.
element2 translateBy: 150@150.
view open.
When a visualization contains more than one element it is better to have an algorithm to automatically position each element. Such an algorithm is called a layout. Roassal provides many layouts to arrange elements by positioning them in the space. A layout in Roassal is a subclass of ROLayout. Layouts are described in Section 11.5.
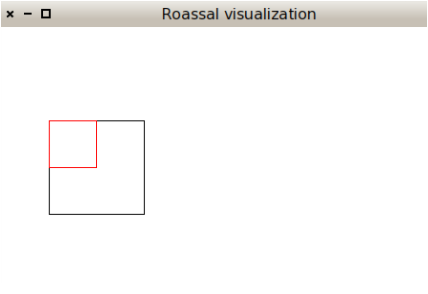
Nesting Elements. A ROElement object can also contain other ROElement objects. We refer to this containment relationship as nesting. Nesting enables elements to be structured as a tree. In addition, as shown by the following example, the location of children is relative to that of the parent. This means that when we translate the parent, the children will be translated as well.
view := ROView new.
parent := ROElement new
    size: 100;
    + ROBorder.
children := ROElement new
    size: 50;
    + ROBorder red.
parent add: children.
view add: parent.
"Translate the parent"
parent translateTo: 50@100.
view open.
Nesting elements are stretchable per default: when translating a child node, its parent’s bounds will be extended to contain this element in its new position.
view := ROView new.
parent := ROElement new
    size: 100;
    + ROBorder.
children := ROElement new
    size: 50;
    + ROBorder red.
parent add: children.
view add: parent.
"Translate the children"
children translateTo: 50@100.
view open.

Each element has a resize strategy stored as resizeStrategy instance variable. By default, the resize strategy is an instance of ROExtensibleParent, which means a parent will extend its bounds to fit all its child elements. A number of resize strategies are available; just look for the subclasses of ROAbstractResizeStrategy class, as its subclasses each define a strategy to be used by elements.
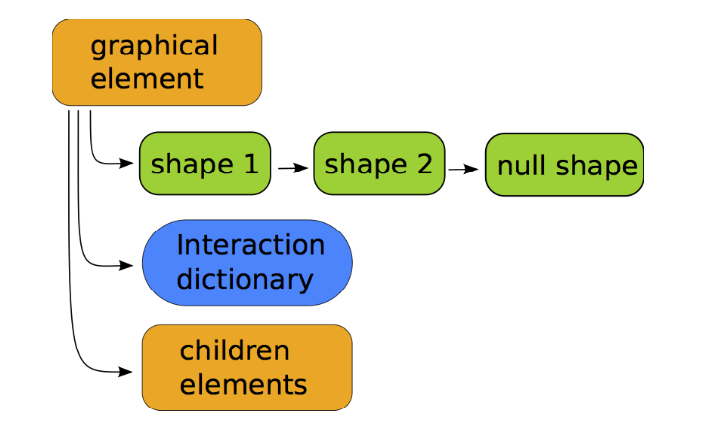
So far, we have introduced the interactions, the shapes, the child elements, and briefly mentioned the possibility to have an object domain. Schematically, an element representation looks like Figure \(\PageIndex{2}\).
Translating the view's camera. A view also answers to the translateBy: and translateTo: messages. Even if it looks like it, it is not the view that changes its position but its camera. The camera component of a view, represented by an instance of ROCamera, is the point of view from which a visualization object is actually viewed. More about the camera can be found in Section 11.8.
The Collection hierarchy example
As an example we will create the Collection hierarchy visualization seen earlier in this chapter. We will build it by executing the following steps:
- Add all data with no particular shape. In this case data is the Collection class with all its subclasses;
- render each class according to its characteristics;
- add a link between a class and its superclass;
- arrange the elements as an hierarchy with a layout.
In this section, we start with the first step: adding all elements representing each class of the hierarchy.
We can do this easily by sending the forCollection: message to the ROElement class, which is a helper to build ROElements from a collection. Each ROElement from the returning value of this message is a representation of each element from the parameter. We add a border shape to each of them and make them draggable for easier manipulation. Finally, we apply a default layout to see all the elements in the view. More explanation of how layouts work will follow later.
view := ROView new.
classElements := ROElement forCollection: Collection withAllSubclasses.
classElements
    do: [ :c | c + ROBorder.
            c @RODraggable ].
view addAll: classElements.
ROHorizontalLineLayout new on: view elements.
view open.

- An element always has a shape, instance of
RONullShape. The null object design pattern is here employed.