
14.2: Getting Started
- Page ID
- 39655
\( \newcommand{\vecs}[1]{\overset { \scriptstyle \rightharpoonup} {\mathbf{#1}} } \)
\( \newcommand{\vecd}[1]{\overset{-\!-\!\rightharpoonup}{\vphantom{a}\smash {#1}}} \)
\( \newcommand{\dsum}{\displaystyle\sum\limits} \)
\( \newcommand{\dint}{\displaystyle\int\limits} \)
\( \newcommand{\dlim}{\displaystyle\lim\limits} \)
\( \newcommand{\id}{\mathrm{id}}\) \( \newcommand{\Span}{\mathrm{span}}\)
( \newcommand{\kernel}{\mathrm{null}\,}\) \( \newcommand{\range}{\mathrm{range}\,}\)
\( \newcommand{\RealPart}{\mathrm{Re}}\) \( \newcommand{\ImaginaryPart}{\mathrm{Im}}\)
\( \newcommand{\Argument}{\mathrm{Arg}}\) \( \newcommand{\norm}[1]{\| #1 \|}\)
\( \newcommand{\inner}[2]{\langle #1, #2 \rangle}\)
\( \newcommand{\Span}{\mathrm{span}}\)
\( \newcommand{\id}{\mathrm{id}}\)
\( \newcommand{\Span}{\mathrm{span}}\)
\( \newcommand{\kernel}{\mathrm{null}\,}\)
\( \newcommand{\range}{\mathrm{range}\,}\)
\( \newcommand{\RealPart}{\mathrm{Re}}\)
\( \newcommand{\ImaginaryPart}{\mathrm{Im}}\)
\( \newcommand{\Argument}{\mathrm{Arg}}\)
\( \newcommand{\norm}[1]{\| #1 \|}\)
\( \newcommand{\inner}[2]{\langle #1, #2 \rangle}\)
\( \newcommand{\Span}{\mathrm{span}}\) \( \newcommand{\AA}{\unicode[.8,0]{x212B}}\)
\( \newcommand{\vectorA}[1]{\vec{#1}} % arrow\)
\( \newcommand{\vectorAt}[1]{\vec{\text{#1}}} % arrow\)
\( \newcommand{\vectorB}[1]{\overset { \scriptstyle \rightharpoonup} {\mathbf{#1}} } \)
\( \newcommand{\vectorC}[1]{\textbf{#1}} \)
\( \newcommand{\vectorD}[1]{\overrightarrow{#1}} \)
\( \newcommand{\vectorDt}[1]{\overrightarrow{\text{#1}}} \)
\( \newcommand{\vectE}[1]{\overset{-\!-\!\rightharpoonup}{\vphantom{a}\smash{\mathbf {#1}}}} \)
\( \newcommand{\vecs}[1]{\overset { \scriptstyle \rightharpoonup} {\mathbf{#1}} } \)
\(\newcommand{\longvect}{\overrightarrow}\)
\( \newcommand{\vecd}[1]{\overset{-\!-\!\rightharpoonup}{\vphantom{a}\smash {#1}}} \)
\(\newcommand{\avec}{\mathbf a}\) \(\newcommand{\bvec}{\mathbf b}\) \(\newcommand{\cvec}{\mathbf c}\) \(\newcommand{\dvec}{\mathbf d}\) \(\newcommand{\dtil}{\widetilde{\mathbf d}}\) \(\newcommand{\evec}{\mathbf e}\) \(\newcommand{\fvec}{\mathbf f}\) \(\newcommand{\nvec}{\mathbf n}\) \(\newcommand{\pvec}{\mathbf p}\) \(\newcommand{\qvec}{\mathbf q}\) \(\newcommand{\svec}{\mathbf s}\) \(\newcommand{\tvec}{\mathbf t}\) \(\newcommand{\uvec}{\mathbf u}\) \(\newcommand{\vvec}{\mathbf v}\) \(\newcommand{\wvec}{\mathbf w}\) \(\newcommand{\xvec}{\mathbf x}\) \(\newcommand{\yvec}{\mathbf y}\) \(\newcommand{\zvec}{\mathbf z}\) \(\newcommand{\rvec}{\mathbf r}\) \(\newcommand{\mvec}{\mathbf m}\) \(\newcommand{\zerovec}{\mathbf 0}\) \(\newcommand{\onevec}{\mathbf 1}\) \(\newcommand{\real}{\mathbb R}\) \(\newcommand{\twovec}[2]{\left[\begin{array}{r}#1 \\ #2 \end{array}\right]}\) \(\newcommand{\ctwovec}[2]{\left[\begin{array}{c}#1 \\ #2 \end{array}\right]}\) \(\newcommand{\threevec}[3]{\left[\begin{array}{r}#1 \\ #2 \\ #3 \end{array}\right]}\) \(\newcommand{\cthreevec}[3]{\left[\begin{array}{c}#1 \\ #2 \\ #3 \end{array}\right]}\) \(\newcommand{\fourvec}[4]{\left[\begin{array}{r}#1 \\ #2 \\ #3 \\ #4 \end{array}\right]}\) \(\newcommand{\cfourvec}[4]{\left[\begin{array}{c}#1 \\ #2 \\ #3 \\ #4 \end{array}\right]}\) \(\newcommand{\fivevec}[5]{\left[\begin{array}{r}#1 \\ #2 \\ #3 \\ #4 \\ #5 \\ \end{array}\right]}\) \(\newcommand{\cfivevec}[5]{\left[\begin{array}{c}#1 \\ #2 \\ #3 \\ #4 \\ #5 \\ \end{array}\right]}\) \(\newcommand{\mattwo}[4]{\left[\begin{array}{rr}#1 \amp #2 \\ #3 \amp #4 \\ \end{array}\right]}\) \(\newcommand{\laspan}[1]{\text{Span}\{#1\}}\) \(\newcommand{\bcal}{\cal B}\) \(\newcommand{\ccal}{\cal C}\) \(\newcommand{\scal}{\cal S}\) \(\newcommand{\wcal}{\cal W}\) \(\newcommand{\ecal}{\cal E}\) \(\newcommand{\coords}[2]{\left\{#1\right\}_{#2}}\) \(\newcommand{\gray}[1]{\color{gray}{#1}}\) \(\newcommand{\lgray}[1]{\color{lightgray}{#1}}\) \(\newcommand{\rank}{\operatorname{rank}}\) \(\newcommand{\row}{\text{Row}}\) \(\newcommand{\col}{\text{Col}}\) \(\renewcommand{\row}{\text{Row}}\) \(\newcommand{\nul}{\text{Nul}}\) \(\newcommand{\var}{\text{Var}}\) \(\newcommand{\corr}{\text{corr}}\) \(\newcommand{\len}[1]{\left|#1\right|}\) \(\newcommand{\bbar}{\overline{\bvec}}\) \(\newcommand{\bhat}{\widehat{\bvec}}\) \(\newcommand{\bperp}{\bvec^\perp}\) \(\newcommand{\xhat}{\widehat{\xvec}}\) \(\newcommand{\vhat}{\widehat{\vvec}}\) \(\newcommand{\uhat}{\widehat{\uvec}}\) \(\newcommand{\what}{\widehat{\wvec}}\) \(\newcommand{\Sighat}{\widehat{\Sigma}}\) \(\newcommand{\lt}{<}\) \(\newcommand{\gt}{>}\) \(\newcommand{\amp}{&}\) \(\definecolor{fillinmathshade}{gray}{0.9}\)The Seaside community
The Seaside.st website (http://www.seaside.st) contains many Seaside-related resources, including downloads, documentation and tutorials. (Keep in mind that Seaside has evolved considerably over the years, and not all available material refers to the latest version.) There are also several active mailing lists, which you can find at http://www.seaside.st/community/mailinglist.
In addition, the Wiki on the Seaside GitHub repository (https://github.com/seasidest/seaside/wiki) provides some crucial documentation, including the Release Notes for each version of Seaside.
Installing Seaside using the one-click experience image
The easiest way to get started is to download the Seaside One-Click Experience 3.1 from the Pharo Downloads section of the Seaside web site (http://www.seaside.st/download/pharo). This is a prepackaged version of the latest stable version of Seaside for Mac OSX, Linux and Windows, built on Pharo 4. The current latest Seaside version is 3.2. These are full Pharo distributions, which include the Pharo VM as well as a development image with many Seaside-related packages preloaded, and a helpful Seaside control panel that starts when you open the image.
Download and launch the Seaside One-Click image (feel free to refer to the Getting Started section of Chapter : A Quick Tour of Pharo for an in-depth discussion of launching Pharo images). Once started, you should see something similar to Figure \(\PageIndex{1}\) - a familiar Pharo development environment with some windows pre-opened, such as welcome messages as well as a Seaside Control Panel.

Starting the Seaside server
The easiest way to start and stop the Seaside web server is through the Seaside Control Panel. If you’re using the Seaside One-Click Experience image, it should already be open (and running a server adapter) when you open the image for the first time. You can manually open it at any time, however, by evaluating WAPharoServerAdapterSpecBrowser open.
Right-clicking on the top pane of the Seaside Control Panel lets you add new server adapters. For example, you can add a ZnZincServerAdaptor, specify a port number, then start it using the Start button on the control panel, which launches a new Seaside server that listens on that port.
ZnZincServerAdaptor startOn: 8080. "start on port 8080"
ZnZincServerAdaptor stop.
You can also start and stop the Seaside web server from a playground, by sending the startOn: and stop messages to your server adapter of choice.
The Seaside welcome page
Once the Seaside server is running, navigate to http://localhost:8080/ in your web browser. You should see a web page that looks like Figure \(\PageIndex{2}\).

The Welcome page contains links to some sample Seaside applications. It also links to various documents and resources, and (in the sidebar) links to the Configuration and Browse applications that allow you to interact with Seaside applications registered in your image.
Let’s look at one of the example applications that demonstrates the Counter component: click on the Counter link.
This page is a small Seaside application: it displays a counter component that can be incremented or decremented by clicking on the ++ and –– links (see Figure \(\PageIndex{3}\)).

Play with the counter by clicking on these links. Use your browser’s Back button to go back to a previous state, and then click on ++ again. Notice how the counter is correctly incremented with respect to the currently displayed state, rather than the state that the counter was in when you started using the Back button.
Notice the toolbar at the bottom of the web page in Figure \(\PageIndex{2}\). Seaside supports a notion of sessions to keep track of the state of the application for different users. New Session will start a new session on the counter application. Configure allows you to configure the settings of your application through a web interface. (To close the Configure view, click on the x in the top right corner.) Halos provides a way to explore the state of the application running on the Seaside server. Profile and Memory provide detailed information about the run-time performance of the application. XHTML can be used to validate the generated web page, but works only when the web page is publicly accessible from the Internet, because it uses the W3C validation service.
Single components
Seaside applications are built up from pluggable components. In fact, components are ordinary Smalltalk objects. The only thing that is special about them is that they are instances of classes that inherit from the Seaside framework class WAComponent. We can explore components and their classes from the Pharo image, or directly from the web interface using halos.
Click on the Halos link at the bottom of the page to toggle on halo functionality. You’ll see a number of nested components each with their own halo icons, including the Counter component (you may have to scroll down a bit to reach it), like the one seen in Figure \(\PageIndex{4}\).
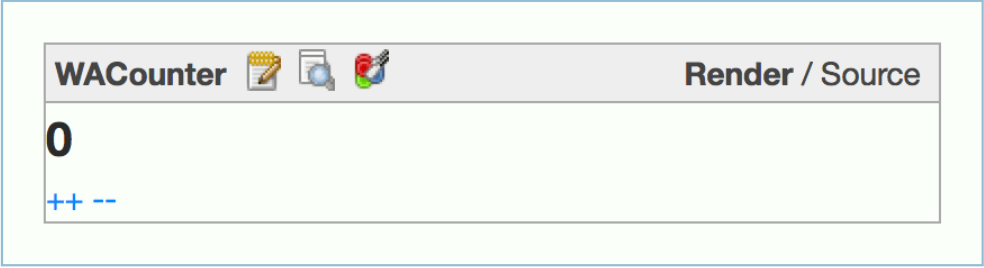
At the top left of the component, the text WACounter tells us the class of the Seaside component that implements its behavior. Next to this are three clickable icons. The first is the Class Browser (the notepad with pencil icon), which opens up a (web-based) Seaside class browser on this component’s class. The second is the Object Inspector (notepad with magnifying glass icon), which opens a web-based object inspector on the actual WACounter instance. The third is the CSS Style Manager (the coloured circles icon), opens a Seaside view to display the CSS style sheet for this component.
At the top right of the component, the Render / Source links let you toggle between the Rendered and (formatted) Source views of the component’s HTML source code. Experiment with all of these links. Note that the ++ and – links are also active in the source view.
The Seaside Class Browser and Object Inspector can be very convenient when the server is running on another computer, especially when the server does not have a display, or if it is in remote place. However, when you are first developing a Seaside application, the server will be running locally, and it is easy to use the ordinary Pharo development tools in the server image.
Using the Object Inspector link in the web browser, open an inspector on the underlying Pharo counter object, type self halt and click the doIt button.
The form submits, and the browser will hang, spinning. Now switch to the Pharo Seaside image. You should see a pre-debugger window (Figure \(\PageIndex{5}\)) showing a WACounter object executing a halt. Examine this execution in the debugger, and then Proceed. Go back to the web browser and notice that the Counter application is running again.

Multiple components
Seaside components can be instantiated multiple times and in different contexts.

Now, point your web browser to http://localhost:8080/examples/multicounter.
You will see a simple application composed of a number of independent instances of the WACounter component, nested inside a WAMultiCounter. Increment and decrement several of the counters. Verify that they behave correctly even if you use the Back button. Toggle the halos to see how the application is built out of nested components. Use the Seaside class browser to view the implementation of WAMultiCounter. You should see two methods on the class side (description, and initialize) and three on the instance side (children, initialize, and renderContentOn:). Note that an application is simply a component that is willing to be at the root of the component containment hierarchy; this willingness is indicated by defining a class-side method canBeRoot to answer true.
You can use the Seaside web interface to configure, copy or remove individual applications (which are root-level components). Try making the following configuration change.
Point your web browser to http://localhost:8080/config.
If you are asked for a login, supply the default login and password (admin and seaside). You can see a list of a registered applications and dispatchers.
Change into the examples dispatcher list by clicking on the link on the left side. With the buttons at the topbar, we can add new request handlers, open the current, copy, remove or set it as the default page. We want to add a new example application. Select Add, enter the name counter2 and choose the type Application, click OK (see Figure \(\PageIndex{7}\)).

On the next screen, set the Root Component to WACounter, apply the changes (Figure \(\PageIndex{8}\)).

Now we have a new counter installed at http://localhost:8080/examples/counter2. Use the same Remove button in the configuration interface to remove this entry point.
Seaside operates in two modes: development mode, which is what we have seen so far, and deployment mode, in which the toolbar is not available.
You can put a Seaside Application into deployment mode by removing the inherited Root Decoration Class (again, see Figure \(\PageIndex{8}\)).
Alternatively, you can disable the development toolbar for all new aplications by evaluating the code:
AAdmin applicationDefaults
    removeParent: WADevelopmentConfiguration instance
If you want to enable the password protection, you need to add the WAAuthConfiguration in the Inherited Configuration. Choose WAAuthConfiguration from the list of possible parents, after adding this configuration, you can define the Login and Password setting.