
4.2: Adding the form to the Page
- Page ID
- 27553

\( \newcommand{\vecs}[1]{\overset { \scriptstyle \rightharpoonup} {\mathbf{#1}} } \)
\( \newcommand{\vecd}[1]{\overset{-\!-\!\rightharpoonup}{\vphantom{a}\smash {#1}}} \)
\( \newcommand{\dsum}{\displaystyle\sum\limits} \)
\( \newcommand{\dint}{\displaystyle\int\limits} \)
\( \newcommand{\dlim}{\displaystyle\lim\limits} \)
\( \newcommand{\id}{\mathrm{id}}\) \( \newcommand{\Span}{\mathrm{span}}\)
( \newcommand{\kernel}{\mathrm{null}\,}\) \( \newcommand{\range}{\mathrm{range}\,}\)
\( \newcommand{\RealPart}{\mathrm{Re}}\) \( \newcommand{\ImaginaryPart}{\mathrm{Im}}\)
\( \newcommand{\Argument}{\mathrm{Arg}}\) \( \newcommand{\norm}[1]{\| #1 \|}\)
\( \newcommand{\inner}[2]{\langle #1, #2 \rangle}\)
\( \newcommand{\Span}{\mathrm{span}}\)
\( \newcommand{\id}{\mathrm{id}}\)
\( \newcommand{\Span}{\mathrm{span}}\)
\( \newcommand{\kernel}{\mathrm{null}\,}\)
\( \newcommand{\range}{\mathrm{range}\,}\)
\( \newcommand{\RealPart}{\mathrm{Re}}\)
\( \newcommand{\ImaginaryPart}{\mathrm{Im}}\)
\( \newcommand{\Argument}{\mathrm{Arg}}\)
\( \newcommand{\norm}[1]{\| #1 \|}\)
\( \newcommand{\inner}[2]{\langle #1, #2 \rangle}\)
\( \newcommand{\Span}{\mathrm{span}}\) \( \newcommand{\AA}{\unicode[.8,0]{x212B}}\)
\( \newcommand{\vectorA}[1]{\vec{#1}} % arrow\)
\( \newcommand{\vectorAt}[1]{\vec{\text{#1}}} % arrow\)
\( \newcommand{\vectorB}[1]{\overset { \scriptstyle \rightharpoonup} {\mathbf{#1}} } \)
\( \newcommand{\vectorC}[1]{\textbf{#1}} \)
\( \newcommand{\vectorD}[1]{\overrightarrow{#1}} \)
\( \newcommand{\vectorDt}[1]{\overrightarrow{\text{#1}}} \)
\( \newcommand{\vectE}[1]{\overset{-\!-\!\rightharpoonup}{\vphantom{a}\smash{\mathbf {#1}}}} \)
\( \newcommand{\vecs}[1]{\overset { \scriptstyle \rightharpoonup} {\mathbf{#1}} } \)
\(\newcommand{\longvect}{\overrightarrow}\)
\( \newcommand{\vecd}[1]{\overset{-\!-\!\rightharpoonup}{\vphantom{a}\smash {#1}}} \)
\(\newcommand{\avec}{\mathbf a}\) \(\newcommand{\bvec}{\mathbf b}\) \(\newcommand{\cvec}{\mathbf c}\) \(\newcommand{\dvec}{\mathbf d}\) \(\newcommand{\dtil}{\widetilde{\mathbf d}}\) \(\newcommand{\evec}{\mathbf e}\) \(\newcommand{\fvec}{\mathbf f}\) \(\newcommand{\nvec}{\mathbf n}\) \(\newcommand{\pvec}{\mathbf p}\) \(\newcommand{\qvec}{\mathbf q}\) \(\newcommand{\svec}{\mathbf s}\) \(\newcommand{\tvec}{\mathbf t}\) \(\newcommand{\uvec}{\mathbf u}\) \(\newcommand{\vvec}{\mathbf v}\) \(\newcommand{\wvec}{\mathbf w}\) \(\newcommand{\xvec}{\mathbf x}\) \(\newcommand{\yvec}{\mathbf y}\) \(\newcommand{\zvec}{\mathbf z}\) \(\newcommand{\rvec}{\mathbf r}\) \(\newcommand{\mvec}{\mathbf m}\) \(\newcommand{\zerovec}{\mathbf 0}\) \(\newcommand{\onevec}{\mathbf 1}\) \(\newcommand{\real}{\mathbb R}\) \(\newcommand{\twovec}[2]{\left[\begin{array}{r}#1 \\ #2 \end{array}\right]}\) \(\newcommand{\ctwovec}[2]{\left[\begin{array}{c}#1 \\ #2 \end{array}\right]}\) \(\newcommand{\threevec}[3]{\left[\begin{array}{r}#1 \\ #2 \\ #3 \end{array}\right]}\) \(\newcommand{\cthreevec}[3]{\left[\begin{array}{c}#1 \\ #2 \\ #3 \end{array}\right]}\) \(\newcommand{\fourvec}[4]{\left[\begin{array}{r}#1 \\ #2 \\ #3 \\ #4 \end{array}\right]}\) \(\newcommand{\cfourvec}[4]{\left[\begin{array}{c}#1 \\ #2 \\ #3 \\ #4 \end{array}\right]}\) \(\newcommand{\fivevec}[5]{\left[\begin{array}{r}#1 \\ #2 \\ #3 \\ #4 \\ #5 \\ \end{array}\right]}\) \(\newcommand{\cfivevec}[5]{\left[\begin{array}{c}#1 \\ #2 \\ #3 \\ #4 \\ #5 \\ \end{array}\right]}\) \(\newcommand{\mattwo}[4]{\left[\begin{array}{rr}#1 \amp #2 \\ #3 \amp #4 \\ \end{array}\right]}\) \(\newcommand{\laspan}[1]{\text{Span}\{#1\}}\) \(\newcommand{\bcal}{\cal B}\) \(\newcommand{\ccal}{\cal C}\) \(\newcommand{\scal}{\cal S}\) \(\newcommand{\wcal}{\cal W}\) \(\newcommand{\ecal}{\cal E}\) \(\newcommand{\coords}[2]{\left\{#1\right\}_{#2}}\) \(\newcommand{\gray}[1]{\color{gray}{#1}}\) \(\newcommand{\lgray}[1]{\color{lightgray}{#1}}\) \(\newcommand{\rank}{\operatorname{rank}}\) \(\newcommand{\row}{\text{Row}}\) \(\newcommand{\col}{\text{Col}}\) \(\renewcommand{\row}{\text{Row}}\) \(\newcommand{\nul}{\text{Nul}}\) \(\newcommand{\var}{\text{Var}}\) \(\newcommand{\corr}{\text{corr}}\) \(\newcommand{\len}[1]{\left|#1\right|}\) \(\newcommand{\bbar}{\overline{\bvec}}\) \(\newcommand{\bhat}{\widehat{\bvec}}\) \(\newcommand{\bperp}{\bvec^\perp}\) \(\newcommand{\xhat}{\widehat{\xvec}}\) \(\newcommand{\vhat}{\widehat{\vvec}}\) \(\newcommand{\uhat}{\widehat{\uvec}}\) \(\newcommand{\what}{\widehat{\wvec}}\) \(\newcommand{\Sighat}{\widehat{\Sigma}}\) \(\newcommand{\lt}{<}\) \(\newcommand{\gt}{>}\) \(\newcommand{\amp}{&}\) \(\definecolor{fillinmathshade}{gray}{0.9}\)After the header has been developed, the form is added to the page. For now, only the display of the form will be presented to make the concepts clearer. Later, this chapter will show how CSS can be used with JavaScript to control display of the form.
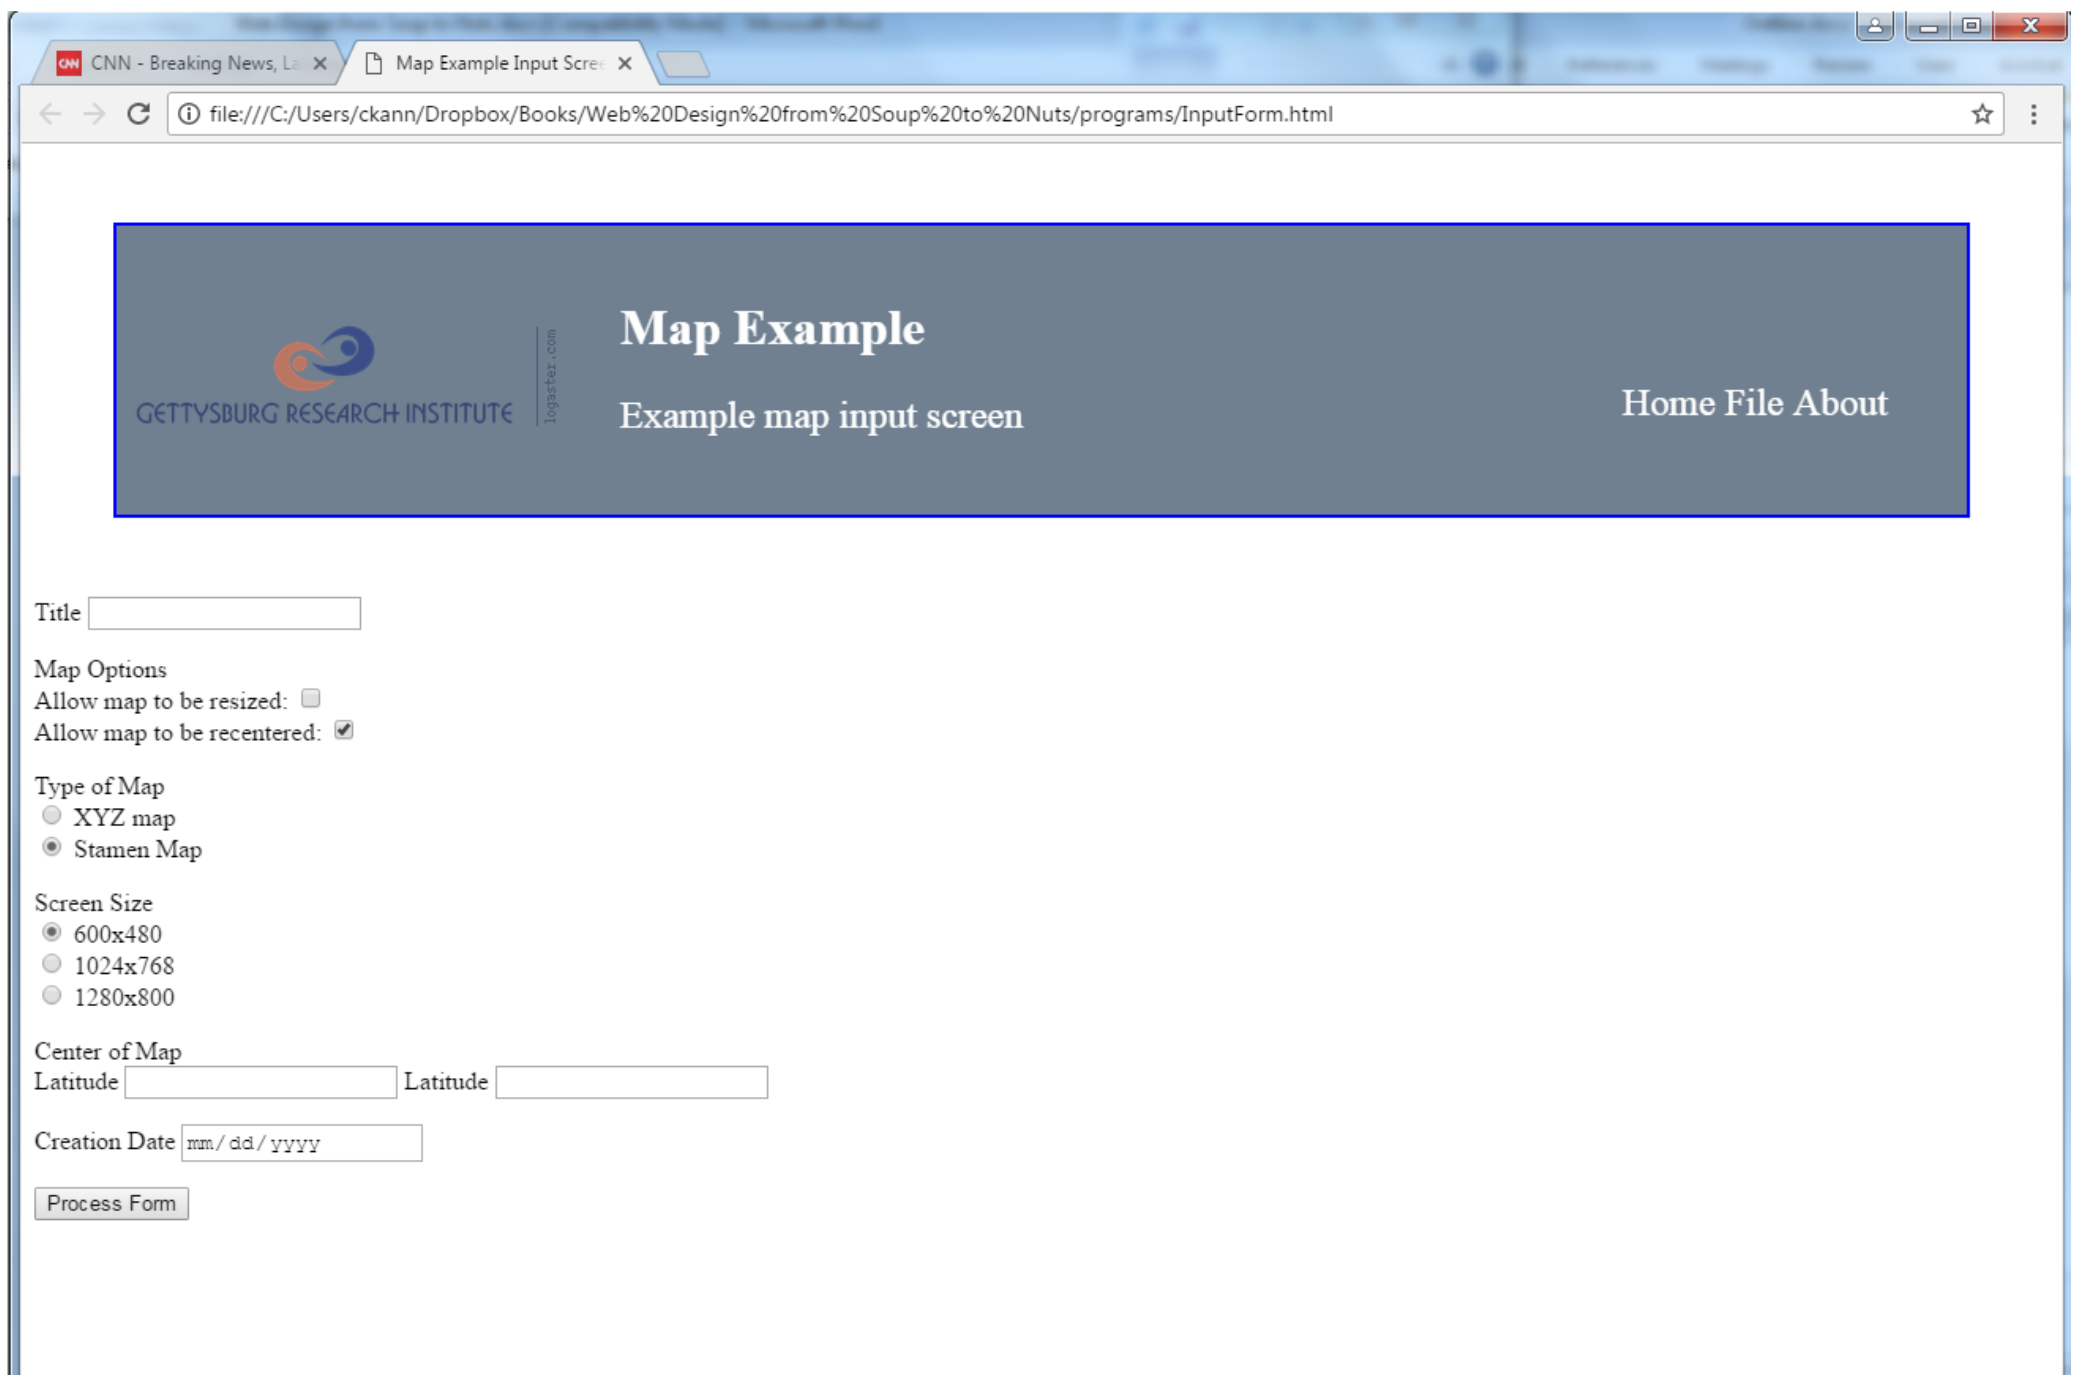
If the form is simply added to the page, as shown below, it looks very unprofessional. While it is functional, it is ugly and would not inspire confidence from the users that the web page actually works.
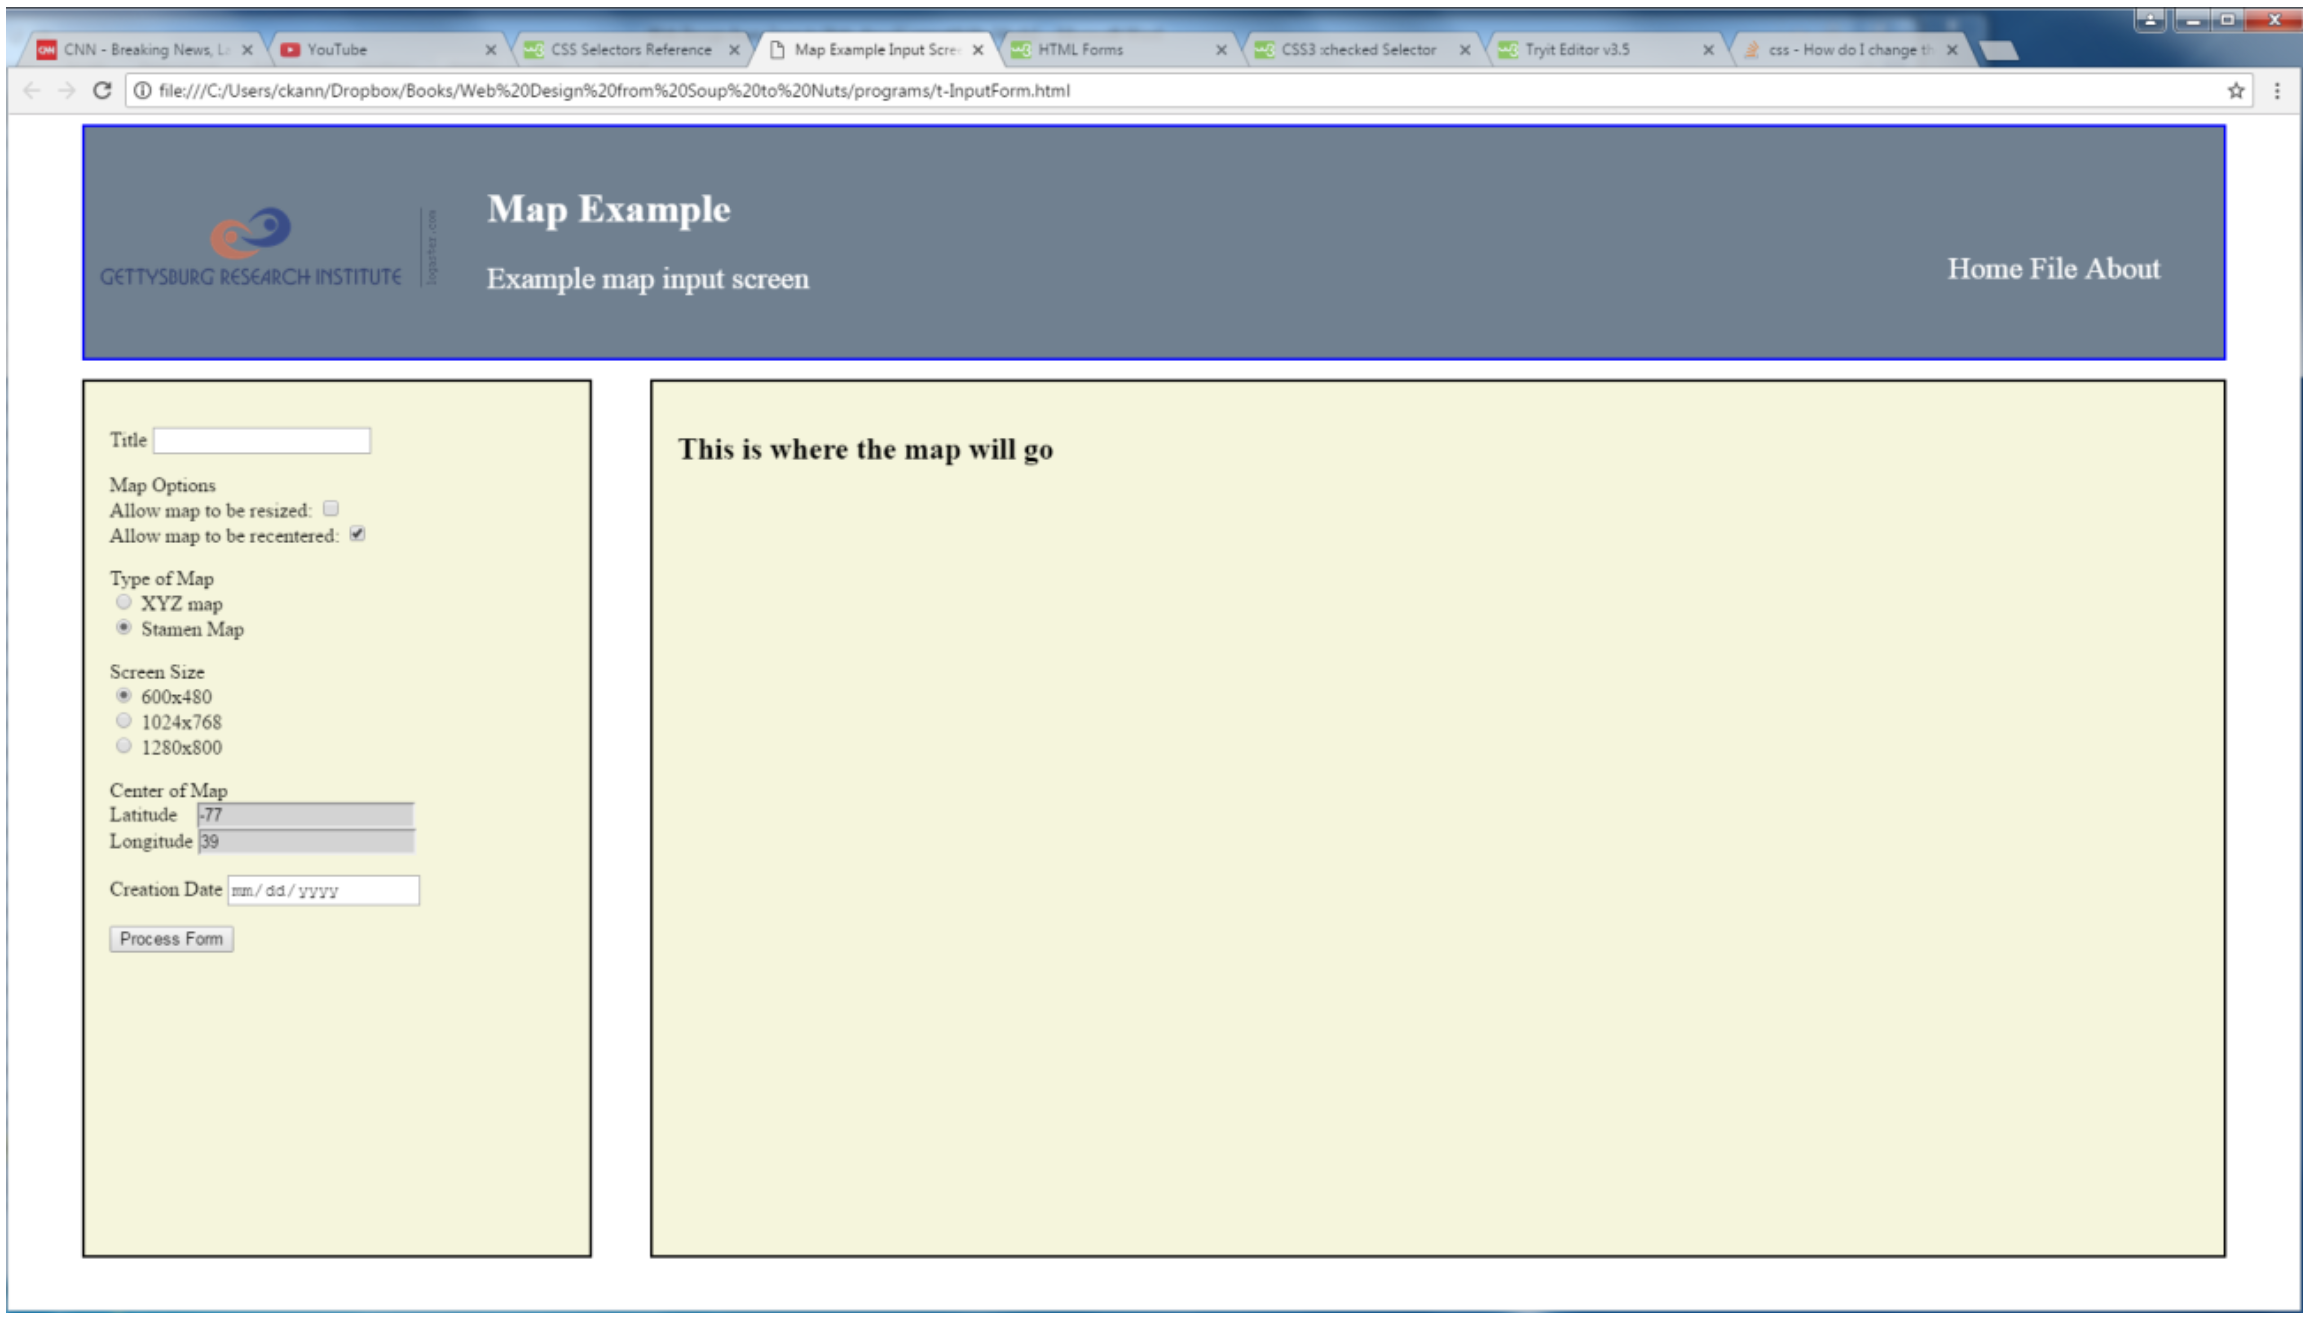
A much nicer layout of the form follows. The following is the form display that will be styled using CSS. Following the form, the CSS and HTML are presented here and an explanation of all the elements is given.
CSS
Program 81 – Form CSS example

header {
    margin : 5px 50px 5px 50px;
    border : 2px solid blue;
    background-color : slategray;
    color : white;
}

header p {
    font-size : 150%;
}

.header-icon {
    display : inline-block;
    margin: 50px 10px 50px
}

.header-desc {
    display : inline-block;
    margin : 25px;
}

.header-menu {
    display : inline-block;
    float: right;
    margin : 75px 50px 50px 50px;
}
#inputForm {
    margin : 10px 5px 5px 50px;
    background-color : beige;
    border : 2px solid black;
    display: inline-block;
    float : left;
    padding : 20px;
    width : 20%;
    height : 70%;
}

#map {
    margin : 0px 50px 5px 5px;
    background-color : beige;
    border : 2px solid black;
    display: inline-block;
    float : right;
    padding : 20px;
    width : 67%;
    height : 70%;
}

input:-moz-read-only { /* For Firefox */
    background-color: lightgray;
}

input:read-only {
    background-color: lightgray;
}
The CSS for the head has been defined, and that leaves just 4 CSS tags to cover here. The first are the #form and #map id tags. These two tags create boxes displayed on the web page to contain other form elements. The #form is 20% of the size of the page, and the #map is 67% the size of the page and is anchored to the right of the page using the float:right attribute. The inline:block attribute tells CSS to put both on the same line. Since they only take up 87% of the line, 13% of the line will not be included in either division and left blank between the two pages. Both or the div sections have black boarder 2 pixels in size, and both will take up 70% of the height of the page, with the rest used by the header. Finally, the padding says leave some room on the right and left of the divisions before rendering the text.
The final two tags, the input:-moz-read-only and input:read-only tags, are to gray out any input tags which are read only, e.g. the value for these input fields cannot be typed in by the user and must be set programmatically. These are the read only fields on the map for latitude and longitude.
HTML
Program 82 – CSS with form completed example.

<html>
    <head>
        <title>Map Example Input Screen </title>
        <link rel="stylesheet" type="text/css" href="WebMapExample.css">
    </head>

    <body>

            <div class="header-icon">
                <image src="GRI_logo.png" />
            </div>
            <div class="header-desc">
                <h1>Map Example</h1>
                <p class="header-p">
                    Example map input screen
                </p>
            </div>
            <div class="header-menu">
                <p class="header-p">
                    Home File About
                </p>
            </div>
        </header>

        <section  />

                <label  for="title">Title</label>
                <input type="text"  size="20">
            </p>
                            Map Options<br>
                <label  for="resize">Allow map to be resized:
                </label>
                    <input type="checkbox" />
                    <br/>
                <label  for="recenter">
                    Allow map to be recentered:
                </label>
                    <input type="checkbox"  checked />
            </p>
                            Type of Map<br>
                <input type="radio" name="maptype"  value="XYZ Map"/>
                <label  for="XYZMap">XYZ map </label>
                <br/>
                <input type="radio" name="maptype"  checked />
                <label  for="StamenMap">Stamen Map
                </label>
            </p>
                            Screen Size<br>
                <input type="radio" name="screenSize" checked
                     value="600x480" />
                <label  for="XYZMap">600x480 </label>
                <br/>
                <input type="radio" name="screenSize"  value="1024x768"/>
                <label  for="XYZMap">1024x768 </label>
                <br/>
                <input type="radio" name="screenSize"  value="1280x800"/>
                <label  for="XYZMap">1280x800 </label>
            </p>

                            Center of Map<br>
                <label  for="lat">Latitude
                </label>
                <input type="number"  value="-77" readonly /><br />
                <label  for="long" >Longitude </label>
                <input type="number"  value="39" readonly />
            </p>

                            <label  for="creationDate">Creation Date
                </label>
                <input type="date" />
            </p>

            <input type="button" value="Process Form" />
        </section>

        <section >
            <h1> This is where the map will go </h1>
        </section>
    </body>
</html>
For the HTML for the page, the only change was to add two section tags to create sections for the form and the map. The section tag is a div tag that has a semantic meaning. A section to a for is a completely separate part of the form. A division has no semantic meaning.