Engineering LibreTexts

Appendix B: Slope and Deflection Tables

  • Page ID
    145531
    • James K. Lord, Amy Richardson, Sneha Davison, and David A. Dillard
    • Virginial Tech

    \( \newcommand{\vecs}[1]{\overset { \scriptstyle \rightharpoonup} {\mathbf{#1}} } \)

    \( \newcommand{\vecd}[1]{\overset{-\!-\!\rightharpoonup}{\vphantom{a}\smash {#1}}} \)

    \( \newcommand{\dsum}{\displaystyle\sum\limits} \)

    \( \newcommand{\dint}{\displaystyle\int\limits} \)

    \( \newcommand{\dlim}{\displaystyle\lim\limits} \)

    \( \newcommand{\id}{\mathrm{id}}\) \( \newcommand{\Span}{\mathrm{span}}\)

    ( \newcommand{\kernel}{\mathrm{null}\,}\) \( \newcommand{\range}{\mathrm{range}\,}\)

    \( \newcommand{\RealPart}{\mathrm{Re}}\) \( \newcommand{\ImaginaryPart}{\mathrm{Im}}\)

    \( \newcommand{\Argument}{\mathrm{Arg}}\) \( \newcommand{\norm}[1]{\| #1 \|}\)

    \( \newcommand{\inner}[2]{\langle #1, #2 \rangle}\)

    \( \newcommand{\Span}{\mathrm{span}}\)

    \( \newcommand{\id}{\mathrm{id}}\)

    \( \newcommand{\Span}{\mathrm{span}}\)

    \( \newcommand{\kernel}{\mathrm{null}\,}\)

    \( \newcommand{\range}{\mathrm{range}\,}\)

    \( \newcommand{\RealPart}{\mathrm{Re}}\)

    \( \newcommand{\ImaginaryPart}{\mathrm{Im}}\)

    \( \newcommand{\Argument}{\mathrm{Arg}}\)

    \( \newcommand{\norm}[1]{\| #1 \|}\)

    \( \newcommand{\inner}[2]{\langle #1, #2 \rangle}\)

    \( \newcommand{\Span}{\mathrm{span}}\) \( \newcommand{\AA}{\unicode[.8,0]{x212B}}\)

    \( \newcommand{\vectorA}[1]{\vec{#1}}      % arrow\)

    \( \newcommand{\vectorAt}[1]{\vec{\text{#1}}}      % arrow\)

    \( \newcommand{\vectorB}[1]{\overset { \scriptstyle \rightharpoonup} {\mathbf{#1}} } \)

    \( \newcommand{\vectorC}[1]{\textbf{#1}} \)

    \( \newcommand{\vectorD}[1]{\overrightarrow{#1}} \)

    \( \newcommand{\vectorDt}[1]{\overrightarrow{\text{#1}}} \)

    \( \newcommand{\vectE}[1]{\overset{-\!-\!\rightharpoonup}{\vphantom{a}\smash{\mathbf {#1}}}} \)

    \( \newcommand{\vecs}[1]{\overset { \scriptstyle \rightharpoonup} {\mathbf{#1}} } \)

    \(\newcommand{\longvect}{\overrightarrow}\)

    \( \newcommand{\vecd}[1]{\overset{-\!-\!\rightharpoonup}{\vphantom{a}\smash {#1}}} \)

    \(\newcommand{\ket}[1]{\left| #1 \right>}\)
    \(\newcommand{\bra}[1]{\left< #1 \right|}\)
    \(\newcommand{\braket}[2]{\left< #1 \vphantom{#2} \right| \left. #2 \vphantom{#1} \right>}\)
    \(\newcommand{\braopket}[3]{\left< #1 \vphantom{#2}\vphantom{#3} \right| #2 \vphantom{#1}\vphantom{#3} \left| #3 \vphantom{#1}\vphantom{#2} \right>}\)
    \(\newcommand{\qmvec}[1]{\mathbf{\vec{#1}}}\)
    \(\newcommand{\op}[1]{\hat{\mathbf{#1}}}\)
    \(\newcommand{\expect}[1]{\langle #1 \rangle}\)
    \(\newcommand{\dfn}[1]{\emph{\textbf{#1}}}\)

    \(\newcommand{\avec}{\mathbf a}\) \(\newcommand{\bvec}{\mathbf b}\) \(\newcommand{\cvec}{\mathbf c}\) \(\newcommand{\dvec}{\mathbf d}\) \(\newcommand{\dtil}{\widetilde{\mathbf d}}\) \(\newcommand{\evec}{\mathbf e}\) \(\newcommand{\fvec}{\mathbf f}\) \(\newcommand{\nvec}{\mathbf n}\) \(\newcommand{\pvec}{\mathbf p}\) \(\newcommand{\qvec}{\mathbf q}\) \(\newcommand{\svec}{\mathbf s}\) \(\newcommand{\tvec}{\mathbf t}\) \(\newcommand{\uvec}{\mathbf u}\) \(\newcommand{\vvec}{\mathbf v}\) \(\newcommand{\wvec}{\mathbf w}\) \(\newcommand{\xvec}{\mathbf x}\) \(\newcommand{\yvec}{\mathbf y}\) \(\newcommand{\zvec}{\mathbf z}\) \(\newcommand{\rvec}{\mathbf r}\) \(\newcommand{\mvec}{\mathbf m}\) \(\newcommand{\zerovec}{\mathbf 0}\) \(\newcommand{\onevec}{\mathbf 1}\) \(\newcommand{\real}{\mathbb R}\) \(\newcommand{\twovec}[2]{\left[\begin{array}{r}#1 \\ #2 \end{array}\right]}\) \(\newcommand{\ctwovec}[2]{\left[\begin{array}{c}#1 \\ #2 \end{array}\right]}\) \(\newcommand{\threevec}[3]{\left[\begin{array}{r}#1 \\ #2 \\ #3 \end{array}\right]}\) \(\newcommand{\cthreevec}[3]{\left[\begin{array}{c}#1 \\ #2 \\ #3 \end{array}\right]}\) \(\newcommand{\fourvec}[4]{\left[\begin{array}{r}#1 \\ #2 \\ #3 \\ #4 \end{array}\right]}\) \(\newcommand{\cfourvec}[4]{\left[\begin{array}{c}#1 \\ #2 \\ #3 \\ #4 \end{array}\right]}\) \(\newcommand{\fivevec}[5]{\left[\begin{array}{r}#1 \\ #2 \\ #3 \\ #4 \\ #5 \\ \end{array}\right]}\) \(\newcommand{\cfivevec}[5]{\left[\begin{array}{c}#1 \\ #2 \\ #3 \\ #4 \\ #5 \\ \end{array}\right]}\) \(\newcommand{\mattwo}[4]{\left[\begin{array}{rr}#1 \amp #2 \\ #3 \amp #4 \\ \end{array}\right]}\) \(\newcommand{\laspan}[1]{\text{Span}\{#1\}}\) \(\newcommand{\bcal}{\cal B}\) \(\newcommand{\ccal}{\cal C}\) \(\newcommand{\scal}{\cal S}\) \(\newcommand{\wcal}{\cal W}\) \(\newcommand{\ecal}{\cal E}\) \(\newcommand{\coords}[2]{\left\{#1\right\}_{#2}}\) \(\newcommand{\gray}[1]{\color{gray}{#1}}\) \(\newcommand{\lgray}[1]{\color{lightgray}{#1}}\) \(\newcommand{\rank}{\operatorname{rank}}\) \(\newcommand{\row}{\text{Row}}\) \(\newcommand{\col}{\text{Col}}\) \(\renewcommand{\row}{\text{Row}}\) \(\newcommand{\nul}{\text{Nul}}\) \(\newcommand{\var}{\text{Var}}\) \(\newcommand{\corr}{\text{corr}}\) \(\newcommand{\len}[1]{\left|#1\right|}\) \(\newcommand{\bbar}{\overline{\bvec}}\) \(\newcommand{\bhat}{\widehat{\bvec}}\) \(\newcommand{\bperp}{\bvec^\perp}\) \(\newcommand{\xhat}{\widehat{\xvec}}\) \(\newcommand{\vhat}{\widehat{\vvec}}\) \(\newcommand{\uhat}{\widehat{\uvec}}\) \(\newcommand{\what}{\widehat{\wvec}}\) \(\newcommand{\Sighat}{\widehat{\Sigma}}\) \(\newcommand{\lt}{<}\) \(\newcommand{\gt}{>}\) \(\newcommand{\amp}{&}\) \(\definecolor{fillinmathshade}{gray}{0.9}\)

    B.1 Simply Supported Beams

    Beam

    Slope

    Max. Deflection

    Elastic Curve

    ufigapp2_1.jpg

    θmax=−PL216EI

    ymax=-PL348EI

    y=-Px48EI(3L2-4x2)

    Valid for x ≤ L/2

    ufigapp2_2.jpg

    θA=−Pab(L+b)6EILθB=Pab(L+a)6EIL

    ymax=-Pb(L2-b2)3/293EILAtx=L2-b23

    y=−Pbx6EIL(L2−b2−x2)Valid for x < aAt x=a, y=−Pa2b23EIL

    ufigapp2_3.jpg

    θmax=−wL324EL

    ymax=-5wL4384EI

    y=-wx24EI(x3-2Lx2+L3)

    ufigapp2_4.jpg

    θA=−3wL3128EIθB=7wL3384EI

    ymax=-wL4152.37EIAtx=0.4598L

    y=−wx384EI(16x3−24Lx2+9L3)Valid for0≤x≤L2At x=L2,y=−5wL4768EI

    ufigapp2_5.jpg

    θA=−7wL3360EIθB=wL345EI

    ymax=-w0L4153.37EIAtx=0.5193L

    y=-wx360EIL(3x4-10L2x2+7L4)

    ufigapp2_6.jpg

    θA=−ML6EIθB=ML3EI

    ymax=-ML293EIAtx=L3

    y=-Mx6EIL(L2-x2)

    B.2 Cantilever Beams

    Beam

    Slope

    Max. Deflection

    Elastic Curve

    ufigapp2_7.jpg

    θmax=-PL22EI

    ymax=-PL33EI

    y=-Px26EI(3L-x)

    ufigapp2_8.jpg

    θmax=-PL28EI

    ymax=-5PL348EI

    y=−Px212EI(3L−2x)Valid for0≤x≤L2y=−PL248EI(6x−L)Valid forL2≤x≤L

    ufigapp2_9.jpg

    θmax=-wL36EI

    ymax=-wL48EI

    y=-wx224EI(x2-4Lx+6L2)

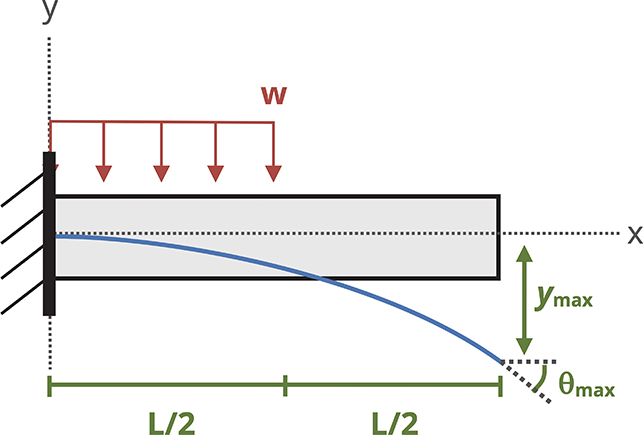
    ufigapp2_10.jpg

    θmax=-wL348EI

    ymax=-7wL4384EI

    y=−wx224EIx2−2Lx+1.5L2Valid for 0≤x≤L20≤x≤L2Valid for L2≤x≤L

    ufigapp2_11.jpg

    θmax=-wL324EI

    ymax=-w0L430EI

    y=-wx2120EIL(10L3-10L2x+5Lx2-x3)

    ufigapp2_12.jpg

    θmax=MLEI

    ymax=ML22EI

    y=Mx22EI

    References

    Figures

    All figures in this appendix were created by Kindred Grey in 2025 and released under a CC BY license.


    This page titled Appendix B: Slope and Deflection Tables was last modified on Fri, 30 Oct 2026 07:40:00 GMT and is shared under a CC BY-NC-SA 4.0 license and was authored, remixed, and/or curated by James K. Lord, Amy Richardson, Sneha Davison, and David A. Dillard via source content that was edited to the style and standards of the LibreTexts platform.