5.2: Text Properties
- Page ID
- 93809
\( \newcommand{\vecs}[1]{\overset { \scriptstyle \rightharpoonup} {\mathbf{#1}} } \)
\( \newcommand{\vecd}[1]{\overset{-\!-\!\rightharpoonup}{\vphantom{a}\smash {#1}}} \)
\( \newcommand{\id}{\mathrm{id}}\) \( \newcommand{\Span}{\mathrm{span}}\)
( \newcommand{\kernel}{\mathrm{null}\,}\) \( \newcommand{\range}{\mathrm{range}\,}\)
\( \newcommand{\RealPart}{\mathrm{Re}}\) \( \newcommand{\ImaginaryPart}{\mathrm{Im}}\)
\( \newcommand{\Argument}{\mathrm{Arg}}\) \( \newcommand{\norm}[1]{\| #1 \|}\)
\( \newcommand{\inner}[2]{\langle #1, #2 \rangle}\)
\( \newcommand{\Span}{\mathrm{span}}\)
\( \newcommand{\id}{\mathrm{id}}\)
\( \newcommand{\Span}{\mathrm{span}}\)
\( \newcommand{\kernel}{\mathrm{null}\,}\)
\( \newcommand{\range}{\mathrm{range}\,}\)
\( \newcommand{\RealPart}{\mathrm{Re}}\)
\( \newcommand{\ImaginaryPart}{\mathrm{Im}}\)
\( \newcommand{\Argument}{\mathrm{Arg}}\)
\( \newcommand{\norm}[1]{\| #1 \|}\)
\( \newcommand{\inner}[2]{\langle #1, #2 \rangle}\)
\( \newcommand{\Span}{\mathrm{span}}\) \( \newcommand{\AA}{\unicode[.8,0]{x212B}}\)
\( \newcommand{\vectorA}[1]{\vec{#1}} % arrow\)
\( \newcommand{\vectorAt}[1]{\vec{\text{#1}}} % arrow\)
\( \newcommand{\vectorB}[1]{\overset { \scriptstyle \rightharpoonup} {\mathbf{#1}} } \)
\( \newcommand{\vectorC}[1]{\textbf{#1}} \)
\( \newcommand{\vectorD}[1]{\overrightarrow{#1}} \)
\( \newcommand{\vectorDt}[1]{\overrightarrow{\text{#1}}} \)
\( \newcommand{\vectE}[1]{\overset{-\!-\!\rightharpoonup}{\vphantom{a}\smash{\mathbf {#1}}}} \)
\( \newcommand{\vecs}[1]{\overset { \scriptstyle \rightharpoonup} {\mathbf{#1}} } \)
\( \newcommand{\vecd}[1]{\overset{-\!-\!\rightharpoonup}{\vphantom{a}\smash {#1}}} \)
\(\newcommand{\avec}{\mathbf a}\) \(\newcommand{\bvec}{\mathbf b}\) \(\newcommand{\cvec}{\mathbf c}\) \(\newcommand{\dvec}{\mathbf d}\) \(\newcommand{\dtil}{\widetilde{\mathbf d}}\) \(\newcommand{\evec}{\mathbf e}\) \(\newcommand{\fvec}{\mathbf f}\) \(\newcommand{\nvec}{\mathbf n}\) \(\newcommand{\pvec}{\mathbf p}\) \(\newcommand{\qvec}{\mathbf q}\) \(\newcommand{\svec}{\mathbf s}\) \(\newcommand{\tvec}{\mathbf t}\) \(\newcommand{\uvec}{\mathbf u}\) \(\newcommand{\vvec}{\mathbf v}\) \(\newcommand{\wvec}{\mathbf w}\) \(\newcommand{\xvec}{\mathbf x}\) \(\newcommand{\yvec}{\mathbf y}\) \(\newcommand{\zvec}{\mathbf z}\) \(\newcommand{\rvec}{\mathbf r}\) \(\newcommand{\mvec}{\mathbf m}\) \(\newcommand{\zerovec}{\mathbf 0}\) \(\newcommand{\onevec}{\mathbf 1}\) \(\newcommand{\real}{\mathbb R}\) \(\newcommand{\twovec}[2]{\left[\begin{array}{r}#1 \\ #2 \end{array}\right]}\) \(\newcommand{\ctwovec}[2]{\left[\begin{array}{c}#1 \\ #2 \end{array}\right]}\) \(\newcommand{\threevec}[3]{\left[\begin{array}{r}#1 \\ #2 \\ #3 \end{array}\right]}\) \(\newcommand{\cthreevec}[3]{\left[\begin{array}{c}#1 \\ #2 \\ #3 \end{array}\right]}\) \(\newcommand{\fourvec}[4]{\left[\begin{array}{r}#1 \\ #2 \\ #3 \\ #4 \end{array}\right]}\) \(\newcommand{\cfourvec}[4]{\left[\begin{array}{c}#1 \\ #2 \\ #3 \\ #4 \end{array}\right]}\) \(\newcommand{\fivevec}[5]{\left[\begin{array}{r}#1 \\ #2 \\ #3 \\ #4 \\ #5 \\ \end{array}\right]}\) \(\newcommand{\cfivevec}[5]{\left[\begin{array}{c}#1 \\ #2 \\ #3 \\ #4 \\ #5 \\ \end{array}\right]}\) \(\newcommand{\mattwo}[4]{\left[\begin{array}{rr}#1 \amp #2 \\ #3 \amp #4 \\ \end{array}\right]}\) \(\newcommand{\laspan}[1]{\text{Span}\{#1\}}\) \(\newcommand{\bcal}{\cal B}\) \(\newcommand{\ccal}{\cal C}\) \(\newcommand{\scal}{\cal S}\) \(\newcommand{\wcal}{\cal W}\) \(\newcommand{\ecal}{\cal E}\) \(\newcommand{\coords}[2]{\left\{#1\right\}_{#2}}\) \(\newcommand{\gray}[1]{\color{gray}{#1}}\) \(\newcommand{\lgray}[1]{\color{lightgray}{#1}}\) \(\newcommand{\rank}{\operatorname{rank}}\) \(\newcommand{\row}{\text{Row}}\) \(\newcommand{\col}{\text{Col}}\) \(\renewcommand{\row}{\text{Row}}\) \(\newcommand{\nul}{\text{Nul}}\) \(\newcommand{\var}{\text{Var}}\) \(\newcommand{\corr}{\text{corr}}\) \(\newcommand{\len}[1]{\left|#1\right|}\) \(\newcommand{\bbar}{\overline{\bvec}}\) \(\newcommand{\bhat}{\widehat{\bvec}}\) \(\newcommand{\bperp}{\bvec^\perp}\) \(\newcommand{\xhat}{\widehat{\xvec}}\) \(\newcommand{\vhat}{\widehat{\vvec}}\) \(\newcommand{\uhat}{\widehat{\uvec}}\) \(\newcommand{\what}{\widehat{\wvec}}\) \(\newcommand{\Sighat}{\widehat{\Sigma}}\) \(\newcommand{\lt}{<}\) \(\newcommand{\gt}{>}\) \(\newcommand{\amp}{&}\) \(\definecolor{fillinmathshade}{gray}{0.9}\)The previous font settings can be paired with other style sheet properties to apply additional formatting to strings of text. The following table lists these properties that can bring more variety to text displays. Some of the properties pertain to styling the font itself, while others pertain to the structural arrangement of text within its container.
| Property: | Values |
|---|---|
| letter-spacing | Sets the horizontal letter spacing of an element's text. Values are: normal npx nem |
| line-height | Sets the line height of an element's text. A measurement in pixels, em's, or points is an actual height; a number or a percentage is a multiplier of the current font size. normal npx nem npt n n% |
| text-align | Sets the horizontal alignment of text within an element. Values are: left center right justify |
| text-decoration | Sets the decoration of text within an element. Values are: none line-through overline underline blink |
| text-indent | Sets the indention of text within an element. Values are: npx nem n% |
| text-shadow | Adds a drop shadow to the text. Values in order include: offset-x offset-y, blur-radius Where offset-x, offset-y, and blur-radius are length values (px, em, etc...), and color is a valid color value. The values offset-x and offset-y are required, while the others are optional. |
| text-transformation | Sets the capitalization of tex within an element. Values are: none Capitalize lowercase UPPERCASE |
| vertical-align | Sets the vertical alignment of contents within an element. Values are: bottom top baseline middle sub super text-bottom text-top |
| white-space | Sets how white space inside an element is treated. Values are:
|
| word-spacing | Sets the amount of spacing between words in an element. Values are: normal npx nem |
You have already been introduced to the text-align and text-indent properties. The former controls how individual lines of text are aligned within a block of text; the latter controls the amount of spacing at the beginning of the first line of text.
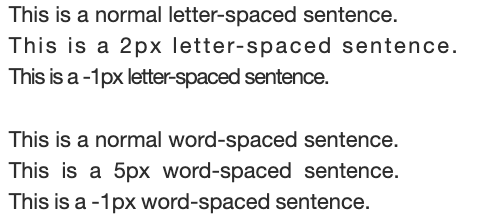
There are two properties which control the amount of horizontal spacing across a line. The word-spacing property gives the amount of space between words; the letter-spacing property sets the space between letters. These properties are used to stretch (using positive values) or compress (using negative values) words and letters horizontally by adding or removing space between them.
The amount of vertical spacing in a text block is given by the line-height property. Although pixel, em, or point measurements can be used, a numeric value better equates to familiar settings. It is a multiplier of the current font size; therefore, a declaration of line-height:1.5 equates to line-and-a-half spacing and line-height:2 equates to double spacing. Note that fractional values are valid. Thus, a setting of line-height:.8 narrows the space between lines to 80% of the normal distance.
There are three text properties that are better thought of as font properties since they affect the style of characters. The text-decoration property draws a line over the characters (overline), under the characters (underline), or through the characters (line-through). The text-transform property converts text to upper-case characters, lower-case characters, or capitalized (capitalize) words.
To give text a drop shadow, the text-shadow property can be used. You must supply the x and y offset (offset-x offset-y) of the shadow, where positive x offsets the shadow to the right, and positive y offsets the shadow downwards. You can optionally provide a blur-radius to increase the blur of the shadow. Finally, you can set a color for your shadow. Text can have more than one drop shadows applied at once using comma separated values. The following is an example of a drop shadow.
text-shadow: 3px 3px #ccc;
The vertical-align property has a number of different uses depending on which tag it is applied to. For example, as a font styling property it can convert characters to superscript (super) or subscript (sub) notation. As a text alignment property, it positions text relative to its container or relative to surrounding content. Examples of this property are given when discussing particular tags or styling needs.
Applying Text Properties
You can see the effects of some of these text settings in the page below and displayed in Figure \(\PageIndex{3}\). Output is designed to resemble a typed report.

Most of the styling appears in an embedded style sheet defining style classes which are applied with <span> and <div> tags. In-line style sheets are used in one particular section of the page for one-time styles that are not shared by other sections of the document. The default format of the page is given by the selector for the <body> tag: 1 1/2 line spacing, paragraph indention, and justified text alignment.
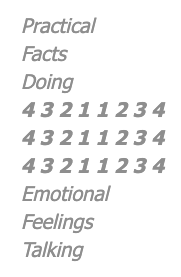
<!DOCTYPE html><html lang="en"><head><meta charset="utf-8"><title>Cognitive Profile</title><style>body {line-height:1.5; text-indent:20px; text-align:justify} .head1 {text-align:center; letter-spacing:1.5px; font:bold 1.4em;} .head2 {text-indent:0px; font:bold 1.2em;} .uline {text-decoration:underline} .ital {font-style:italic} .offset {margin-left:20px; text-indent:0px; line-height:normal} .line {text-indent:0px} .super {font-size:0.7em; vertical-align:text-top} .footnote {line-height:normal; text-indent:20px}</style></head><body><divclass="head1">The Cognitive Profile Model</div><p>The<span class="uline">Cognitive Profile Model</span>is a self assessment instrument designed to help students identify their cognitive styles. It provides a measure of how students think, learn, and make decisions.</p><p>The Model classifies cognitive styles along two bi-polar dimensions: Sensor-Intuitive and Thinker-Feeler. The quadrants formed by these two intersecting dimensions are labeled Sensor Thinker (ST), Sensor Feeler (SF), Intuitive Thinker (NT), and Intuitive Feeler (NF). Scores from the assessment are plotted on this grid as a point value in each of the quadrants. Connecting the points produces a quadrilateral shape that shows a combination of preferred learning styles.</p><div class="offset">You probably have a dominant quadrant, or one quadrant in which you have the most area (your highest number). You can see that you have some area/preference/ability in each type of thinking, and you can strengthen those abilities by learning skills in each of those areas.<span class="super">1</span></div><p><span class="head2">Assessment Inventory</span></p><p>The inventory consists of 60 pairs of words for which students choose the one that appeals the most or that describes them best. Examples of word pairs include:</p><div class="offset"><span style="width: 80px; text-align:Left">Practical<br />Facts<br />Doing<br /></span><span style="width: 100px; text-align:center; font-weight:bold">4 3 2 1 1 2 3 4<br />4 3 2 1 1 2 3 4<br />4 3 2 1 1 2 3 4<br /></span><span style="width: 80px; text-align:Right">Emotional<br />Feelings<br />Talking<br /></span></div><p>A value between 1 (weak preference) and 4 (strong preference) is assigned to one of the word pairs. The values are summed across all inventories and plotted on the quadrant to produce the cognitive profile.</p><div><span class="line">_________________</span></div><div class="footnote"><span class="super">1</span>Krause, Lois Breur,<span class="ital">How We Learn and Why We Don't</span>, Cincinnati: Thomson Learning, 2000 (p. 19).</div></body></html>
A comment is probably in order about the following section of output, reproduced here with borders around the <div> and <span> areas to make them more obvious.
By default, a <div> tag extends the width of the page as shown by the outer border area enclosing the three blocks of text. Being a block-level tag the <div> tag also causes a line break to set off its content from surrounding text.
<div class="offset"><span style="width:80px; text-align:left">Practical<br />Facts<br />Doing<br /></span><span style="width:100px; text-align:center; font-weight:bold">4 3 2 1 1 2 3 4<br />4 3 2 1 1 2 3 4<br />4 3 2 1 1 2 3 4<br /><span style="width:80px; text-align:right">Emotional<br />Feelings<br />Talking<br /></span></div>
A <span> tag is an in-line tag with no line breaks or spaces before or after. Therefore, multiple <span> tags coded one after another are displayed side by side by the browser. Although the words and numbers inside the <span> tags appear on separate lines, the contents of the tags themselves appear side by side inside the enclosing division.
In this example the <span> tags are also given fixed widths and various alignments to space their contents evenly. This is an example of using the width property, used earlier to size horizontal rules and graphic images, to set exact dimensions for a block of text. Further examples of sizing text blocks are presented in a later tutorial.
Using Negative Measurements
When using pixel measurements it is often necessary to supply negative values to achieve desired results. The paragraphs shown in Figure \(\PageIndex{7}\) use -20px text indentions to produce an "underhung" paragraph format often used for bibliographic entries in reports.

As shown in Figure \(\PageIndex{8}\), styling is given by an enclosing <div> tag which applies the .biblio style class to its paragraphs. The left margin for all paragraphs is set to 20px. This setting indents the entire paragraph so that its -20px first-line indent extends the line to the left of the margin.
<style type="text/css">\ .head {text-align:center; font-weight:bold; font-size:1.2em;} .biblio {margin-left:20px; text-indent:-20px} .book {font-style:italic}</style><div class="head">Bibliography</div><div class="biblio">
Letter and Word Spacing
Recall that both letter-spacing and word-spacing properties can take on either positive or negative values. The lines in Figure \(\PageIndex{9}\) are set to different letter- and word-spacing values for comparison of effects.