
7.1.8: Performances in the runway
- Page ID
- 78154

After analyzing the performances of an aircraft in the air, we will analyze the performances of an aircraft while taking off and landing.
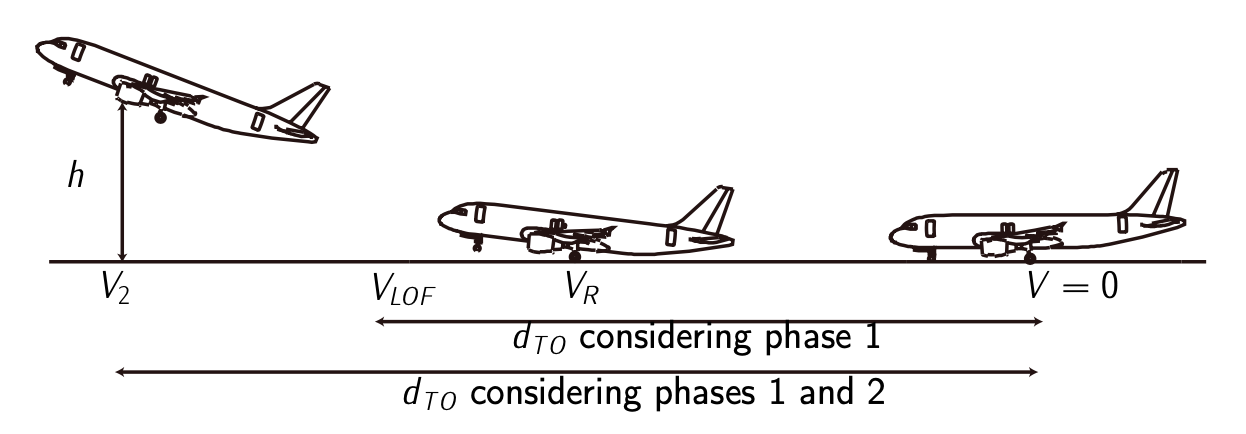
Figure 7.5: Take off distances and velocities.
Take off
The take off is defined as the maneuver covering those phases from the initial acceleration at the runway’s head until the aircraft reaches a prescribed altitude and velocity (defined by the aeronavegability norms). This maneuver is performed with maximum thrust, deflected flaps, and landing gear down.
We can divide the maneuver in two main phases:
- Rolling in the ground (\(0 \le V \le V_{LOF}\)): From the initial acceleration to the velocity of take off (\(V_{LOF}\)), when the aircraft does not touch the runway.
(a) Rolling with all the wheels in the ground (\(0 \le V \le V_R\)): The aircraft takes off rolling with all the wheels in the ground until it reaches a velocity called rotational velocity, \(V_R\).
(b) Rolling with the aft wheels in the ground (\(V_R \le V \le V_{LOF}\)): At \(V_R\) the nose rotates upwards and the aircraft keeps rolling but now just with the aft wheels in the ground. - Path in the air (\(V_{LOF} \le V \le V_2\)): From the instant in which the aircraft does not touch the runway to the instant in which the aircraft reaches a velocity \(V_2\) at a given altitude \(h\) (such altitude is usually defined as \(h = 35\ ft(10.7\ m)\)).
(a) Track of curve transition \((V \approx V_{LOF})\): The aircraft needs a transition until it reaches the desired ascent flight path angle.
(b) Straight accelerated track \((V_{LOF} \le V \le V_2)\): The aircraft accelerates with constant flight path angle until it reaches \(V_2\) at a given altitude \(h\).

Figure 7.6: Forces during taking off
Of all the above, we are interested on analyzing sub-phase 1.(a). In order to get approximate numbers of taking off distances and times, let us assume the aircraft performs a uniform accelerated movement and the only force is thrust \(T\). According to Newton's second law:
\[ma = T.\]
The acceleration is \(a = \tfrac{dV}{dt}\). Then:
\[V = \int \dfrac{T}{m} dt = \dfrac{T}{m} t.\]
If we make the integral defined between \(t = 0\) and \(t = t_{TO}\), and \(V = 0\) and \(V = V_{TO}\):
\[V_{TO} = \int_{0}^{t_{TO}} \dfrac{T}{m} dt = \dfrac{T}{m} t_{TO} \to t_{TO} = \dfrac{V_{TO} m}{T}.\]
The velocity is \(V = \tfrac{dx}{dt}\). Then:
\[x = \int \dfrac{T}{m} t dt = \dfrac{T}{m} \dfrac{t^2}{2}.\]
If we make the integral defined between \(t = 0\) and \(t = t_{TO}\) and \(x = 0\) and \(x = x_{TO}\):
\[x_{TO} = \int_{0}^{t_{TO}} \dfrac{T}{m} t dt = \dfrac{T}{m} \dfrac{t_{TO}^2}{2} \to x_{TO} = \dfrac{V_{TO}^2 m}{2T}.\]
Landing
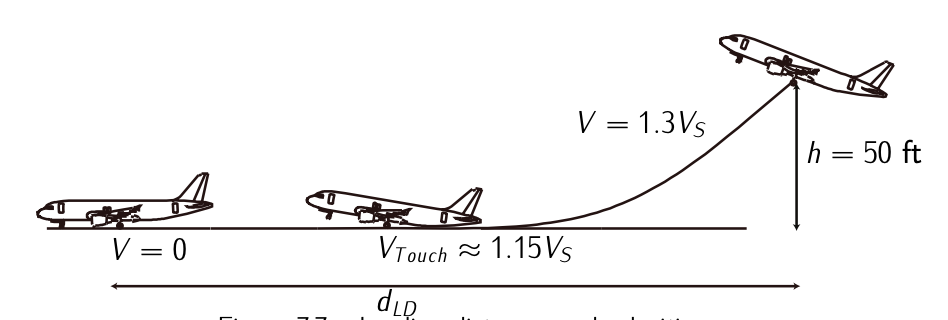
Figure 7.7: Landing distances and velocities.
The landing is defined as the maneuver covering those phases starting from a prescribed altitude (defined by the aeronavegability norms, typically \(h = 50\ ft\) and \(V_A = 1.3 V_S\)) until the aircraft stops (to be more precise, when the aircraft reaches a constant taxiing velocity). This maneuver is performed with minimum thrust, deflected flaps, and landing gear down.
We can divide the maneuver in two main phases:
- Path in the air (\(V_A \ge V \le V_{Touch}\)): From the instant in which the aircraft reaches a prescribed altitude performing a steady descent to the instant the aircraft touches down.
(a) Final approach: it consist in a steady straight trajectory at a velocity typically 1.3 the stall velocity of the aircraft in the landing configuration.
(b) Transition: The aircraft performs a transition between the straight trajectory to the horizontal plane of the runway. It can be supposed as a circumference. This transition is performed at a touchdown velocity \(V_{touch} \approx 1.15 V_S\). - Rolling in the ground (\(V_{Touch} \ge V \ge 0\)): From the instant of touchdown to the instant in which stops:
(a) Rolling with the aft wheels in the ground: the nose rotates downwards and the aircraft rolls but now just with the aft wheels in the ground.
(b) Rolling with all the wheels in the ground: the aircraft keeps rolling with all the wheels in the ground until it stops.
The equations of sub-phase 2.(b) are basically the same as the equations for sub-phase 1.(a) in taking off. The only differences are that thrust is minimum, zero, o even negative (in reverse gear aircrafts), drag is maximized deflecting the spoiler; the coefficient of friction is much higher due to break and downforce effects. The kinematic analysis for distances and times follow the same patterns as for take off: the movement can be considered herein uniformly decelerated.