8.2: High Fluence Effects
- Page ID
- 44670
\( \newcommand{\vecs}[1]{\overset { \scriptstyle \rightharpoonup} {\mathbf{#1}} } \)
\( \newcommand{\vecd}[1]{\overset{-\!-\!\rightharpoonup}{\vphantom{a}\smash {#1}}} \)
\( \newcommand{\id}{\mathrm{id}}\) \( \newcommand{\Span}{\mathrm{span}}\)
( \newcommand{\kernel}{\mathrm{null}\,}\) \( \newcommand{\range}{\mathrm{range}\,}\)
\( \newcommand{\RealPart}{\mathrm{Re}}\) \( \newcommand{\ImaginaryPart}{\mathrm{Im}}\)
\( \newcommand{\Argument}{\mathrm{Arg}}\) \( \newcommand{\norm}[1]{\| #1 \|}\)
\( \newcommand{\inner}[2]{\langle #1, #2 \rangle}\)
\( \newcommand{\Span}{\mathrm{span}}\)
\( \newcommand{\id}{\mathrm{id}}\)
\( \newcommand{\Span}{\mathrm{span}}\)
\( \newcommand{\kernel}{\mathrm{null}\,}\)
\( \newcommand{\range}{\mathrm{range}\,}\)
\( \newcommand{\RealPart}{\mathrm{Re}}\)
\( \newcommand{\ImaginaryPart}{\mathrm{Im}}\)
\( \newcommand{\Argument}{\mathrm{Arg}}\)
\( \newcommand{\norm}[1]{\| #1 \|}\)
\( \newcommand{\inner}[2]{\langle #1, #2 \rangle}\)
\( \newcommand{\Span}{\mathrm{span}}\) \( \newcommand{\AA}{\unicode[.8,0]{x212B}}\)
\( \newcommand{\vectorA}[1]{\vec{#1}} % arrow\)
\( \newcommand{\vectorAt}[1]{\vec{\text{#1}}} % arrow\)
\( \newcommand{\vectorB}[1]{\overset { \scriptstyle \rightharpoonup} {\mathbf{#1}} } \)
\( \newcommand{\vectorC}[1]{\textbf{#1}} \)
\( \newcommand{\vectorD}[1]{\overrightarrow{#1}} \)
\( \newcommand{\vectorDt}[1]{\overrightarrow{\text{#1}}} \)
\( \newcommand{\vectE}[1]{\overset{-\!-\!\rightharpoonup}{\vphantom{a}\smash{\mathbf {#1}}}} \)
\( \newcommand{\vecs}[1]{\overset { \scriptstyle \rightharpoonup} {\mathbf{#1}} } \)
\( \newcommand{\vecd}[1]{\overset{-\!-\!\rightharpoonup}{\vphantom{a}\smash {#1}}} \)
\(\newcommand{\avec}{\mathbf a}\) \(\newcommand{\bvec}{\mathbf b}\) \(\newcommand{\cvec}{\mathbf c}\) \(\newcommand{\dvec}{\mathbf d}\) \(\newcommand{\dtil}{\widetilde{\mathbf d}}\) \(\newcommand{\evec}{\mathbf e}\) \(\newcommand{\fvec}{\mathbf f}\) \(\newcommand{\nvec}{\mathbf n}\) \(\newcommand{\pvec}{\mathbf p}\) \(\newcommand{\qvec}{\mathbf q}\) \(\newcommand{\svec}{\mathbf s}\) \(\newcommand{\tvec}{\mathbf t}\) \(\newcommand{\uvec}{\mathbf u}\) \(\newcommand{\vvec}{\mathbf v}\) \(\newcommand{\wvec}{\mathbf w}\) \(\newcommand{\xvec}{\mathbf x}\) \(\newcommand{\yvec}{\mathbf y}\) \(\newcommand{\zvec}{\mathbf z}\) \(\newcommand{\rvec}{\mathbf r}\) \(\newcommand{\mvec}{\mathbf m}\) \(\newcommand{\zerovec}{\mathbf 0}\) \(\newcommand{\onevec}{\mathbf 1}\) \(\newcommand{\real}{\mathbb R}\) \(\newcommand{\twovec}[2]{\left[\begin{array}{r}#1 \\ #2 \end{array}\right]}\) \(\newcommand{\ctwovec}[2]{\left[\begin{array}{c}#1 \\ #2 \end{array}\right]}\) \(\newcommand{\threevec}[3]{\left[\begin{array}{r}#1 \\ #2 \\ #3 \end{array}\right]}\) \(\newcommand{\cthreevec}[3]{\left[\begin{array}{c}#1 \\ #2 \\ #3 \end{array}\right]}\) \(\newcommand{\fourvec}[4]{\left[\begin{array}{r}#1 \\ #2 \\ #3 \\ #4 \end{array}\right]}\) \(\newcommand{\cfourvec}[4]{\left[\begin{array}{c}#1 \\ #2 \\ #3 \\ #4 \end{array}\right]}\) \(\newcommand{\fivevec}[5]{\left[\begin{array}{r}#1 \\ #2 \\ #3 \\ #4 \\ #5 \\ \end{array}\right]}\) \(\newcommand{\cfivevec}[5]{\left[\begin{array}{c}#1 \\ #2 \\ #3 \\ #4 \\ #5 \\ \end{array}\right]}\) \(\newcommand{\mattwo}[4]{\left[\begin{array}{rr}#1 \amp #2 \\ #3 \amp #4 \\ \end{array}\right]}\) \(\newcommand{\laspan}[1]{\text{Span}\{#1\}}\) \(\newcommand{\bcal}{\cal B}\) \(\newcommand{\ccal}{\cal C}\) \(\newcommand{\scal}{\cal S}\) \(\newcommand{\wcal}{\cal W}\) \(\newcommand{\ecal}{\cal E}\) \(\newcommand{\coords}[2]{\left\{#1\right\}_{#2}}\) \(\newcommand{\gray}[1]{\color{gray}{#1}}\) \(\newcommand{\lgray}[1]{\color{lightgray}{#1}}\) \(\newcommand{\rank}{\operatorname{rank}}\) \(\newcommand{\row}{\text{Row}}\) \(\newcommand{\col}{\text{Col}}\) \(\renewcommand{\row}{\text{Row}}\) \(\newcommand{\nul}{\text{Nul}}\) \(\newcommand{\var}{\text{Var}}\) \(\newcommand{\corr}{\text{corr}}\) \(\newcommand{\len}[1]{\left|#1\right|}\) \(\newcommand{\bbar}{\overline{\bvec}}\) \(\newcommand{\bhat}{\widehat{\bvec}}\) \(\newcommand{\bperp}{\bvec^\perp}\) \(\newcommand{\xhat}{\widehat{\xvec}}\) \(\newcommand{\vhat}{\widehat{\vvec}}\) \(\newcommand{\uhat}{\widehat{\uvec}}\) \(\newcommand{\what}{\widehat{\wvec}}\) \(\newcommand{\Sighat}{\widehat{\Sigma}}\) \(\newcommand{\lt}{<}\) \(\newcommand{\gt}{>}\) \(\newcommand{\amp}{&}\) \(\definecolor{fillinmathshade}{gray}{0.9}\)
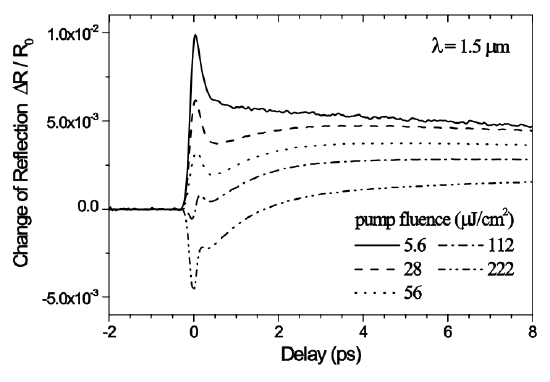
To avoid Q-switched mode-locking caused by a semiconductor saturable absorber, the absorber very often is operated far above the saturation fluence or enters this regime during Q-switched operation. Therefore it is also important to understand the nonlinear optical processes occuring at high excitation levels [13]. Figure 8.8 shows differential pump probe measurements on a semiconductor saturable absorber mirror similar to Figure 8.2 but adapted to the 1.55 μm range for the developement of pulsed laser sources for optical communication. The structure is a GaAs/AlAs-Bragg-mirror with an InP half-wave layer and an embedded InGaAsP quantum well absorber with a band edge at 1.530 \(\mu m\). The mirror is matched to air with an \(\ce{Al203}\) single-layer Arcoating. At low fluence (5.6 \(\mu J\)) the bleaching dynamics of the QWs are dominant. At higher fluences, two-photon absorption (TPA) and free carrier absorption (FCA) in the InP half-wave layer develop and enventually dominate [13].

Langlois, P. et al. "High fluence ultrafast dynamics of semiconductor saturable absorber mirrors." Applied Physics Letters 75 (1999): 3841-3483. Used with permission.
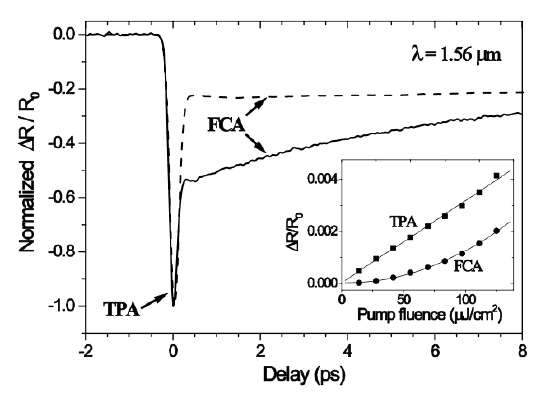
The assumption that TPA and FCA are responsible for this behaviour has been verified experimentally. Figure 8.9 shows differential reflectivity measurements under high fluence excitation at 1.56 μm for a saturable absorber mirror structure in which absorption bleaching is negligible (solid curve). The quantum well was placed close to a null of the field. A strong TPA peak is followed by induced FCA with a single \(\sim\) 5ps decay for FCA. Both of these dynamics do not significantly depend on the wavelength of the excitation, as long as the excitation remains below the band gap. The \(\sim\) 5ps decay is attributed to carrier diffusion across the InP half-wave layer [13] The dashed curve shows the differential absorption of a \(\sim 350 \mu m\) thick InP substrate in which a standing-wave pattern is not formed and the \(\sim\) 5ps decay is absent. The inset in Figure 8.9 shows the power dependence of TPA and FCA. As expected, TPA and FCA vary linearly and quadratically, respectively, with pump power.The pump-induced absorption of the probe (TPA) is linearly dependent on the pump power. Since FCA is produced by carriers that are generated by the pump alone via TPA, FCA scales with the square of the pump power.

Langlois, P. et al. "High fluence ultrafast dynamics of semiconductor saturable absorber mirrors." Applied Physics Letters 75 (1999): 3841-3483. Used with permission.
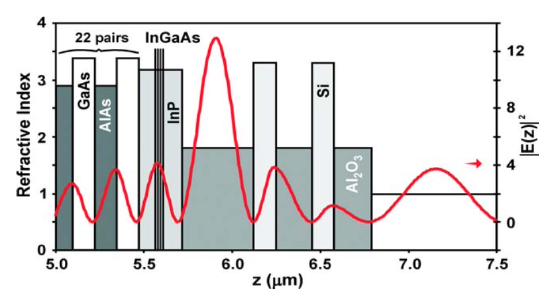
These high fluence effects lead to strong modifications of the saturation characteristics of a saturable absorber. The importance of the high fluence effects was first recognized in resonant absorbers (see Figure 8.10). The field inside the absorber is enhanced by adding a top reflector and a proper spacer layer. This leads to an effective lower saturation fluence when viewed with respect to the intracavity fluence or intensity. Therefore, high fluenece effects are already reached at low intracavity intensities (see Figure 8.9).

Theon, E. R., et al. "Two-photon absorption in semiconductor saturable absorber mirrors." Applied Physics Letters 74 (1999): 3927-3929. Used with permission.

Theon, E. R., et al. "Two-photon absorption in semiconductor saturable absorber mirrors." Applied Physics Letters 74 (1999): 3927-3929. Used with permission.
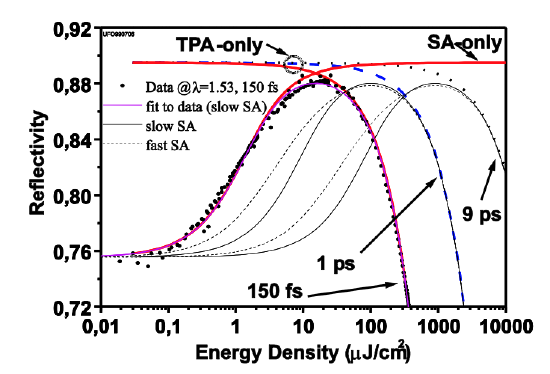
The roll-over of the saturation characteristics has positive and negative consequences for mode locking. First, if the roll-over can be reached with the available intracavity pulse energy, Q-switching can be suppressed. Second if the roll-over occurs too early, the pulses break up into multiple pulses to optimize the net gain for the overall pulse stream.