3.1: Structuring Page Content
- Page ID
- 93890
\( \newcommand{\vecs}[1]{\overset { \scriptstyle \rightharpoonup} {\mathbf{#1}} } \)
\( \newcommand{\vecd}[1]{\overset{-\!-\!\rightharpoonup}{\vphantom{a}\smash {#1}}} \)
\( \newcommand{\dsum}{\displaystyle\sum\limits} \)
\( \newcommand{\dint}{\displaystyle\int\limits} \)
\( \newcommand{\dlim}{\displaystyle\lim\limits} \)
\( \newcommand{\id}{\mathrm{id}}\) \( \newcommand{\Span}{\mathrm{span}}\)
( \newcommand{\kernel}{\mathrm{null}\,}\) \( \newcommand{\range}{\mathrm{range}\,}\)
\( \newcommand{\RealPart}{\mathrm{Re}}\) \( \newcommand{\ImaginaryPart}{\mathrm{Im}}\)
\( \newcommand{\Argument}{\mathrm{Arg}}\) \( \newcommand{\norm}[1]{\| #1 \|}\)
\( \newcommand{\inner}[2]{\langle #1, #2 \rangle}\)
\( \newcommand{\Span}{\mathrm{span}}\)
\( \newcommand{\id}{\mathrm{id}}\)
\( \newcommand{\Span}{\mathrm{span}}\)
\( \newcommand{\kernel}{\mathrm{null}\,}\)
\( \newcommand{\range}{\mathrm{range}\,}\)
\( \newcommand{\RealPart}{\mathrm{Re}}\)
\( \newcommand{\ImaginaryPart}{\mathrm{Im}}\)
\( \newcommand{\Argument}{\mathrm{Arg}}\)
\( \newcommand{\norm}[1]{\| #1 \|}\)
\( \newcommand{\inner}[2]{\langle #1, #2 \rangle}\)
\( \newcommand{\Span}{\mathrm{span}}\) \( \newcommand{\AA}{\unicode[.8,0]{x212B}}\)
\( \newcommand{\vectorA}[1]{\vec{#1}} % arrow\)
\( \newcommand{\vectorAt}[1]{\vec{\text{#1}}} % arrow\)
\( \newcommand{\vectorB}[1]{\overset { \scriptstyle \rightharpoonup} {\mathbf{#1}} } \)
\( \newcommand{\vectorC}[1]{\textbf{#1}} \)
\( \newcommand{\vectorD}[1]{\overrightarrow{#1}} \)
\( \newcommand{\vectorDt}[1]{\overrightarrow{\text{#1}}} \)
\( \newcommand{\vectE}[1]{\overset{-\!-\!\rightharpoonup}{\vphantom{a}\smash{\mathbf {#1}}}} \)
\( \newcommand{\vecs}[1]{\overset { \scriptstyle \rightharpoonup} {\mathbf{#1}} } \)
\(\newcommand{\longvect}{\overrightarrow}\)
\( \newcommand{\vecd}[1]{\overset{-\!-\!\rightharpoonup}{\vphantom{a}\smash {#1}}} \)
\(\newcommand{\avec}{\mathbf a}\) \(\newcommand{\bvec}{\mathbf b}\) \(\newcommand{\cvec}{\mathbf c}\) \(\newcommand{\dvec}{\mathbf d}\) \(\newcommand{\dtil}{\widetilde{\mathbf d}}\) \(\newcommand{\evec}{\mathbf e}\) \(\newcommand{\fvec}{\mathbf f}\) \(\newcommand{\nvec}{\mathbf n}\) \(\newcommand{\pvec}{\mathbf p}\) \(\newcommand{\qvec}{\mathbf q}\) \(\newcommand{\svec}{\mathbf s}\) \(\newcommand{\tvec}{\mathbf t}\) \(\newcommand{\uvec}{\mathbf u}\) \(\newcommand{\vvec}{\mathbf v}\) \(\newcommand{\wvec}{\mathbf w}\) \(\newcommand{\xvec}{\mathbf x}\) \(\newcommand{\yvec}{\mathbf y}\) \(\newcommand{\zvec}{\mathbf z}\) \(\newcommand{\rvec}{\mathbf r}\) \(\newcommand{\mvec}{\mathbf m}\) \(\newcommand{\zerovec}{\mathbf 0}\) \(\newcommand{\onevec}{\mathbf 1}\) \(\newcommand{\real}{\mathbb R}\) \(\newcommand{\twovec}[2]{\left[\begin{array}{r}#1 \\ #2 \end{array}\right]}\) \(\newcommand{\ctwovec}[2]{\left[\begin{array}{c}#1 \\ #2 \end{array}\right]}\) \(\newcommand{\threevec}[3]{\left[\begin{array}{r}#1 \\ #2 \\ #3 \end{array}\right]}\) \(\newcommand{\cthreevec}[3]{\left[\begin{array}{c}#1 \\ #2 \\ #3 \end{array}\right]}\) \(\newcommand{\fourvec}[4]{\left[\begin{array}{r}#1 \\ #2 \\ #3 \\ #4 \end{array}\right]}\) \(\newcommand{\cfourvec}[4]{\left[\begin{array}{c}#1 \\ #2 \\ #3 \\ #4 \end{array}\right]}\) \(\newcommand{\fivevec}[5]{\left[\begin{array}{r}#1 \\ #2 \\ #3 \\ #4 \\ #5 \\ \end{array}\right]}\) \(\newcommand{\cfivevec}[5]{\left[\begin{array}{c}#1 \\ #2 \\ #3 \\ #4 \\ #5 \\ \end{array}\right]}\) \(\newcommand{\mattwo}[4]{\left[\begin{array}{rr}#1 \amp #2 \\ #3 \amp #4 \\ \end{array}\right]}\) \(\newcommand{\laspan}[1]{\text{Span}\{#1\}}\) \(\newcommand{\bcal}{\cal B}\) \(\newcommand{\ccal}{\cal C}\) \(\newcommand{\scal}{\cal S}\) \(\newcommand{\wcal}{\cal W}\) \(\newcommand{\ecal}{\cal E}\) \(\newcommand{\coords}[2]{\left\{#1\right\}_{#2}}\) \(\newcommand{\gray}[1]{\color{gray}{#1}}\) \(\newcommand{\lgray}[1]{\color{lightgray}{#1}}\) \(\newcommand{\rank}{\operatorname{rank}}\) \(\newcommand{\row}{\text{Row}}\) \(\newcommand{\col}{\text{Col}}\) \(\renewcommand{\row}{\text{Row}}\) \(\newcommand{\nul}{\text{Nul}}\) \(\newcommand{\var}{\text{Var}}\) \(\newcommand{\corr}{\text{corr}}\) \(\newcommand{\len}[1]{\left|#1\right|}\) \(\newcommand{\bbar}{\overline{\bvec}}\) \(\newcommand{\bhat}{\widehat{\bvec}}\) \(\newcommand{\bperp}{\bvec^\perp}\) \(\newcommand{\xhat}{\widehat{\xvec}}\) \(\newcommand{\vhat}{\widehat{\vvec}}\) \(\newcommand{\uhat}{\widehat{\uvec}}\) \(\newcommand{\what}{\widehat{\wvec}}\) \(\newcommand{\Sighat}{\widehat{\Sigma}}\) \(\newcommand{\lt}{<}\) \(\newcommand{\gt}{>}\) \(\newcommand{\amp}{&}\) \(\definecolor{fillinmathshade}{gray}{0.9}\)In this chapter we will look at some of the HTML tags that help define the template of a page. The template is an HTML structure that defines how your site looks across many pages. Each page in a website will be different but each page should follow a common brand as the other pages in the website. By defining and committing to a brand, users will be able to distinguish your website from other websites. If a page in your website does not follow the common brand users may feel inclined to leave your website. Think about it. If you were reading your local news site and you go to a page that doesn't look like it belongs to them, what do you do? Most would probably close the page and maybe leave your website altogether.
HTML describes and structures, CSS styles
The primary purpose of HTML tags is to structure and describe the text and graphic content of a Web page. The function of HTML tags is not styling and decorating content, but rather presenting content in such a logical and organized manner that allows the browser to understand and to recognize the information. Browsers render many HTML elements with a default style that proves useful in arranging content on a page; however, these default styles may be changed by using CSS.
In addition to structuring the content of a page, visual styles may also be applied. Different sizes, colors, or text fonts are some of the visual changes that can be made. Graphic images can also be resized and decorated. These tutorials will introduce styling methods that add such kinds of visual appeal to text and graphic elements. Styling elements is primarily done through CSS instead of through HTML. Before covering CSS and advanced styling, it is necessary to become familiar with basic HTML tags that can describe content and be used by browsers to provide some degree of arrangement and style to a page.
Editor versus Browser Displays
Web page design begins with a standard document setup that gives the page its overall structure. The image below reproduces the standard page template.
The ideal gas law is easy to remember and apply in solving problems, as long as you get the proper values a
<!DOCTYPE html><html lang="en"><head><meta charset="UTF-8" /><title>page title goes here</title></head><body>* page content goes here *</body></html>
Listing \(\PageIndex{1}\) A web page template
Every page designed begins with the coding represented in the image above. The title of the page must be coded within the <title> tag. When the page is opened, the text will appear in the browser’s "Title Bar." Informative content should be added inside the <body> tag. Only the information appearing in the body of the document shows up in the browser window. Text and graphic images are placed inside the <body> tag, and are then surrounded by HTML tags to order and arrange them.
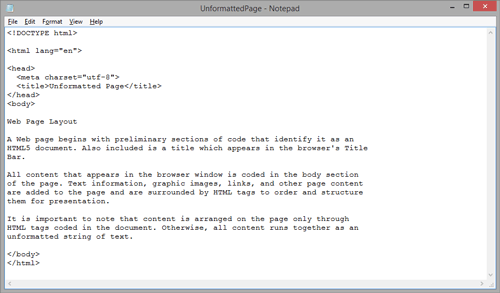
It is important to understand that formatting Web pages can not take place without the usage of HTML tags. To emphasize this point consider the heading and three paragraphs coded in the Notepad editor in Figure 2-1. The information in the browser should be displayed in this same general format.
 Figure \(\PageIndex{1}\): Unformatted web document appearing in the Notepad editor ("MGA Web Development Tutorials" by Floyd, Kevin; Kwak, Myungjae; and Stines, Alan, Computer Science and Information Technology Ancillary Materials. 4, GALILEO Open Learning Materials is licensed under CC BY-SA 4.0)
As shown above, a heading appears at the top of the document, and all subsequent paragraphs are separated from each other by single blank lines. When entering information into the editor, care must always be taken to ensure that the information entered will appear in the browser in an orderly and readable fashion. Editor formatting has little to do with how the entered information appears as a Web page, but it is still a valuable practice to develop to avoid such careless mistakes as interchanging words like deprecating and defecating.
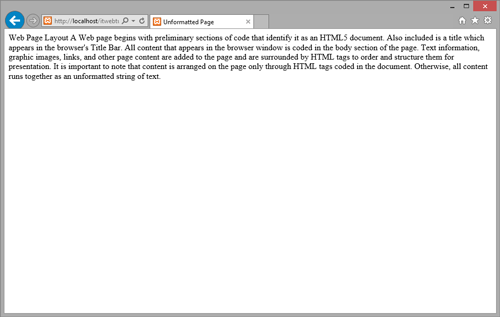
When the document exemplified above is saved as an HTML file (.htm or .html) and opened in the browser, it is displayed as shown in the below Figure 2-2.

Figure \(\PageIndex{2}\):Unformatted Web page appearing in the browser. ("MGA Web Development Tutorials" by Floyd, Kevin; Kwak, Myungjae; and Stines, Alan, Computer Science and Information Technology Ancillary Materials. 4, GALILEO Open Learning Materials is licensed under CC BY-SA 4.0)
The appearance of the information is very different from how it is displayed in the editor. Of course, the reason for this is that no HTML tags appear in the document to guide the browser in laying out the text on the page. Therefore, the browser treats the information as one continuous string of text. All blank spaces and line breaks appearing in the editor are collapsed to single blank spaces separating the words. The result is a single block of text on the page.
Formatted Text Content
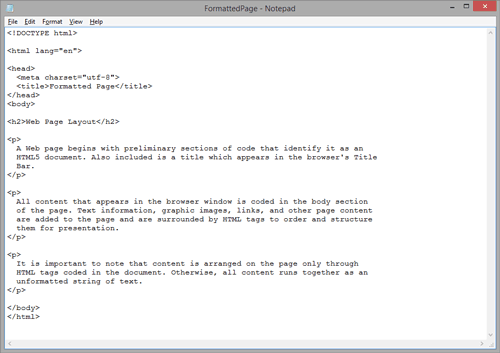
It is an easy step to return to the Notepad editor and include some basic HTML tags to arrange the text for display in the browser. In this case, as shown in Figure 2-3, paragraph tags (coded as <p> container tags) surround the separate paragraphs and a header tag (coded as an <h2> container tag) surrounds the heading line.

Figure \(\PageIndex{2}\): Formatted web document appearing in the Notepad editor. ("MGA Web Development Tutorials" by Floyd, Kevin; Kwak, Myungjae; and Stines, Alan, Computer Science and Information Technology Ancillary Materials. 4, GALILEO Open Learning Materials is licensed under CC BY-SA 4.0)
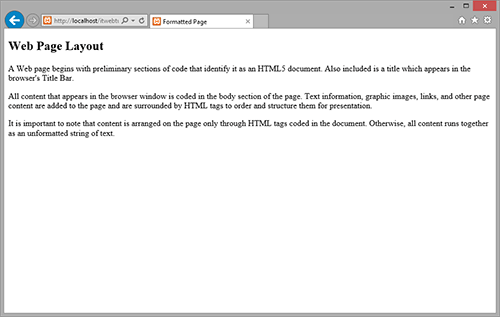
Now, when the page is opened in a browser, these tags cause the text blocks to be displayed as separate paragraphs as shown in Figure 2-4. The formatting is far from fancy, but it does illustrate the point that the layout of page elements is exclusively controlled by the HTML tags that appear in the document.

Figure \(\PageIndex{3}\): Formatted Web page appearing in the browser. ("MGA Web Development Tutorials" by Floyd, Kevin; Kwak, Myungjae; and Stines, Alan, Computer Science and Information Technology Ancillary Materials. 4, GALILEO Open Learning Materials is licensed under CC BY-SA 4.0)
The next several topics introduce a basic set of HTML tags that bring order and structural formatting to page content. The initial focus is on text arrangement. Later topics will introduce basic tags for adding graphic images and links. For the time being, learn the structural aspects of page design, and begin becoming comfortable with the styling techniques introduced in the following tutorial.

