9.2: HTML 101
- Page ID
- 62945

\( \newcommand{\vecs}[1]{\overset { \scriptstyle \rightharpoonup} {\mathbf{#1}} } \)
\( \newcommand{\vecd}[1]{\overset{-\!-\!\rightharpoonup}{\vphantom{a}\smash {#1}}} \)
\( \newcommand{\id}{\mathrm{id}}\) \( \newcommand{\Span}{\mathrm{span}}\)
( \newcommand{\kernel}{\mathrm{null}\,}\) \( \newcommand{\range}{\mathrm{range}\,}\)
\( \newcommand{\RealPart}{\mathrm{Re}}\) \( \newcommand{\ImaginaryPart}{\mathrm{Im}}\)
\( \newcommand{\Argument}{\mathrm{Arg}}\) \( \newcommand{\norm}[1]{\| #1 \|}\)
\( \newcommand{\inner}[2]{\langle #1, #2 \rangle}\)
\( \newcommand{\Span}{\mathrm{span}}\)
\( \newcommand{\id}{\mathrm{id}}\)
\( \newcommand{\Span}{\mathrm{span}}\)
\( \newcommand{\kernel}{\mathrm{null}\,}\)
\( \newcommand{\range}{\mathrm{range}\,}\)
\( \newcommand{\RealPart}{\mathrm{Re}}\)
\( \newcommand{\ImaginaryPart}{\mathrm{Im}}\)
\( \newcommand{\Argument}{\mathrm{Arg}}\)
\( \newcommand{\norm}[1]{\| #1 \|}\)
\( \newcommand{\inner}[2]{\langle #1, #2 \rangle}\)
\( \newcommand{\Span}{\mathrm{span}}\) \( \newcommand{\AA}{\unicode[.8,0]{x212B}}\)
\( \newcommand{\vectorA}[1]{\vec{#1}} % arrow\)
\( \newcommand{\vectorAt}[1]{\vec{\text{#1}}} % arrow\)
\( \newcommand{\vectorB}[1]{\overset { \scriptstyle \rightharpoonup} {\mathbf{#1}} } \)
\( \newcommand{\vectorC}[1]{\textbf{#1}} \)
\( \newcommand{\vectorD}[1]{\overrightarrow{#1}} \)
\( \newcommand{\vectorDt}[1]{\overrightarrow{\text{#1}}} \)
\( \newcommand{\vectE}[1]{\overset{-\!-\!\rightharpoonup}{\vphantom{a}\smash{\mathbf {#1}}}} \)
\( \newcommand{\vecs}[1]{\overset { \scriptstyle \rightharpoonup} {\mathbf{#1}} } \)
\( \newcommand{\vecd}[1]{\overset{-\!-\!\rightharpoonup}{\vphantom{a}\smash {#1}}} \)
\(\newcommand{\avec}{\mathbf a}\) \(\newcommand{\bvec}{\mathbf b}\) \(\newcommand{\cvec}{\mathbf c}\) \(\newcommand{\dvec}{\mathbf d}\) \(\newcommand{\dtil}{\widetilde{\mathbf d}}\) \(\newcommand{\evec}{\mathbf e}\) \(\newcommand{\fvec}{\mathbf f}\) \(\newcommand{\nvec}{\mathbf n}\) \(\newcommand{\pvec}{\mathbf p}\) \(\newcommand{\qvec}{\mathbf q}\) \(\newcommand{\svec}{\mathbf s}\) \(\newcommand{\tvec}{\mathbf t}\) \(\newcommand{\uvec}{\mathbf u}\) \(\newcommand{\vvec}{\mathbf v}\) \(\newcommand{\wvec}{\mathbf w}\) \(\newcommand{\xvec}{\mathbf x}\) \(\newcommand{\yvec}{\mathbf y}\) \(\newcommand{\zvec}{\mathbf z}\) \(\newcommand{\rvec}{\mathbf r}\) \(\newcommand{\mvec}{\mathbf m}\) \(\newcommand{\zerovec}{\mathbf 0}\) \(\newcommand{\onevec}{\mathbf 1}\) \(\newcommand{\real}{\mathbb R}\) \(\newcommand{\twovec}[2]{\left[\begin{array}{r}#1 \\ #2 \end{array}\right]}\) \(\newcommand{\ctwovec}[2]{\left[\begin{array}{c}#1 \\ #2 \end{array}\right]}\) \(\newcommand{\threevec}[3]{\left[\begin{array}{r}#1 \\ #2 \\ #3 \end{array}\right]}\) \(\newcommand{\cthreevec}[3]{\left[\begin{array}{c}#1 \\ #2 \\ #3 \end{array}\right]}\) \(\newcommand{\fourvec}[4]{\left[\begin{array}{r}#1 \\ #2 \\ #3 \\ #4 \end{array}\right]}\) \(\newcommand{\cfourvec}[4]{\left[\begin{array}{c}#1 \\ #2 \\ #3 \\ #4 \end{array}\right]}\) \(\newcommand{\fivevec}[5]{\left[\begin{array}{r}#1 \\ #2 \\ #3 \\ #4 \\ #5 \\ \end{array}\right]}\) \(\newcommand{\cfivevec}[5]{\left[\begin{array}{c}#1 \\ #2 \\ #3 \\ #4 \\ #5 \\ \end{array}\right]}\) \(\newcommand{\mattwo}[4]{\left[\begin{array}{rr}#1 \amp #2 \\ #3 \amp #4 \\ \end{array}\right]}\) \(\newcommand{\laspan}[1]{\text{Span}\{#1\}}\) \(\newcommand{\bcal}{\cal B}\) \(\newcommand{\ccal}{\cal C}\) \(\newcommand{\scal}{\cal S}\) \(\newcommand{\wcal}{\cal W}\) \(\newcommand{\ecal}{\cal E}\) \(\newcommand{\coords}[2]{\left\{#1\right\}_{#2}}\) \(\newcommand{\gray}[1]{\color{gray}{#1}}\) \(\newcommand{\lgray}[1]{\color{lightgray}{#1}}\) \(\newcommand{\rank}{\operatorname{rank}}\) \(\newcommand{\row}{\text{Row}}\) \(\newcommand{\col}{\text{Col}}\) \(\renewcommand{\row}{\text{Row}}\) \(\newcommand{\nul}{\text{Nul}}\) \(\newcommand{\var}{\text{Var}}\) \(\newcommand{\corr}{\text{corr}}\) \(\newcommand{\len}[1]{\left|#1\right|}\) \(\newcommand{\bbar}{\overline{\bvec}}\) \(\newcommand{\bhat}{\widehat{\bvec}}\) \(\newcommand{\bperp}{\bvec^\perp}\) \(\newcommand{\xhat}{\widehat{\xvec}}\) \(\newcommand{\vhat}{\widehat{\vvec}}\) \(\newcommand{\uhat}{\widehat{\uvec}}\) \(\newcommand{\what}{\widehat{\wvec}}\) \(\newcommand{\Sighat}{\widehat{\Sigma}}\) \(\newcommand{\lt}{<}\) \(\newcommand{\gt}{>}\) \(\newcommand{\amp}{&}\) \(\definecolor{fillinmathshade}{gray}{0.9}\)What is HTML
Hypertext Markup Language (HTML) is a standard markup language for tagging text files to achieve font, color, graphic, and hyperlink effects to be displayed in a web browser. It can be assisted by technologies such as Cascading Style Sheets (CSS) and scripting languages such as JavaScript.
Web browsers obtain HTML documents from either a web server or local storage and produce the documents into multimedia web pages. HTML elements are the foundation of HTML pages. Images and other objects such as interactive forms may be embedded into the rendered page using HTML constructs. HTML provides a means to create structured documents by denoting structural semantics for text such as headings, paragraphs, lists, links, quotes, and other items. Tags are written using angle brackets to delineate HTML elements. Browsers do not display the HTML tags but use them to interpret the content of the page.
Creating HTML Files
File Format
Before we can create our first web page, we need to create a file that our service will recognize as a web page. To do this, we can open our chosen text editor (see a shortlist of potentials in the section on Integrated Development Environments), and create a new document if one was not created automatically. We will immediately select “Save As” from your editor’s File menu, and give your new page its name. If this is going to be the front page or first page you want a user to see for your site, you should name it index. The index is the default file name most web servers look for in any folder of your website; it saves your users from having to know and type the page name as part of the URL.
In many text editors, underneath or near where you enter the file name is another drop-down selector that allows you to pick a file type. This is the extension (what comes after the period in the file name), or file type, that identifies what kind of data the file represents. This tells our operating system, applications, and browsers what conventions were used to create the content so it can be reassembled into a usable form. Since we are creating a basic web page, we will use the .htm extension (.html is also acceptable, just be consistent to make your life easier). If your editor does not have .htm or .html in its list, then select “All” and make index.htm your file name.
Additional Notes
If you ever come across an unfamiliar extension and want to know more about it, sites like filext.com can help you determine what programs can open it and what it is for. Once we have saved our file as index.htm, we are ready to begin. Saving as soon as we create a file is useful as the text editor will then know what syntax is expected. This will enable features like color coding and highlighting that your editor supports.
Document Type
Every HTML page we create should declare its document type (doctype) in the first line. This will identify which spec of HTML is included so the browser knows how to interpret the tags within. Earlier version of the HTML specifications used two definitions for HTML: HTML 4.01 and XHTML. Both of these contained two additional properties of strict and transitional.
With HTML5, much of this has been eliminated, leaving one general doctype declaration of <!DOCTYPE html>. This should be the first line of code in any HTML page you create. We will not cover the older doctype formats as all of our examples will focus on HTML5. Keep in mind, though, that code examples you find online with anything other than the tag above may be outdated approaches to what is shown.
Learn more
Keywords, search terms: xml, html, css, dom, document markup,
W3C Documentation for XML: http://www.w3.org/TR/2004/REC-xml11-20040204/
W3C Documentation for CSS: http://www.w3.org/Style/CSS/
W3C Specifications for HTML:http://www.w3.org/community/webed/wiki/HTML/Specifications
Navigation
A feature found on almost every website is a navigation system for moving between pages. These are typically menus, where groups of common pages are created to give the site a hierarchical organization. While the approach to visual styling and interaction with menus comes in great variety, most follow a basic principle of using unordered lists of links, and the application of CSS to those lists in order to turn them into colorful, interactive elements we are accustomed to. While there are drawbacks that we will discuss in Visually Impaired Considerations, alternative approaches can still utilize linked lists to some extent.
Since we created our menu earlier, we already know the contents and structure of our navigation. Our group label, or top-level labels, and the nested <ul>s represent the contents of the list for that menu item.
Some popular approaches to providing a means of navigation are menu bars with dropdowns, bread crumbs, and event driven responses. Menu bars are the most frequently utilized element, where hovering or clicking over an item in the menu brings up additional choices related to the main item. Typically referred to as drop-down menus, they can be styled to move in any direction. Nesting lists within lists can give us a multi-tier menu that allows us the ability to select from a large number of pages with little effort.
Breadcrumbs are typically depicted as a horizontal delimited list of pages, similar to:
- Home >> Sports >> Football >> Buffalo Bills >> Patriots >> Golf
The breadcrumb does not follow a hierarchical notation but acts more like a brief history of where you have been on the site, allowing you to skip back several steps at once without using your browser’s back button. These can be helpful in sites with large amounts of content where the user’s experience may not be particularly linear, as they move between topics or sections, like news or reference sites.
Event-driven navigation is useful in narrowing the user experience to a fixed set of paths. This method will only make certain links available under certain conditions, restricting the options a user has on a particular page to what they are allowed to do, which may be based on a variety of rules such as if they are logged in, previous links, or decisions they have made, or if something in the system needs their attention.
These approaches can be used by themselves, or in combination to provide your user experience.
Linking
Links in HTML can take two forms, both of which are created with the anchor tag (<a>). They can either point to a resource in another location, or to a location within the document. The former is used far more frequently than the latter, however, internal links are coming back into popularity with the rise of infinite scrolling.
Absolute, Base, and Relative Path
The href attribute of an anchor tag defines the actual location the link will represent. Absolute and relative paths are two reference methods for connecting sites and pages. While both methods can be used when creating links that point to content in our own site, only absolute can be used when pointing to content that is outside of your domain.
Absolute paths are the entire length of the link required to identify one resource, whether it is a page, image, script, or media file. The URL http://www.msn.com/news/index.htm tells us we want to go to the index page in the news folder of the msn.com website. If this was our site, and we wanted to go to the index.htm file in the sports folder, we could write it as http://www.msn.com/sports/index.htm (absolute) or ../sports/index.htm (relative). The initial .. instructs the browser that our intention is to go back one layer of depth (i.e. “up” one level in folders) and then into the sports folder, which in this example sits in the same parent folder as our news page.
Using just an initial / without .. tells the server that we want to start at the root folder of the server and navigate from there, meaning we start with the base path.
A base path is everything needed to get us to the index page of the root folder of the site. This is typically http://www.yoursitename.com, and is the part you find missing in the relative path above. The combination of the base path, and relative path, equals your absolute path.
Target
While the anchor tag supports several attributes, one of the most important of these is “target.” This attribute describes where links will be loaded, like a new tab or the same tab/browser window we are already using. The attribute can take any of the following values to define that location.
Table 10.2.2.110.2.2.1: Anchor Targets
|
Value |
Description |
|
_blank |
Opens the linked document in a new window or tab |
|
_self |
Opens the linked document in the same frame as it was clicked (this is default) |
|
_parent |
Opens the linked document in the parent frame |
|
_top |
Opens the linked document in the full body of the window |
|
framename |
Opens the linked document in a named frame |
From php.net manual, creative commons 3.0 Attribution
Within the Page
We can add links to a page that move the user around the page itself, which is useful on pages with long content. To do this, we use an anchor tag to define where we want our destination to be. When we create our link, we simply reference the name of our anchor, preceded by a pound sign in place of a traditional URL.
|
Some text here. Some more text. This is where we want to “jump” to. |
Graphics
Images are the greatest contributors to the visual appeal of your site, and typically account for the majority of bandwidth used in loading your pages. By using a combination of image types, and newer techniques found in HTML5 like canvas, and reproducing images using CSS, we can balance quality against size to reduce our bandwidth needs and allow our site to be more flexible.
Formats
Images are files, just like any other document in your computer, but they can be coded and formatted differently to reproduce the image you want to see. We find these referred to as raster and vector graphics. These formats represent two very different methods of creating an image.
Raster
The image files most of us are already familiar with using are typically raster format. Examples of these are JPEG, GIF and BMP. When we interact with pictures we took on digital cameras for example, we are dealing with JPEG or JPG files. Raster files recreate an image by recording the color value of pixels, which represent the smallest single point on a screen that can be assigned a color by the display. The higher the number of pixels (or density, measured as pixels per inch) translates to how sharp the image is, and how large it can be rendered without losing quality.
The number of colors available in the image file is based on the length of the value available to each point. If we only allowed a single binary character for each pixel point, we would be able to keep our file size as small as possible. This however would mean we could only represent our image in black and white (binary only allows us two options, 0 or 1, so we can only represent two colors.). When we allow longer values to represent a single point, we can assign values a larger range of colors. Once we scale these up, however, we trade away our smaller image sizes in order to have more colorful pictures. Large images can slow down the user experience, and if loading takes too long, users will leave.
Traditionally, we have faced this trade off by using different image formats in different areas of our site. While reserving JPG for our larger images or photos, we can use GIF for smaller icons and indicators. GIFs limit us to 256 colors, but since most icons use few colors, we are able to capitalize on the benefits of this format here. It is important to note that raster images will quickly lose quality when rendered at sizes larger than the original image’s width or height.
Vector
Vector images store information about colors and locations as definitions of angles, lines, and curves in mathematical format. The benefit of a vector formatted image is that it can be scaled both up and down in size without distortion or degradation in quality. This is due to the fact that the image is “drawn” by the browser each time it is loaded, and the processor performs the steps necessary to recreate the image. Since the image can be scaled, the same image file can be drawn very large, or very small, without changing the file size. We will get some hands-on experience in how vector images are drawn when we look at the new Canvas features in HTML.
Table 10.2.3.110.2.3.1: Image Formats
|
Format |
Compression |
Platforms |
Colors |
Notes |
|
Unix, Win, Mac |
24-bit per pixel; 16.7 million colors. |
JPEG is a compression algorithm; the format is actually JFIF (JPEG File Interchange Format) |
||
|
GIF (Graphic Interchange Format) |
Lossless |
Unix, Win, Mac |
8-bit; 256 colors (216 web palette). |
LZW compression algorithm developed by CompuServe; patent now held by Unisys, which charges for use of the code in graphics programs. Once Unisys began enforcing its patent (in 1995), programs began moving to PNG. |
|
BMP (Bitmap graphics) |
Uncompressed |
Win |
24-bit; 16.7 million colors. |
Like all uncompressed formats, these files are very large. |
|
PICT |
Lossless |
Mac |
Very little compression; large files |
|
|
TIFF (Tag Interchange File Format) |
Lossless or uncompressed |
Unix, Mac, Win |
TIFF-LZW uses the proprietary LZW compressions (see GIF). |
|
|
Lossless |
Unix, Mac, Win |
48-bit; “true color” plus transparency |
Will likely replace GIF. Supported in IE, NN 4 and above. A WC3specification. |
http://mason.gmu.edu/~dtaciuch
You may notice the compression column. This is the act of removing or modifying the data that represents a file in a manner that makes its overall file size smaller. By doing this, we can transmit files faster, and they will take up less space in memory. When we discuss compression in terms of graphics we need to consider whether it will result in a lossy or lossless result. A lossless result means the compression techniques used do not remove data from the original copy, so we can restore the image to its exact original size and appearance. A lossy compressions structure can result in greater compression, but achieves the extra advantage by removing information from the file.
As an example, imagine a picture of you and your friends on the beach with a clear blue sky behind you. The data in the image file will measure the “blueness” of the sky in varying colors of blue, at a level greater than the eye can distinguish. By averaging the blueness and making more of the sky pixels the same color, we have eliminated information. Certain levels of lossy compression will still be indistinguishable from the original, but at any level, the lossy-compressed version of the file will not be restorable to the original because the extra values were eliminated.
Which is better? As usual, it depends on your intent. If the image can be lossy compressed and is still acceptable to you and your users, and having the smallest possible file sizes (good, of course, for mobile devices) is a priority, then go for it. Quality optimized scenarios will likely call for a lossless compression, like in sites that use large images as their background.
Font and Text Decoration
Color for Heading Tags
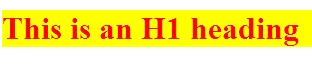
When we began our testing site, we started using HTML tags wherever we could to provide structure to our content with heading tags. We did this with the understanding that later we would redefine those tags so our headings looked how we wanted them to. That time has come. To start with some basics, we can use what we have already learned above by changing the color of the text and background for our heading tags:
|
|
We can also adjust our font family and size. You will notice that none of these changes affect anything outside of our headings. While you may see examples using the key terms for size, ranging from “extra extra small” (xx-small) to “extra extra large” (xx-large), it is a good idea to always be as specific as possible, as key terms can be treated differently between browsers. Instead, our examples will use percentage based and fixed font sizes. To do so, we will make our h1 content italicized and bring the size down to 20px tall:
|
|

These are just a few examples of the full power of font through CSS. Some “fancier” methods include effects like capitalizing, while simultaneously shrinking, your text (small-caps):
|
|

Additional notes
Order is Important! Active style rules must come after hover rules, and hover must come after link and visited! Since a link being hovered over can already have been visited, and the active link can be the one with hover on it, this ensures the correct order of application of style.
Text Styles
While our next example seems like it applies more to font than text, a good way to remember what noun you want to use in your rule is whether the affect changes the way the letters appear or not. If they do, you probably want font. If not, then you probably want text as in these next examples.
First, we might want to add the lead spaces back into our paragraph’s definition to make them appear more like a written document. We can also move our text around in our containing element by setting it to left (default), right, center, or stretch to fit with justify:
|
 |
This is our paragraph for demonstrating some of the things we can do to text and font through the use of CSS. This is our paragraph for demonstrating some of the things we can do to text and font through the use of CSS. This is our paragraph for demonstrating some of the things we can do to text and font through the use of CSS.
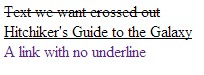
In addition to adjusting the font itself, we can decorate it with more affects like crossing it out, underlining it, or specifying that it should not be decorated, which is especially useful in eliminating the default lines under links:
|
 |
Anchors
Following up on our ability to remove the underline from a link, there are some other special features we can control for our page anchors using CSS. By specifying link, visited, or hover in our link selector, we can control what happens before, during and after a link has been clicked. We can think of these like applying attributes in our HTML tags, except in CSS the special features are called pseudo-classes. Since we can specify any valid CSS rule, we can have our links change colors, alter the backgrounds, change text and font properties, and everything else we will look at. To see some of the basics in action, we will change our text colors for each action, and also our background color when we are hovering. Since you will need to interact with the links to see these in action, we will forgo an image here and you can test the code yourself:
- <style>
- a:link {color:#FF0000; background-color:yellow;} /* unvisited link */
- a:visited {color:#00FF00; background-color:orange;} /* visited link */
- a:hover {color:#FF00FF; background-color:green;} /* mouse over link */
- a:active {color:#0000FF; background-color:white;} /* selected link */
- </style>
- <a href="" target="_blank">Here is our fake link!</a>
Title
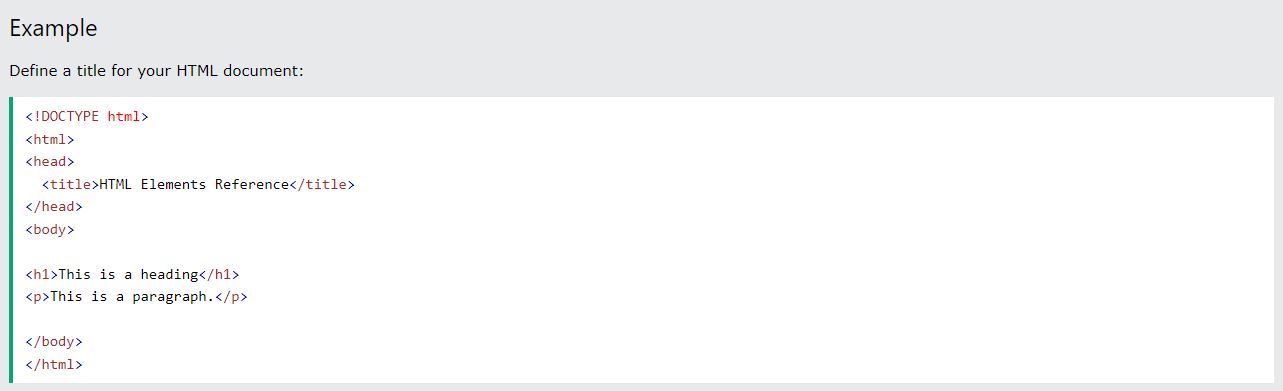
The title tag defines the title of the document. The title must be text-only, and it is shown in the browser's title bar or in the page's tab. The title tag is required in HTML documents. The contents of a page title is very important for search engine optimization (SEO)! The page title is used by search engine algorithms to decide the order when listing pages in search results. The <title> element defines a title in the browser toolbar, provides a title for the page when it is added to favorites and displays a title for the page in search-engine results.
Paragraph
HTML paragraph <p> is a tag to defines a paragraph on the webpage. The text between the starting tag and the end tag represents a paragraph in HTML. Since the browsers automatically add a single blank line before and after each paragraph element, there is no need to add a line of separation before and after a paragraph.

Body
The HTML body tag <body> defines the main content of an HTML document displays on the browser. It can contain all the contents of an HTML document, such as headings, paragraphs, images, hyperlinks, tables, lists, etc. The <body> must be the second element after the <head> tag or it should be placed between </head> and </html> tags. This tag is required for every HTML document and should only use once in the whole HTML document.

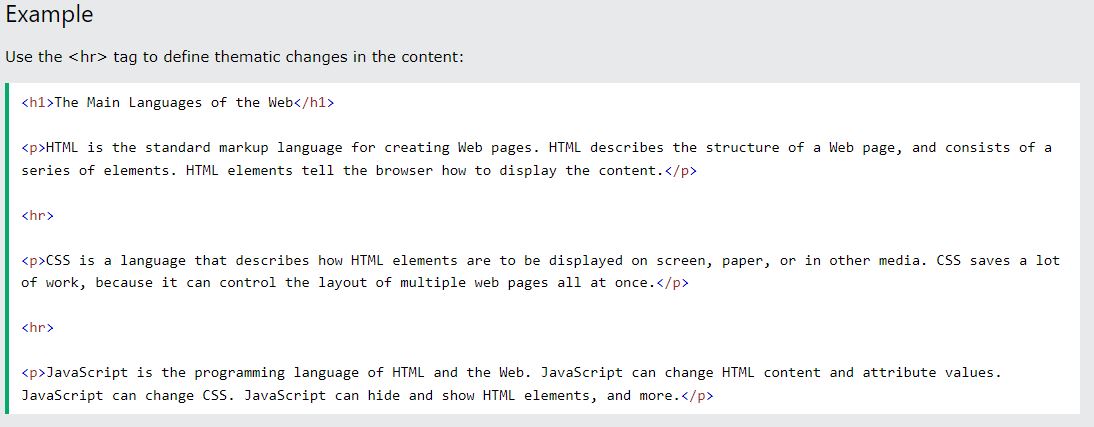
Horizontal Rule
A horizontal Rule <hr> defines a thematic break to separate two lines or two paragraphs between any two objects. To apply the horizontal rule, the tag is used in an HTML code. The horizontal rule element displays a horizontal rule that is used to separate content (or define a change) in an HTML page.