12.5: Analysis of Indeterminate Beams
- Page ID
- 43002

The procedure for the analysis of indeterminate beams by the method of moment distribution is briefly summarized as follows:
Procedure for Analysis of Indeterminate Beams by the Moment Distribution Method
•Calculate the fixed-end moments for members, assuming that the joints are clamped against rotation.
•Calculate the distribution factor for each of the members connected at the joint
•Calculate the unbalanced moment at each joint and distribute the same to the ends of members connected at that joint.
•Carry over one-half of the distributed moment to the other ends of members.
•Add or subtract these latter moments (moments obtained in steps three and four) to or from the original fixed-end moments.
•Apply the determined end moments at the joints of the given structure.
•Draw the free-body diagram of each span of the given beam, showing the loads and moments at the joints obtained by the moment distribution method.
•Determine the support reactions for each span.
•Compute and construct the shearing force and bending moment diagrams for each span.
•Draw one bending moment and one shearing force diagram for the given beam by combining the diagrams in step 9.
Example 12.1
Using the moment distribution method, determine the end moments and the reactions at the supports of the beam shown in Figure 12.6a. Draw the shearing force and the bending moment diagrams. \(EI =\) constant.
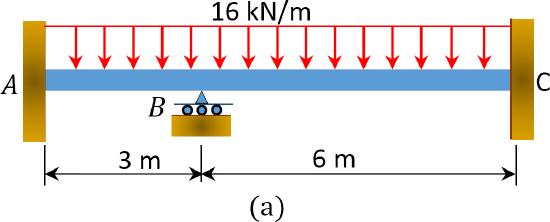
\(Fig. 12.6\). Beam.
Solution
Fixed end moment.
\(\begin{array}{l}
(F E M)_{A B}=-\frac{w \mathrm{~L}^{2}}{12}=-\frac{16 \times 3^{2}}{12}=-12 \mathrm{kN} . \mathrm{m} \\
(F E M)_{B A}=\frac{w \mathrm{~L}^{2}}{12}=12 \mathrm{kN} . \mathrm{m} \\
(F E M)_{B C}=-\frac{16 \times 6^{2}}{12}=-48 \mathrm{kN} . \mathrm{m} \\
(F E M)_{C B}=48 \mathrm{kN} . \mathrm{m}
\end{array}\)
Stiffness factor.
\(\begin{array}{l}
K_{A B}=K_{B A}=\frac{I}{3}=0.333 \mathrm{I} \\
K_{B C}=K_{C B}=\frac{1}{6}=0.167 \mathrm{I}
\end{array}\)
Distribution factor.
\(\begin{array}{l}
(D F)_{A B}=\frac{K_{A B}}{\sum K}=\frac{K_{A B}}{K_{A B}+\infty}=\frac{0.333 \mathrm{I}}{0.333 \mathrm{I}+\infty}=0 \\
(D F)_{B A}=\frac{K_{B A}}{\sum K}=\frac{K_{B A}}{K_{B A}+K_{B C}}=\frac{0.333 \mathrm{I}}{0.333 \mathrm{I}+0.167 \mathrm{I}}=0.67 \\
(D F)_{B C}=\frac{K_{B C}}{\sum K}=\frac{K_{B C}}{K_{B A}+K_{B C}}=\frac{0.167 \mathrm{I}}{0.333 \mathrm{I}+0.167 \mathrm{I}}=0.33 \\
(D F)_{C B}=\frac{K_{C B}}{\sum K}=\frac{K_{C B}}{K_{A B}+\infty}=\frac{0.167 \mathrm{I}}{0.167 \mathrm{I}+\infty}=0
\end{array}\)
\(Table 12.1\). Distribution table.
| Joint | A | B | C | |
| Member | AB | BA | BC | CB |
| DF | 0 | 0.33 | 0.67 | 0 |
|
FEM Bal |
-12
|
+12 +24.12 |
-48 +11.88 |
+48
|
| CO | +12.06 | +5.94 | ||
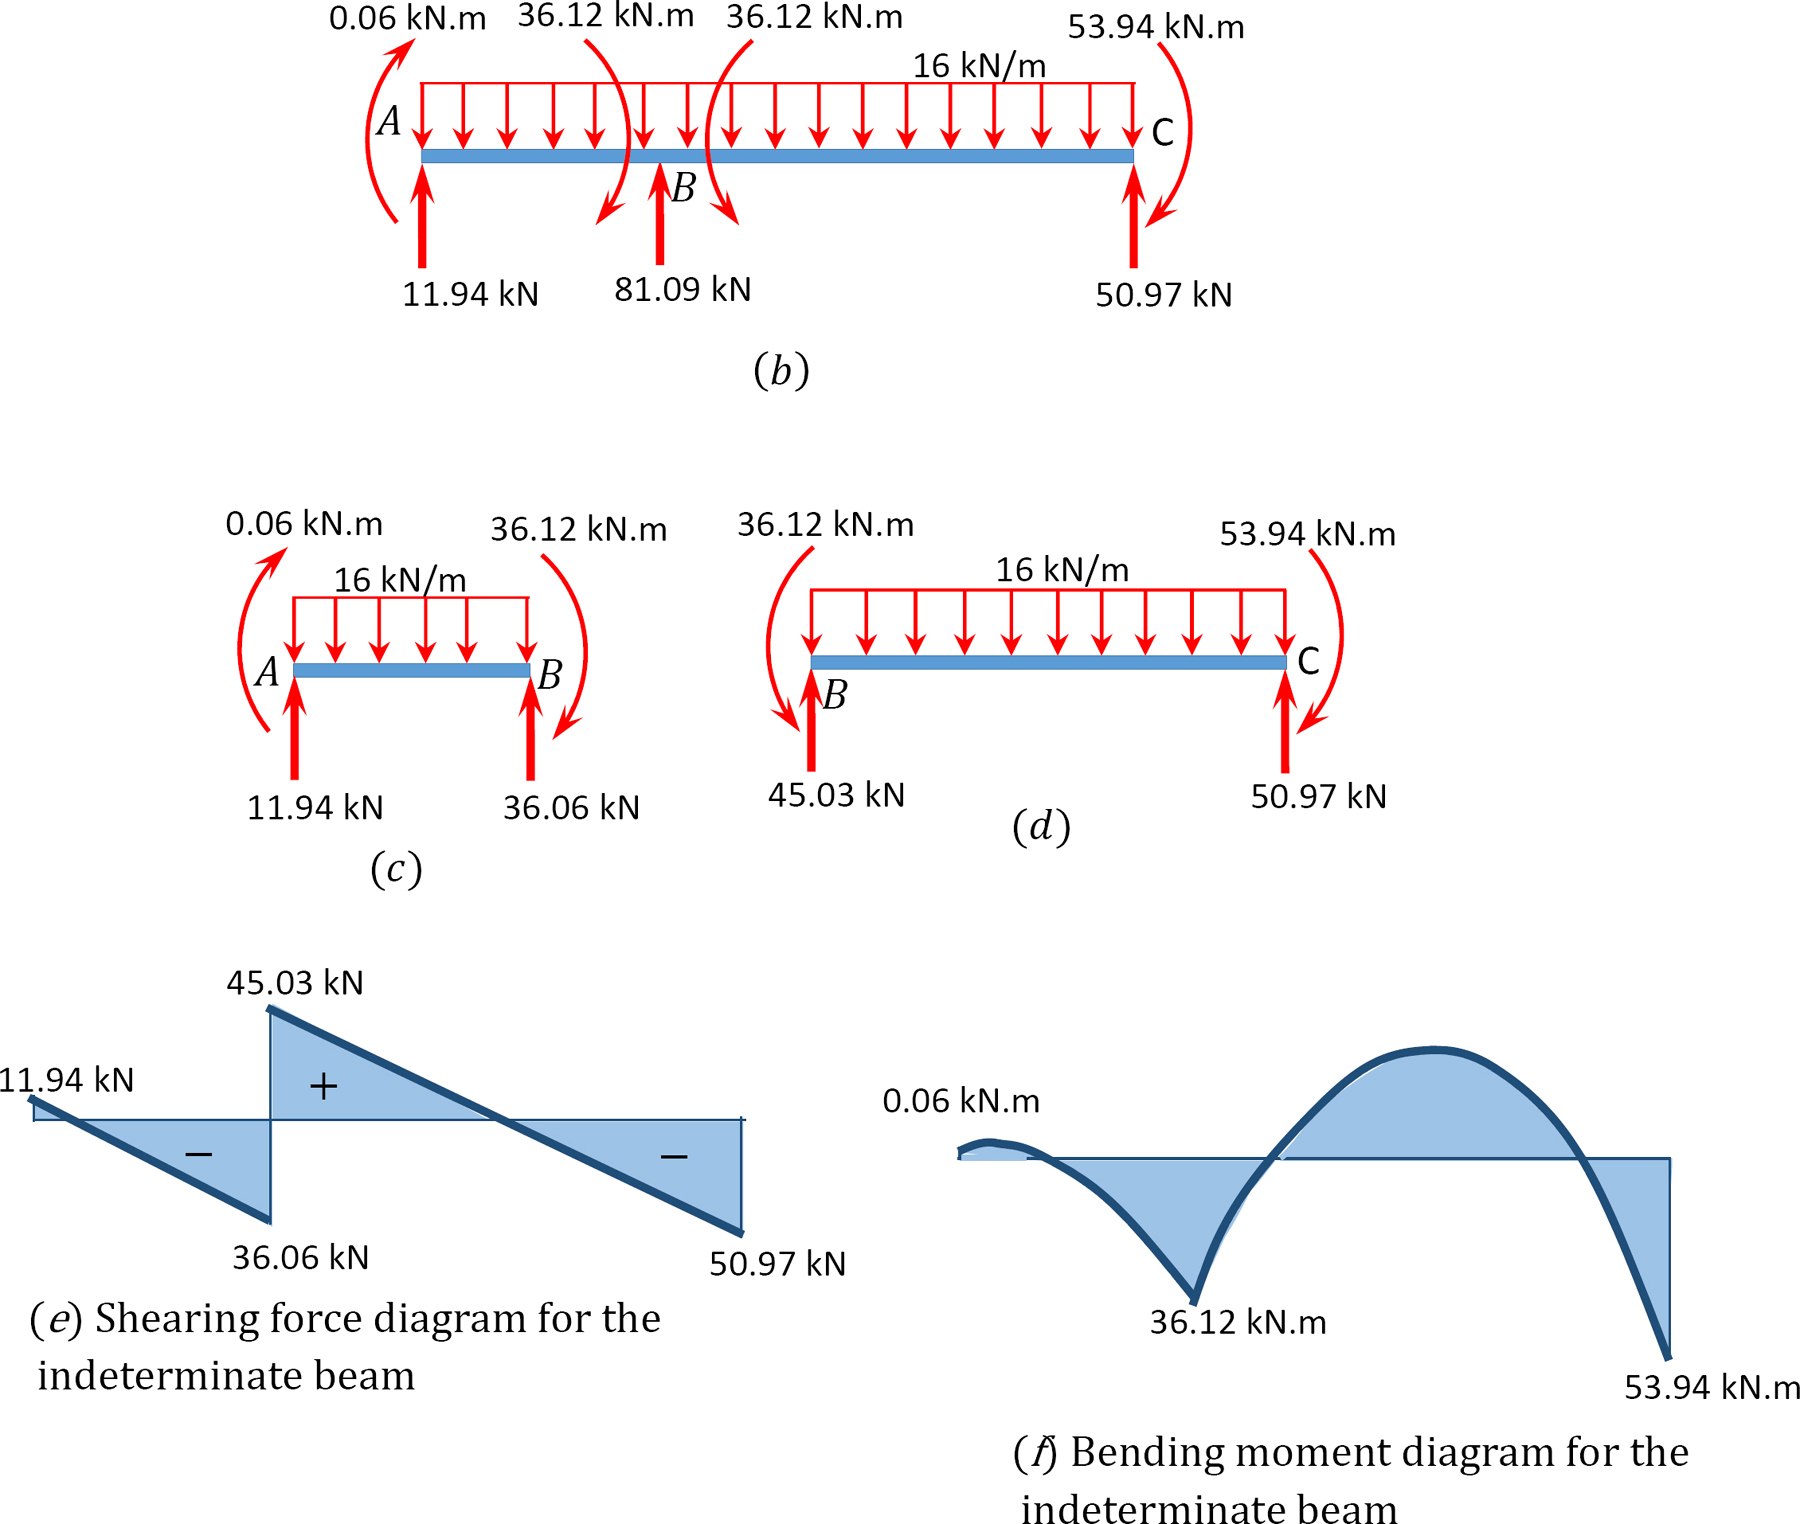
| Total | +0.06 | +36.12 | -36.12 | +53.94 |
Shear force and bending moment diagrams.
Example 12.2
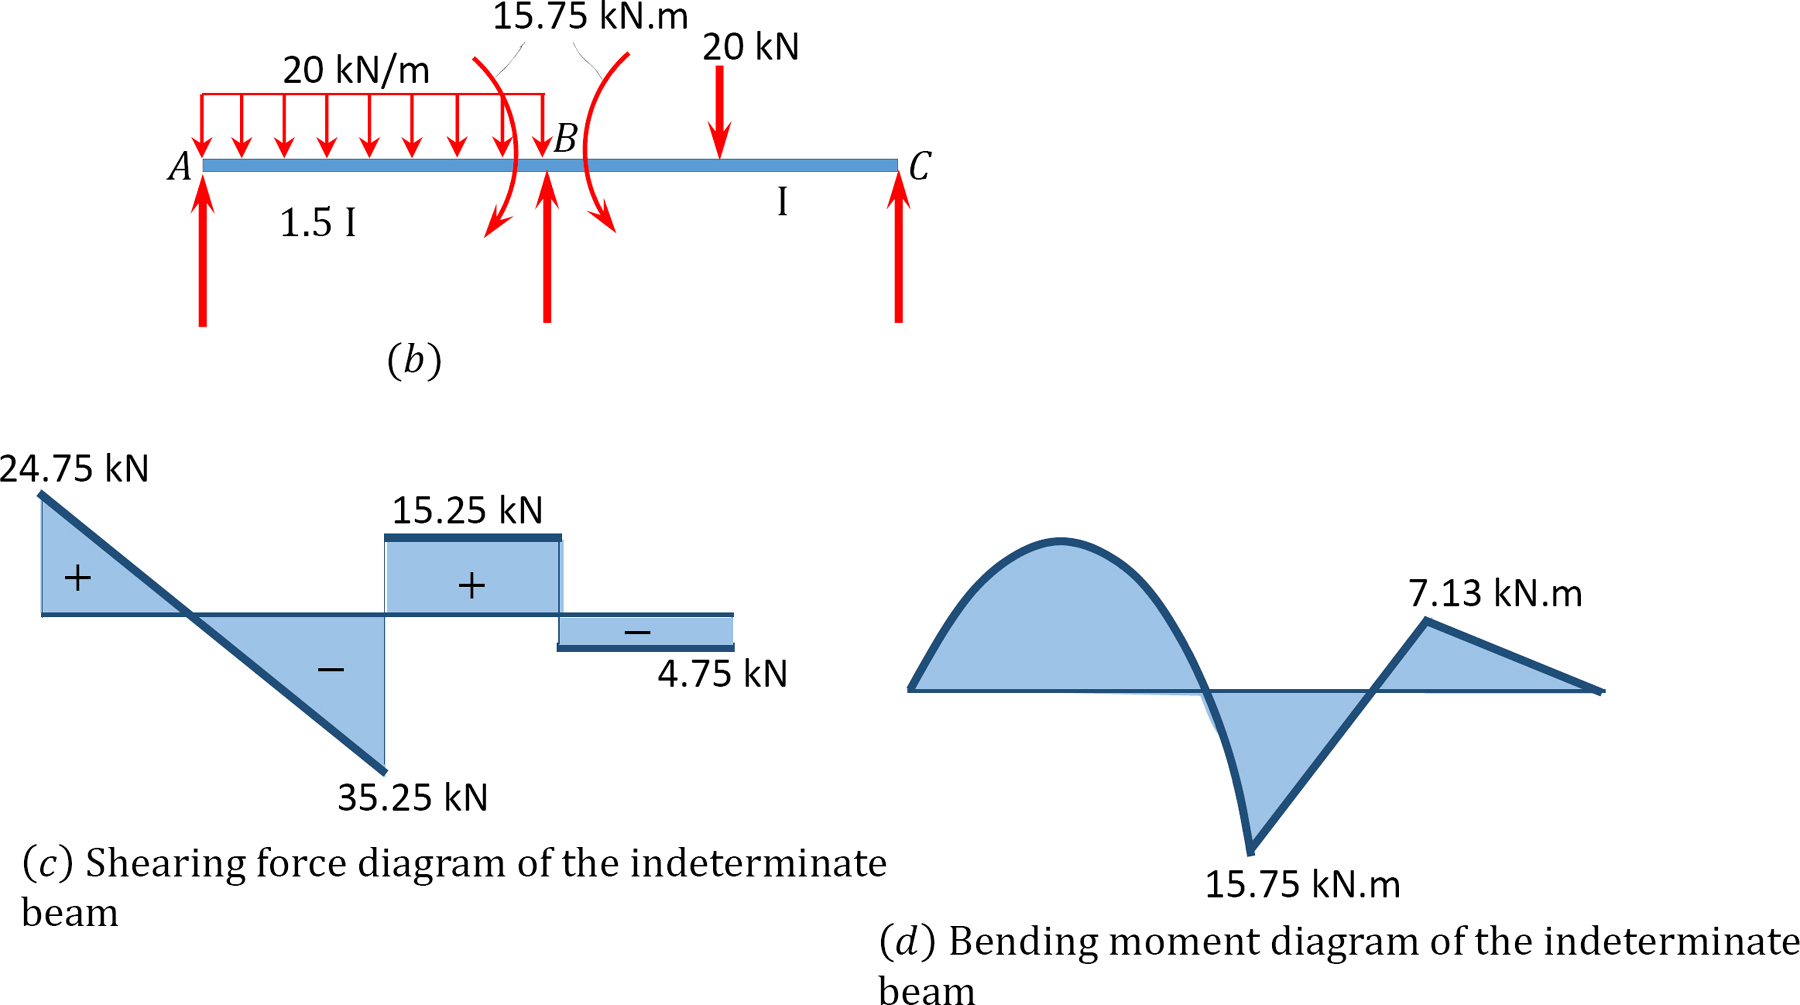
Using the moment distribution method, determine the end moments and the reactions at the supports of the beam shown in Figure 12.7a. Draw the shearing force and the bending moment diagrams.
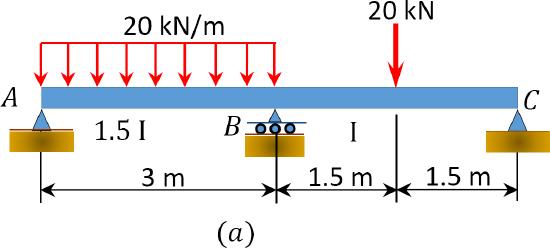
\(Fig. 12.7\). Beam.
Solution
Fixed end moment.
\(\begin{array}{l}
(F E M)_{A B}=-\frac{w L^{2}}{12}=-\frac{20 \times 3^{2}}{12}=-15 \mathrm{kN} . \mathrm{m} \\
(F E M)_{B A}=\frac{w L^{2}}{12}=+15 \mathrm{kN} . \mathrm{m} \\
(F E M)_{B C}=-\frac{P L}{8}=-\frac{20 \times 3}{8}=-7.5 \mathrm{kN} . \mathrm{m} \\
(F E M)_{C B}=+7.5 \mathrm{kN} . \mathrm{m}
\end{array}\)
Stiffness factor.
\(\begin{array}{l}
K_{A B}=K_{B A}=\frac{I_{A B}}{L_{A B}}=\frac{3}{4} \times \frac{1.5 \mathrm{I}}{3}=0.375 \mathrm{I} \\
K_{B C}=K_{C B}=\frac{I_{B C}}{L_{B C}}=\frac{3}{4} \times \frac{1}{3}=0.25 \mathrm{I}
\end{array}\)
Distribution factor.
\(\begin{array}{l}
(D F)_{A B}=\frac{K_{A B}}{\sum K}=\frac{K_{A B}}{K_{A B}+0}=\frac{0.375 \mathrm{I}}{0.375 \mathrm{I}+0}=1 \\
(D F)_{B A}=\frac{K_{B A}}{\sum K}=\frac{K_{B A}}{K_{B A}+K_{B C}}=\frac{0.375 \mathrm{I}}{0.375 \mathrm{I}+0.25 \mathrm{I}}=0.6 \\
(D F)_{B C}=\frac{K_{B C}}{\sum K}=\frac{K_{B C}}{K_{B A}+K_{B C}}=\frac{0.25 \mathrm{I}}{0.375 \mathrm{I}+0.25 \mathrm{I}}=0.4 \\
(D F)_{C B}=\frac{K_{C B}}{\sum K}=\frac{K_{C B}}{K_{C B}+0}=\frac{0.25 \mathrm{I}}{0.25 \mathrm{I}+0}=1
\end{array}\)
\(Table 12.2\). Distribution table.
| Joint | A | B | C | |
| Member | AB | BA | BC | CB |
| DF | 1 | 0.6 | 0.4 | 1 |
|
FEM Bal. 1 |
-15 +15 |
+15 -4.5 |
-7.5 -3 |
+7.5 -7.5 |
|
CO Bal. 2 |
+7.5 -2.25 |
-3.75 -1.5 |
||
| Total | 0.0 | +15.75 | -15.75 | 0 |
Shear force and bending moment diagrams.