Introduction to Linux for the Raspberry Pi-command line
( \newcommand{\kernel}{\mathrm{null}\,}\)
Basics of the Linux command line on the RPi
Raspbian is both a desktop computer with a GUI and potentially a server.
It is a server if VNC and/or ssh are running.
To access the command line ssh into your RPi or if you are in through VNC open a terminal by pressing (at the same time) Ctr-Alt-t, (t is for terminal).
Above is the typical command prompt for a Linux terminal.
The RPi comes with a pre-installed user named ‘pi’.
Do you want to be the master or the servant?
Make the computer work for you not the other way around.
* Command completion
using tab
* Command history
recall a previous command (up arrow)
show all previous commands (history)
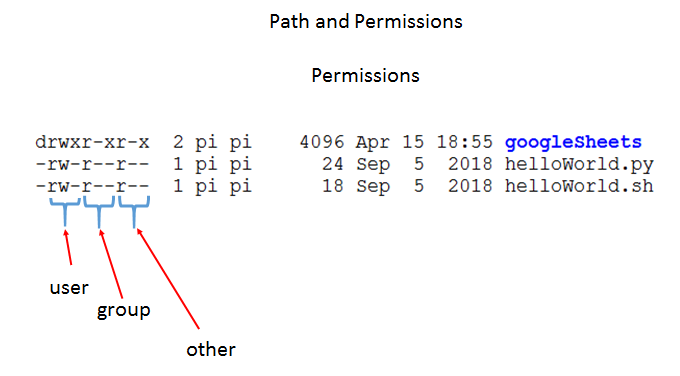
The path and permissions graphic is an example of the “ls -l” command (directory long listing).
On the fare right are the file names. This includes two script, helloWorld.py and helloWorld.sh. Also in blue is a directory named googleSheets.
On the fare left are the permissions for these files. The first character is the file type. The dash ‘-‘ indicates a regular file, the ‘d’ is for directory. An ‘l’ (L) would indicate a symbolic link.
The directory googleSheets has the letter “d” as the first character.
The next sets of characters are in three sets of three. The first set of three are permissions for the user (the owner of the file). Next are permissions for the group. Users can be in a group with file permissions set accordingly.
The last set of three is the “other”. Files accessible on a webserver would use ‘other’ with file permissions set accordingly.
The letters represent specific file permissions. For example ‘w’ is write permission for that file and ‘r’ is read permission.
The ‘x’ is for executable. Directories and scripts would have this set appropriately for each user group.
---------------------------------------
The following is a demonstration of file permissions using several Linux commands.
First some background on commands and programs.
The echo command is a program.
Programs take command line parameters.
Some command line parameters are switches.
In most cases switches start with a dash ‘-‘.
Some command line parameters are filenames.
Other command line parameters are strings.
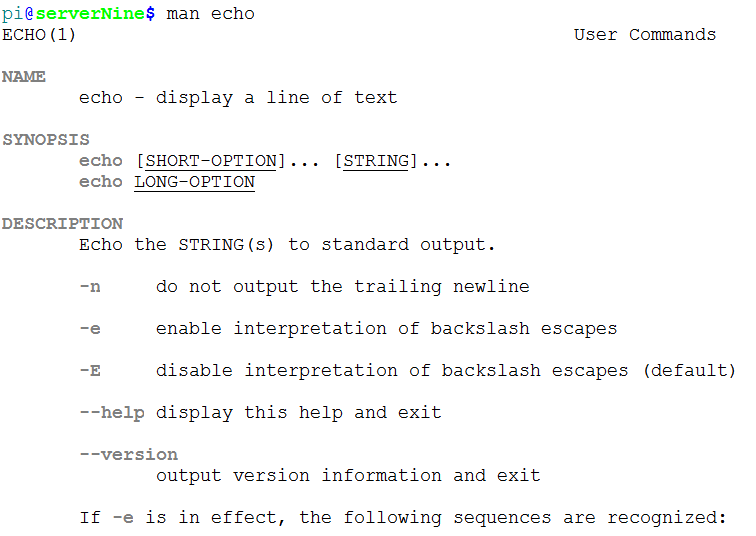
To see a list of potential command line parameters for the echo command use the man-pages as follows, Note, to exit the man page press q to quit.
Path and Permissions continued:
Permissions
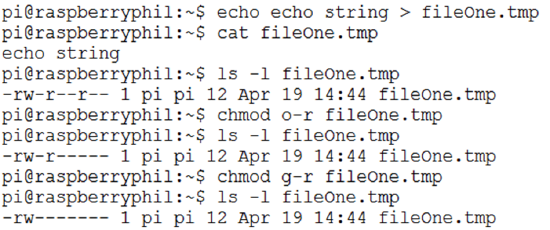
Run the above commands on your RPi and notice the changes in file permissions.

Why did you get the Permission denied error when you tried to write data to the file using the echo command?
Answer, using the chmod command you write protected the file.

Here the ability to write to the file is restored.
Next is a demonstration of our ability to remove read permission for a file.
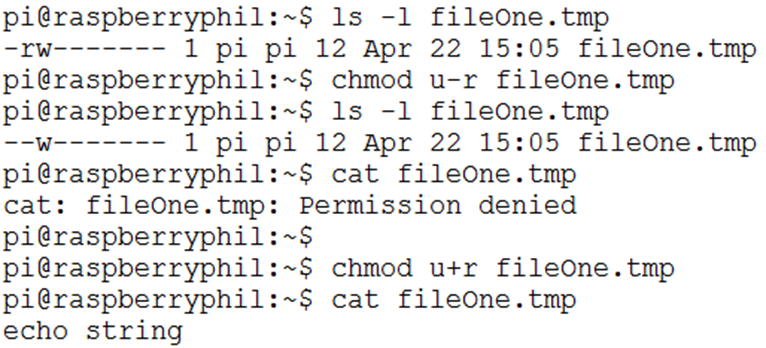
After read permission is restored the cat command can be used to see the content of the file.
Now the move command (mv) is used to rename the file.
After renaming the file the permissions are set to executable.
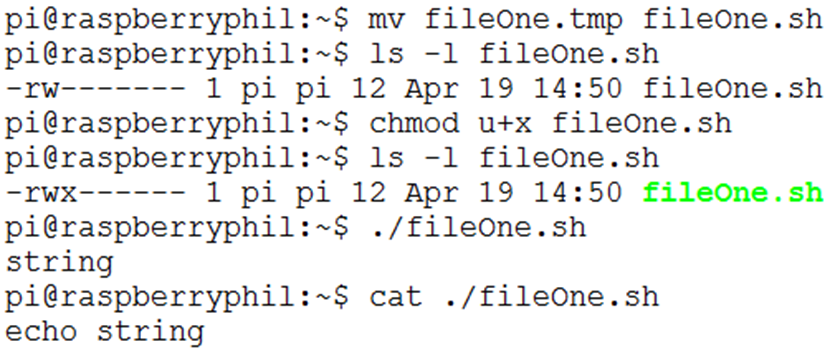
Now the file containing the data “echo string” is a program.
Running the program produces results.
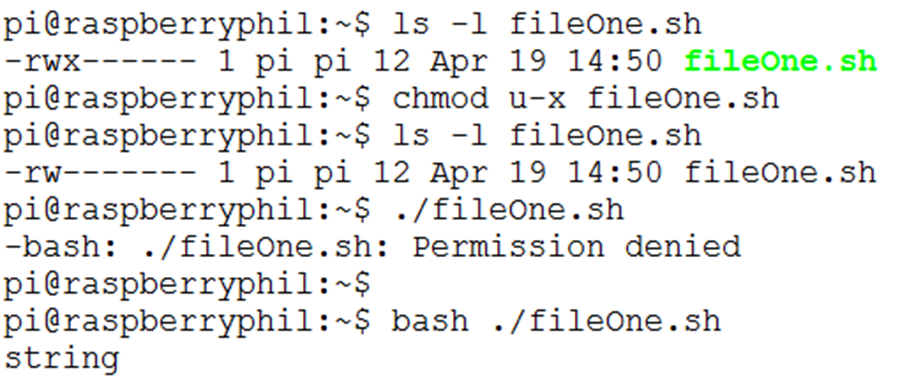
In this example executable permission is remove and therefore it produces and error when the program is run.
Note however that the script can be run by providing the interpreter on the command line.
In the example above “bash” is a program. Programs take command line parameters. Here the parameter is a text file containing commands. Bash “interpreter” the text and runs the commands in the file.
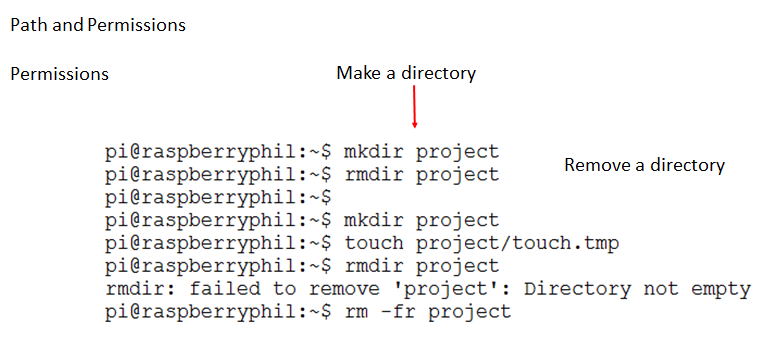
Notice in the above set of commands that when the directory has data it cannot be removed.
The “rm” command is used to remove the populated directory with the force recursive switches “-fr”.
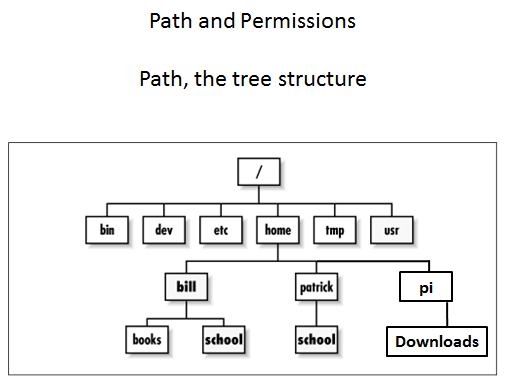
Describing path as a tree structure helps to illustrate the idea of up and down for a directory structure.
Try the commands in the following demonstration and understand what is happening.

In this example the “cd” command is used to move from one directory to another.
The user is changing the default location to a different location in the directory tree structure.
The next example starts by finding out where you are using the “pwd” command then moving to the Downloads directory.
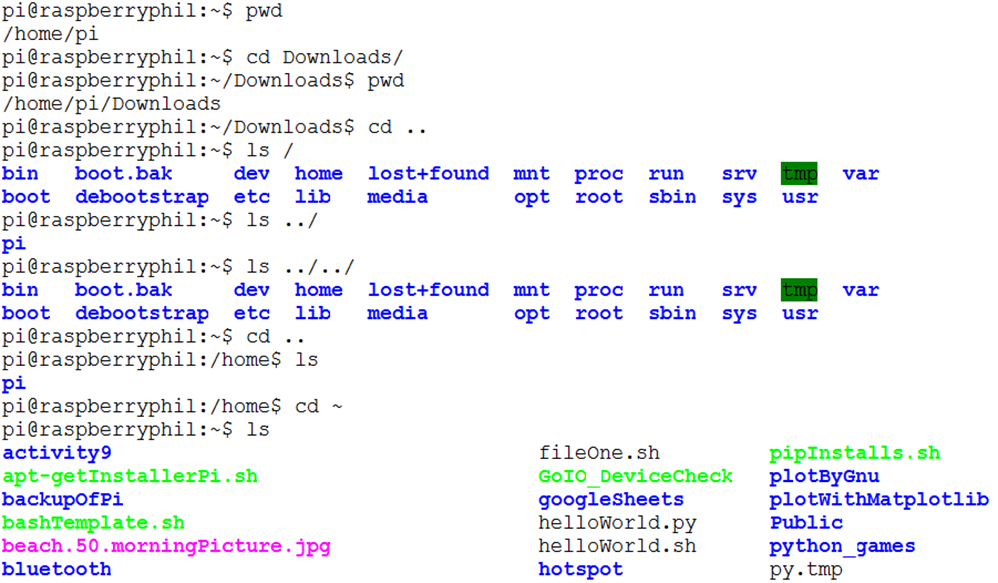
The difference between a full path and a relative path is described here;
A full path always starts with a root slash “/”, examples;
- /
- /home
- /opt
In contrast the relative path always starts with a dot “.”, examples;
- ./Downloads
- ../../home
- ./
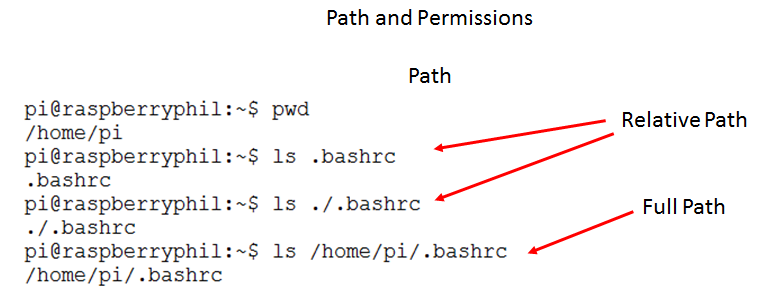
Path, where are my programs?
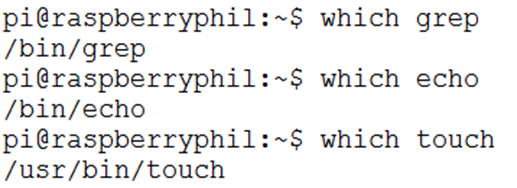
For example, to run this program not in the search path would look like this;
Full path;
/home/pi/Downloads/autodocksuiteBuild.sh
Relative path;
./Downloads/autodocksuiteBuild.sh
If the program is in the search path the output would be the full path to the program as shown in the examples above for grep, echo and touch.
Knowing the full path to an application is needed for some situations like running from a cron job.
Preset Variables
The user can set variables in bash. Here are some preset variables.

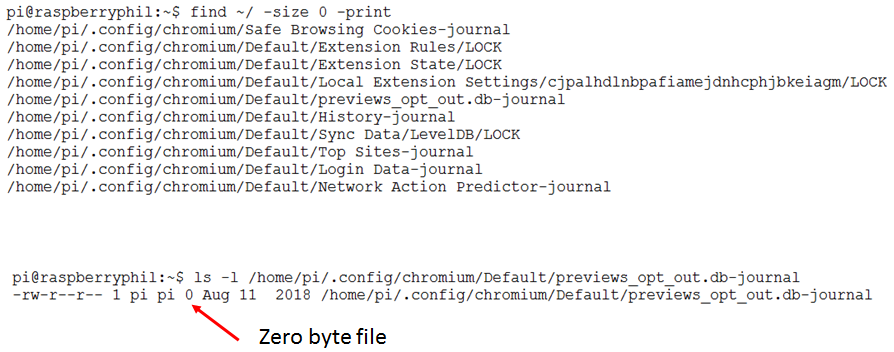
Finding files by type

In the above example “find” is used to locate files of a specific type (starting with a dot ‘.’) and including the string “bash”.
The full path to each file is returned in a list.
In this next example “find” is used to locate zero byte files.
Working with files
wc – line count, char count, word count, max line length
mv – move or rename a file
cp – copy a file
unzip – unzip a zip file
gunzip – unzip a gz file
bunzip – unzip a bz file
tar – extract files from a tar archive, (tar file)
-----------------------------------------------------------------------
wc – line count, char count, word count, max line length
How many lines does the file have?

More tools of the Bash shell
awk - text processing, extract columns
grep – find a string in a file or stream, extract rows
- grep and awk used together for slicing and dicing
sed – stream editor
- head, tail, cat, more, less - look into a file
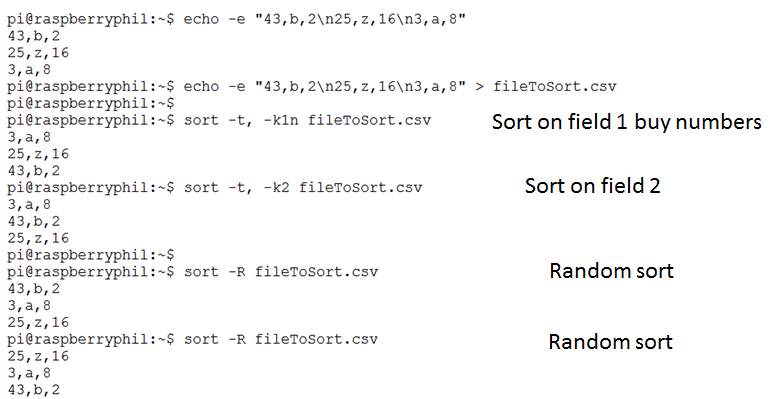
sort – sort content of a file
history – look at past commands
----------------------------------------------------------------
Question – what is the difference between these examples;
head .bashrc
head -10 .bashrc
head -1 .bashrc
tail -1 .bashrc
Hint, run each command and evaluate the output.
----------------------------------------------------------------
grep – find a string in a file or stream
grep case .bashrc
grep -v case .bashrc
Extract all lines that do not contain the string case
grep -c case .bashrc
Count the occurrences of a string
Help! How do I use these tools?
Man pages – the manuals
man find
man du
man test
press q to quit man page
Sorting contents of a file
The for loop
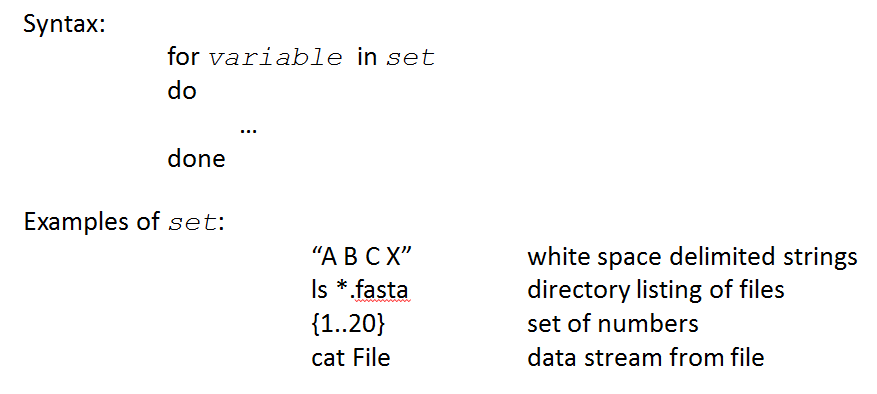
The for-loop can be a very powerful tool especially when combined with HPC (high performance computing).
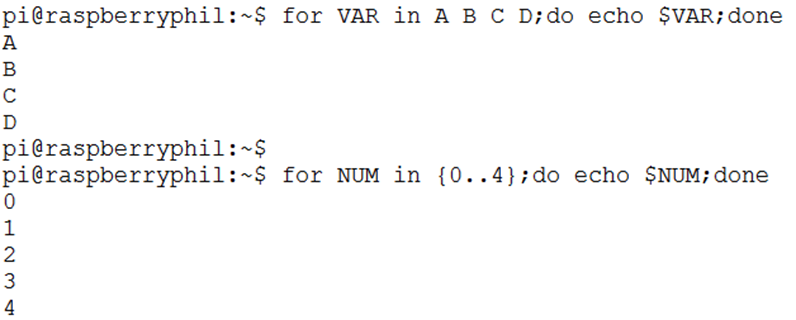
The trick is to understand the many possibilities of what is contained in the “set”.
The following are examples of different sets used in a for-loop.
-----------------------------------------------------------------------------------------------

-----------------------------------------------------------------------------------------------

Things I need to know about the server
How much storage space have I used?

What does the following command return?
du -h --max-depth=1 ./
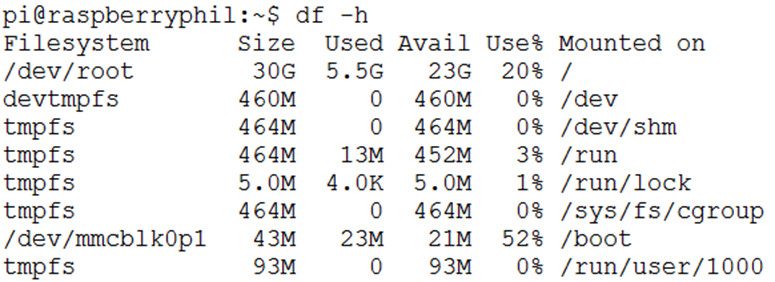
Do I have space for my data?
Linux command specific to the Raspberry Pi

The above example demonstrates piping to the cut command.
Questions on the test;
In the above example using the “df –h” command how much storage has been used? How much space is available for more data?
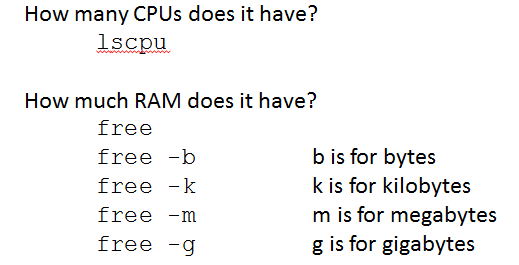
From “lscpu”, how many cores does your RPi have?


